Why you should know how to format a book for Kindle
Once upon a time, writers relied on traditional publishing to get their books in front of an audience. And it’s true that publishing through an established company means your book won’t get sent out into the world full of typos.
But every writer also knows this: sometimes, publishing houses release bland books that should’ve stayed in draft form forever. Conversely, sometimes even the best books never find a home through a traditional publisher. Actually, this happens all the time.
This situation has driven many writers to take matters into their own hands and self-publish books through platforms like Amazon. One neat thing about Amazon is that you can easily format an e-book using Kindle Create, a free formatting software that makes your book look professional before you upload it to Kindle Direct Publishing (KDP).
If you’re wondering how to format a book for Kindle, keep reading. We’ll show you everything you need to know in three simple steps.
There are several reasons you need to carefully format your book on Kindle Create before you even think of submitting to an e-book publisher.
- Continuity. Kindle allows readers to make the text bigger or smaller as they read. Also, people will read the book from all sorts of different screen sizes. Proper formatting provides continuity for your readers at any font or screen size.
- Professionalism. Everyone would rather read a book that looks like one you’d buy at a Barnes & Noble versus something that came straight off your laptop. Kindle Create helps make your e-books shine.
- Table of Contents. One of the best things about reading an e-book on Kindle is your ability to jump to each chapter via the table of contents. Formatting your book for Kindle makes sure you get the TOC right.
- Rejection. KDP won’t accept your book for publishing if it’s not properly formatted. Neither will other e-book stores like Payhip, Selz, Apple iBooks, and Barnes & Noble’s Nook marketplace.
You can avoid these publishing pitfalls by following our guide on how to format a book for Kindle. Since most of us write our novels with Word or a similar word processor, it’s easiest to begin your formatting in your word processor and then move to Kindle Create to finish off.
Formatting on Microsoft Word + Kindle Create
The easiest way to format your book for Kindle is to read this guide before you even write a word of your draft. That way, you can follow all the steps as you go and save yourself time in the end.
But that might not be totally realistic, especially since most books go through several drafts before final formatting. So wherever you are in your book-making process, you can implement these formatting steps to get your book Kindle-ready.


Because so many authors work extensively in Word, Pages, or Google Docs, we’ll use a blended method of formatting. First, we’ll start in the Word doc (the steps are similar in Pages and Google Docs). Once we’ve done all we can there, we’ll move to Kindle Create.
Step 1: Know what you don’t need
Headers, footers, and page numbers
You don’t need page numbers because e-books are reflowable. The words will adapt to any available font, text size, or screen. Viewing the e-book in small print will make the page count smaller, and vice versa.
If you can’t muster the courage to draft without being able to see the page numbers, just use them while you need them. When you’re ready to format the book for Kindle, remove them.
On some versions of Word, you can choose Remove Page Numbers under the Insert tab. On others, like mine, there’s no clear option, so you have to use a simple trick.
First, double click on the header or footer and highlight the page number:

Second, press the Delete key on your computer.

Voilà! Page numbers are gone from the entire document. I took this screenshot from a different page to show that deleting the page number from one spot on the header or footer deletes page numbers from the entire document.
The reason you don’t need headers and footers? They’re not part of any e-book. Delete them if you already have them, or make your life easier by avoiding them from the start.
Tab-spaced paragraphs, double-spaced lines, and hard returns
I’m so used to using tab spacing to create new paragraphs that I don’t even have to consciously press the tab key each time. But guess what? Tab spacing doesn’t convert to e-books.
Does this mean you’ll have to painstakingly indent each paragraph with the space bar? Mercifully, no. That would take eons.
All you need to do is click the Format tab in Word and then choose Paragraphs. Once the Paragraph box is open:
- Highlight the paragraphs you want formatted. This could mean the entire document if it’s already written. If you’ve got a blank sheet of paper because you’re just getting started writing, there’s no need to highlight anything.
- Set the line spacing to single (not double if that’s what you drafted in).
- Keep the indents at 0″.
- Under Special, choose First Line and then set the indent to 0.2″.

Once you click OK, you’ll get this result:

And boom! You’ve got that taken care of.
Now for the hard returns. What is a hard return, you might ask? It’s when you push the Enter key on your computer to start a new line. According to Amazon, using a hard return at the end of every line can make things look wonky in your e-book.
You can use hard returns in two places, though: to create a new paragraph and to add space between paragraphs.
Cover image
KDP will upload your cover image file separately, so don’t include it in the manuscript. That slows everything down.
Track changes
Under the Review tab, make sure Track Changes is set to Off.
Drop caps
Drop caps, those fancy extra-big first letters of a new chapter, should be made to match the rest of the font before uploading to KDP.
You can technically leave drop caps in your Word doc before uploading, but they might not look the way you want them to once they’re on KDP.
Instead, modify drop caps directly on Kindle Create. (More on this later.)

Shapes and text boxes
If your e-book requires the use of shapes or text boxes, don’t use the Word ones. Instead, snap a screenshot of your diagram and add it to the diagram as an image. This will make your visuals much more e-book-friendly.
Now that you know everything you can’t have, let’s move on to the things you do need.
Step 2: Add the elements you need
Tidy up your chapters
Once you’ve finished your novel (or even if you have only written a couple chapters), it’s time to think about tidying up those chapters.
Here’s what this looks like.
- Format your chapter titles with Heading 1. In Word, highlight your chapter titles and select Heading 1 from the toolbar. Then center the title, like this:

- Insert page breaks. How terrible would it be to send your book over and all your carefully planned chapters and sections run together? In order for Kindle Create to know where you want your pages to end and begin again, insert page breaks.

That’s all it takes to format your chapters perfectly for Kindle.
Footnotes and hyperlinks
If you’re writing a nonfiction book of almost any kind, you’ll need to make it easy for readers to find your sources.
That’s where footnotes and hyperlinks come in. What’s really neat about e-books is that it’s so easy for readers to go directly to your source — most e-readers these days also feature web browsers.
But even if your readers have an old-fashioned Kindle without web-surfing capabilities, footnotes are important because they allow a source to pop up right on the page.
Here’s how to format footnotes for Kindle:
- Move the cursor to the end of the word or sentence you need to cite sources for. Find the Insert tab and click Footnote. You’ll see this box pop up:

- Make sure it’s all set up the way it is in the box above. Word will move you to the bottom of the page, where you can enter your footnote.

Formatting your footnotes this way ensures that the number in your text will be linked to the citation. Kindle Create will change all the footnotes to endnotes when you upload your book, but they’ll still pop up on the same page for your reader.
Hyperlinks
Use hyperlinks sparingly. After all, you can often use a footnote instead of a hyperlink. But if you really want to direct your readers straight to a website, here’s how to do it:
- Highlight the words that will send readers sailing off into the web.
- Click Insert and then Hyperlink. Select Web Page and enter the link in the box. If you want to direct readers to a specific spot on the site, add anchor text as directed.

It’s that simple.
Images
There’s nothing better than supporting your memoir or biography with images of the places and people you write about. To make sure your images convert nicely to e-book format, follow these guidelines:
- Add images straight to the document by clicking Insert and then Photo, which gives you the opportunity to upload a file from your computer.
- Create a line of space before and after your photo.
- Leave your photo in its original size. Don’t enlarge or shrink it.
- Align your photo in the center of the page.
- Make sure Word is set to leave images uncompressed by clicking File and then Reduce File Size, where this box appears:

That’s it! Your photos are e-book-ready.
Front and back matter
If you don’t know what “matter” means in this context, you’re not alone. But chances are you know exactly what it is even if you’re unfamiliar with the term.
Front matter is your book’s:
- Title page, with the title and subtitle (if applicable) and your author name.
- Dedication page.
- Copyright information. Kindle recommends using this template:
Copyright © 2020 Author Name
All rights reserved.
In the screenshot below, you’ll find this exact template replicated.

Back matter usually includes
- A short author bio and photo.
- A bibliography, if applicable.
Once you’ve formatted everything correctly in Word, it’s time to take your manuscript to Kindle Create for final formatting.
Step 3: Finishing touches on Kindle Create
First, download the free software for Kindle Create. You can find both a Mac and PC version here.
Creating the Table of Contents
Once you’ve downloaded Kindle Create, open it and select New Project From File.

I decided to upload the first fifty pages of a novel that won’t ever get traditionally published to see how Kindle Create works.
In the next box, Kindle Create asks you what type of book you’re uploading. Make sure the file is on your desktop or somewhere easy to find and then upload it.

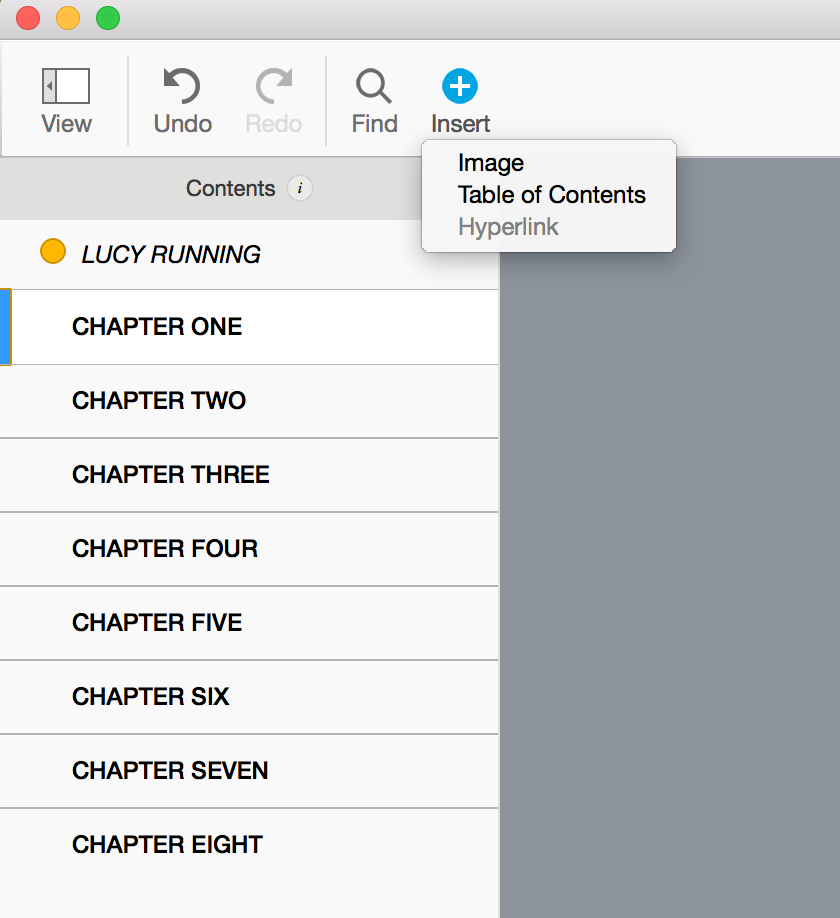
I let Kindle Create take over and scan my novel for chapter headings to create a TOC. Kindle actually makes two TOCs with this one scan:
- The Table of Contents page, which comes right after your front matter and features links to each chapter.
- The Kindle Interactive TOC, which pops up anytime the reader wants it to.

The TOC creator is in the upper lefthand corner. I chose to Accept Selected.
If you
This box will pop up, telling you what the TOC page does:

Click OK and within seconds, you’ll have a TOC page.

Even cooler, you can check out how your TOC will look in a tablet, Kindle e-reader, or phone by pressing Preview on the upper right-hand corner of the screen.

Pretty neat, yeah? And truly easy to do.
If you let Kindle Create automatically create a TOC after importing your document, then you don’t have to worry about the Kindle Interactive TOC. It’s there.
But if you waited to do that, all you have to do is select Edit and then Chapter Detection, and the software will scan for titles. You’ll be able to review and edit them before making the TOC.
Titles and drop caps
Remember how you had to remove those pretty drop caps in your Word document? Now’s the time to put them back in.
But first, go through the document and format your titles, starting with the title of your book.

See the tab that says Book Title on the right-hand side of the screenshot? Just put your cursor next to your title and click that tab. That’ll format your book title. You’ll need to go through the rest of the buttons with your subtitle, author name, part title, and so forth, if they apply.
And then you’ll need to click the Book Start and End Pages tab and the Book Body tab to finish formatting all your chapter titles, poems, and other elements.

Here’s how you create drop caps: Simply stick the cursor next to the first word in the first paragraph of a chapter and click Chapter First Paragraph.

See that lovely drop cap? Like everything else on Kindle Create, it was easy to make.
Images and themes
Even though you can add images on Word, it can be easier to leave them out of your doc until you’re in Kindle Create.
Once in KC, all you have to do is click Insert and then Image, and you’ll be directed to upload a photo. The photo you select will fit perfectly into your book because Kindle Create takes care of all formatting for

Once you’ve taken care of any images, select a theme. There are four to choose from: Modern, Classic, Cosmos, and Amour.

If you’re unsure of which theme makes your book look best, run a quick poll on PickFu to see what potential readers say. You can also test your front and back matter, as well as your author bio. This wi
Once you make any necessary edits, carefully read your book one more time. Check to see how it looks on a Kindle e-reader, phone, or tablet using the Preview feature.
Then take a deep breath and hit Publish, located on the upper right-hand corner of the screen. Navigate to your Kindle Direct Publishing Bookshelf and upload the

After you’ve uploaded your book, all you have to do is sit back and relax for a little while and let Amazon review your shiny new e-book.
And then take a deep breath and get ready to market your book all over the web.
It’s really not hard to format a book for Kindle
The hardest part is writing your actual novel or nonfiction book. Formatting the book for Kindle is happily simple.
The road to becoming a published e-book author has never been smoother.