
The first thing a customer sees when they come across a product is its packaging. This makes packaging as important as the product itself.
Beyond visual appeal, the packaging also has an important practical function: protecting the product during shipping, handling, and storage.
Imagine spending so much time creating and designing your product, only for the customer to receive it damaged or contaminated. Obviously, they’ll be unhappy and might not want to try the product again, even if it’s a good one.
That’s the power of packaging. It affects the overall customer experience, significantly impacting your business’s reputation and success.
To ensure a package maintains its integrity and does its job – preserving the product – you need a good package integrity testing plan in place.
What is package integrity testing?
Athletes wear protective gear like helmets, safety pads, and specific shoes when playing high-intensity sports. This is to shield themselves from injuries and accidents during the game.
In the same way, package integrity is the ability of a product’s packaging to protect its content. The aim is to keep the product’s quality and functionality the same as it was in the manufacturing facility until it gets to the end user.
Package integrity testing, meanwhile, is the process of assessing the packaging to ensure it can adequately protect the product throughout its lifecycle, from manufacturing and storage to transportation and delivery. This includes testing for weaknesses or defects in the packaging materials, such as leaks, punctures, tears, or anything that could compromise the product’s integrity.
By developing an effective package integrity testing plan, you can achieve an excellent packaging system that prevents failures and improves customer satisfaction.
How to create a comprehensive package testing plan

Before you begin, you must first understand the ins and outs of your product alongside industry regulations and requirements. This is to ensure you design a package that serves its intended purpose and is compliant with ASTM International, International Organization for Standardization (ISO), and US Pharmacopeia (USP) standards if they apply to you.
Let’s dive into each step of the package integrity testing process.
Step 1: Define your objective
By objective, we mean the goal of your package integrity testing. Do you want to test reliability, leakage prevention during storage, or resistance to environmental factors?
Usually, the product’s niche or industry influences the objective. For instance, the main goal of a package integrity test for products in the food and beverage industry is to prevent any leakage or microbial contamination (so the food or beverage remains fresh and safe to consume). You can achieve this with good barrier materials and attaining container closure integrity.
For the pharmaceutical or healthcare industry, the focus might be on nonporous packaging to produce sterile products.
Clearly state the objective of your testing plan before proceeding to the next step, which is to…
Step 2: Choose your testing method
The testing method you select depends on the nature of your product, packaging materials, and desired outcomes. When selecting a method, choose one that simulates real-world conditions your product might encounter and also aligns with your objectives.
There are different testing methods available, including the following:
- Leak testing: for checking package leaks, gaps, or holes that could compromise the integrity of the product. Bubble emission or bubble leaks (via ASTM F2096 test), dye penetration (via ASTM F1929 test), vacuum decay testing, and more are the techniques used in leak detection.
- Accelerated aging testing: to see how the product will perform in the long term. Carry out this test by applying increased temperature, humidity, or other environmental factors to the product. Accelerated aging testing is a testing method within the broader category of shelf-life testing.
- Drop impact testing: to evaluate the ability of the package to withstand impact without damage to the product inside. To carry out drop testing, simulate a real-life scenario of accidentally dropping the package in a controlled environment.
- Vibration testing: to assess whether the product can endure the vibrations that can occur during transportation or other movements. There are specialized pieces of equipment used for this testing.
| Note: Drop impact and vibration testing are part of the distribution testing category. Other methods in this category include compression, shock, and shipping container testing. |
- Burst testing: to evaluate a material’s strength and resistance to increasing internal pressure. The aim is to determine the maximum pressure that the package can withstand before it bursts.
- Visual inspection: a general examination of the packaged product with the naked eye to observe its physical condition and overall seal integrity for visible defects.
Step 3: Determine testing parameters
Next, define the testing parameters. This means specifying the conditions to conduct the test and evaluate the package’s integrity.
The parameters include factors like:
- Duration – how long to test the package for
- Temperature – temperature to apply during testing
- Pressure – pressure to apply during testing
- Environmental conditions – conditions to simulate
- Pass/fail criteria – standards for determining whether the package meets the desired level of integrity or not
Say you want to conduct leak testing for pharmaceutical products, for example. You’ll need to determine the pressure for testing the package, test duration, sample size, temperature, humidity, and any other specific requirements.
The International Safe Transit Association (ISTA) offers parameters or protocols based on the distribution hazard and specific need you have. And it’s compulsory to follow the stated parameters to meet their standards.
Step 4: Assign responsibilities and allocate resources
Who will be responsible for what? If you don’t specify this, the package integrity testing process will descend into chaos. Identify the individuals or teams responsible for carrying out the testing activities and ensure they have the necessary resources to execute the plan effectively.
Consider the following:
- Assigning roles and responsibilities by skill set, experience, and availability. A regular testing team often includes these roles:
- Test coordinator who oversees everything
- Test engineer/technician whose job it is to perform the actual testing procedure
- Quality Assurance (QA) specialist who reviews the testing plan and verifies the test is done in a controlled manner
- Data analyst who interprets the test results
- Documentation specialist who documents everything from start to finish
- Allocating the necessary resources for carrying out the testing plan effectively.
- Providing access to testing equipment and materials.
Step 5: Execute your testing plan
At this point, it’s time to implement the plan! Conduct your preferred tests according to the method you’ve chosen and adhere to the defined parameters in step three.
Double check your testing tools to make sure they’re in good shape, the samples are representative of the products you’re testing, and the personnel involved are familiar with the procedures.
The QA specialist also has a role to play here. Quality control strategies like process control, control charts, acceptance sampling, and product quality control should be implemented alongside the testing plan to guarantee the overall quality of the process.
During this step, it’s important to record all relevant information like test results, observations, or challenges encountered. This documentation will prove useful in the next step.
Step 6: Analyze the results
Once the testing is complete, review the results. Compare the test data to the pass/fail criteria set to determine whether the package meets the level of integrity you desire.
If the package passes the testing, congratulations! You can deliver products to customers knowing they will reach the customer in perfect condition without any packaging failures.
However, if it fails the testing, don’t worry. Use the test results and observations to identify the areas of weakness or failure and work on them. This may involve adjusting the package components, design, or testing parameters or implementing more quality control measures.
If you improve on the results, repeat the testing to be sure you’ve truly addressed the previous areas that failed.
Step 7: Prepare a report
You have a package at optimal integrity now. Create a report detailing the entire testing plan process. Cover everything from objectives, methods used, testing parameters, results, and any improvements made.
Include a Pareto Chart to visually represent the data and enhance understanding. The chart will show areas of defects and improvement based on the interpretation of the test data.
Then share this report with relevant stakeholders. It can also serve as a valuable resource for future testing efforts.
Integrating package integrity into the design process
Don’t make package integrity an afterthought – it’s a fundamental aspect of the entire design process. Incorporate it into your team’s design decisions from the start.
This involves choosing flexible packaging and designing it for two things:
- To protect the product and maintain quality. It includes selecting appropriate materials and including protective features for the product packaging, such as a sterile barrier system and package seal with good seal strength. Follow the steps outlined above to create a plan for producing a package with integrity.
- To look aesthetically pleasing through the design and branding elements that align with your brand image.
Before settling on a design, it’s best to test it with your target audience to know what they think. Whether the design is developed by a professional package designer, or by an artificial intelligence – that’s where PickFu comes in.
Run polls on our DIY consumer research platform to get feedback from your target audience on elements of your packaging design. No need to look for your own respondents – we have an audience panel of over 15 million consumers globally that you can segment based on your ideal customer.
Here are three real-life examples of brands running polls on PickFu to test their package’s design:
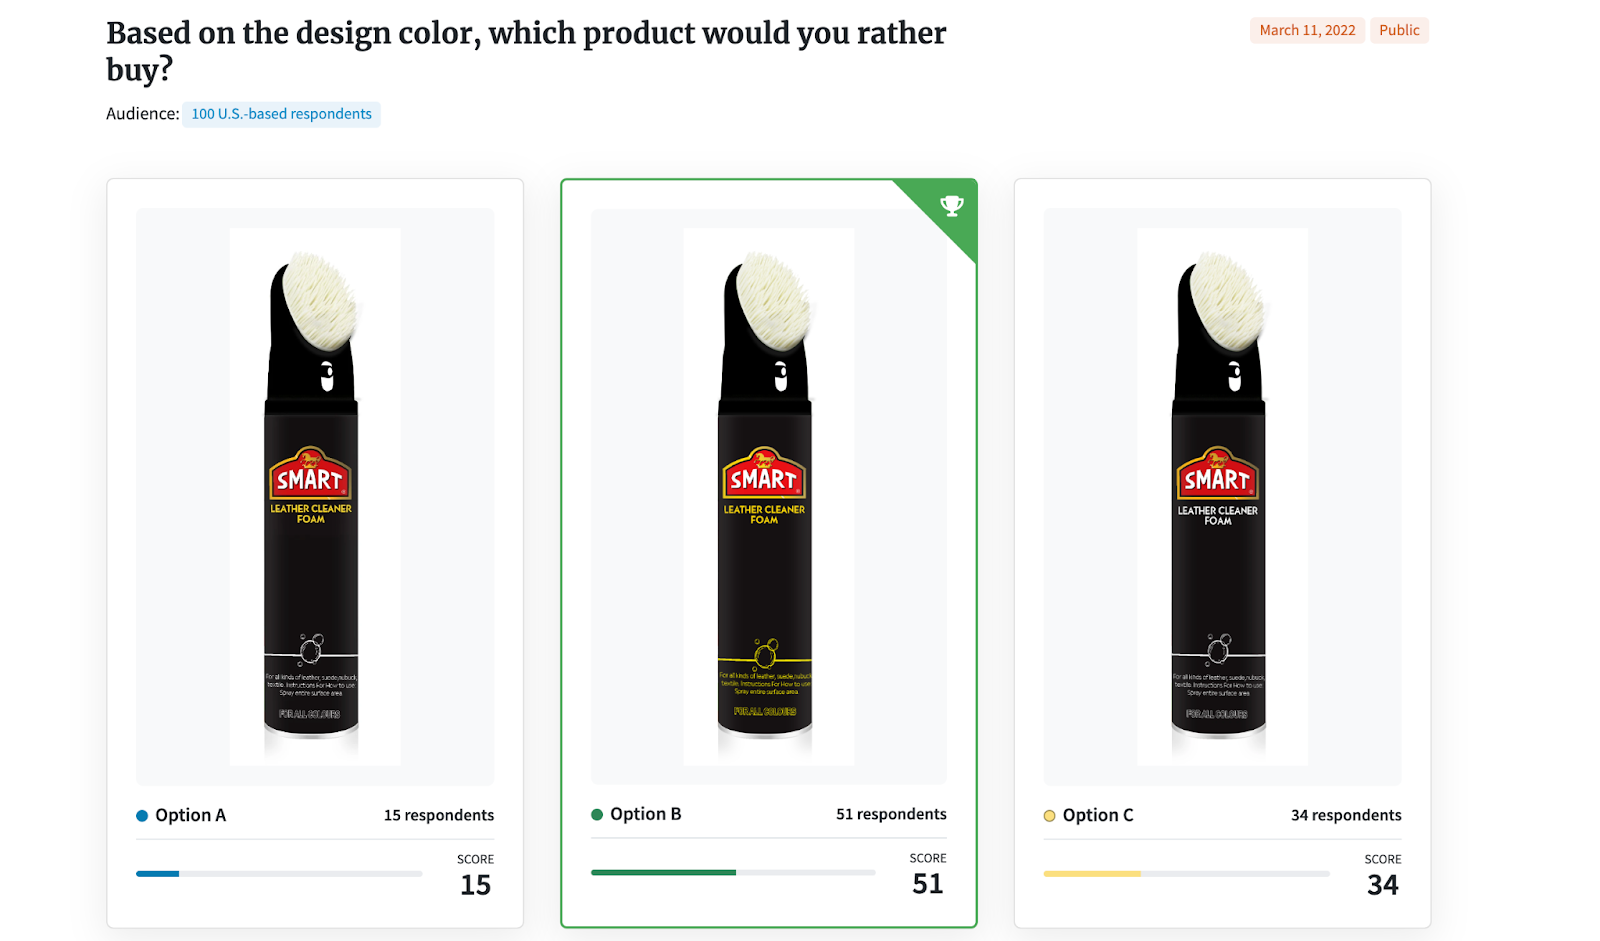
1. A Ranked poll on choosing a font color for their package. The user got 100 responses to their poll in just 40 minutes.
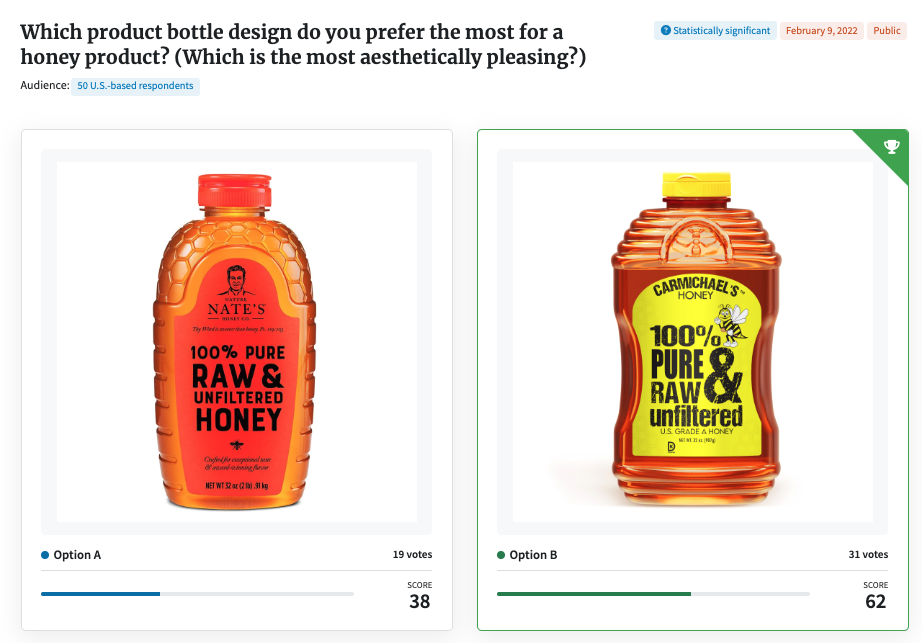
2. A poll on selecting a honey bottle design during competitive analysis research.
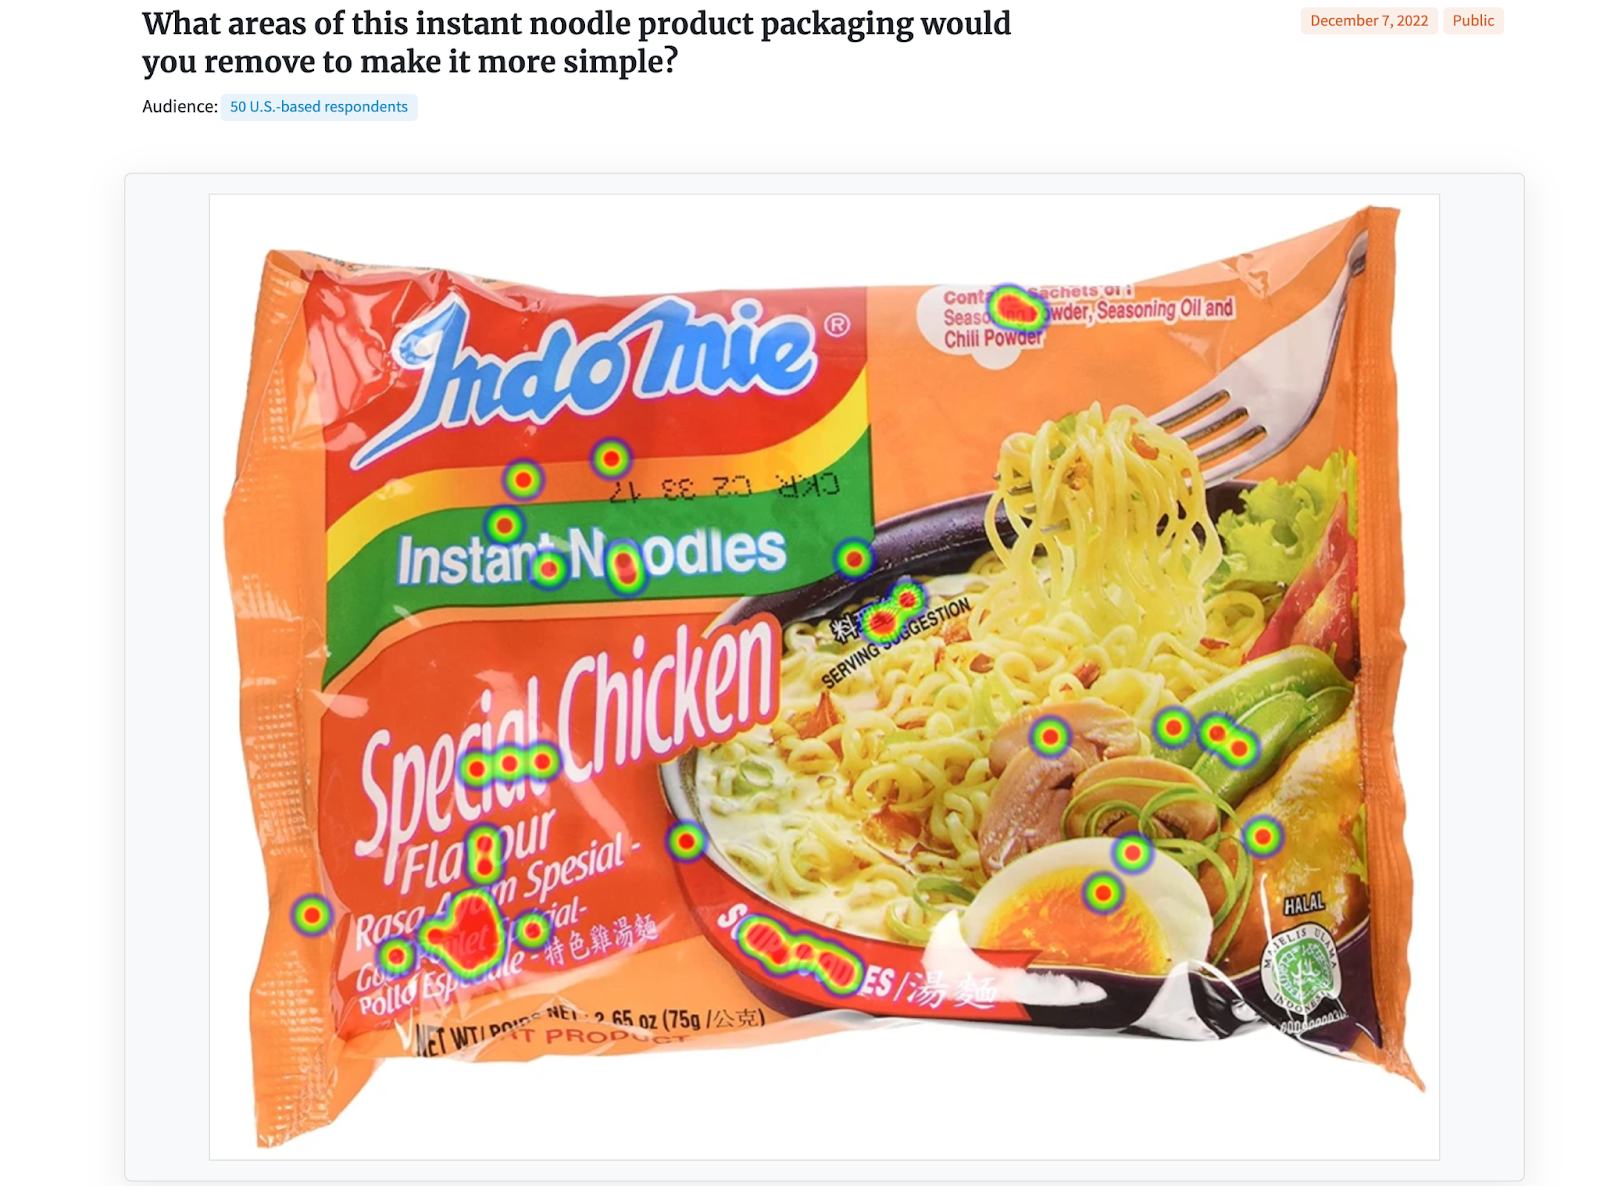
3. A Click Test for instant noodle packaging with a heatmap of the respondents’ clicks on the image based on the area they’d improve.
All three examples show how easy it is to test your product’s packaging design in the market before releasing it.
If you need help designing an attractive package that captures people’s attention, try our packaging evaluation poll templates. This template is an easy, cost-effective way to get started with using polls to gather audience feedback on your product packaging.
FAQs
What is package integrity testing?
Package integrity testing refers to a series of procedures and tests carried out to ensure the packaging of a product can protect the product during manufacturing, storage, transportation, and delivery. The goal of this test is to identify problems like bioburden, leaks, or breaches within the package that could affect its integrity and find solutions to these problems.
What are the methods of packaging integrity tests?
There are several package integrity test methods available. Some common ones include leak testing, accelerated aging testing, strength testing, dye penetration testing, etc.
What is the difference between a package and a product?
A product refers to the tangible items or goods that are being manufactured, sold, and delivered (i.e. clothes, medicine, cookies).
On the other hand, a package refers to the external container or wrapping that holds and protects the product (i.e. boxes, pouches, vials).
There are different types of packaging, and your selection depends on your product type. For example, a medical device package should be different from a food package.
What is the difference between Quality Control and Quality Assurance?
Quality Control (QC) refers to the activities used to identify and resolve quality issues that occur during testing so the product can meet the predetermined quality standards.
Quality Assurance (QA) works to prevent those issues from happening in the first place by establishing processes and guidelines.