Testing your product photos takes work, but it doesn’t have to be stressful. We’re here to show you how to get started.
Testing has its place whether you’re launching a product, designing your website, or creating an ad campaign.
Today, we’ll take you through best practices for split testing your product photography, from choosing a testing platform that fits your business needs to targeting the right audience.
Ready to optimize? Let’s get into it.
Table of contents
- Table of contents
- How important are product photos to your business?
- What does image optimization mean?
- How to test product photos
- 1. Identify your photos, testing goals, and timeline
- 2. Pick a testing platform
- 3. Target the right audience
- 4. Test one thing at a time
- 5. Optional: Revise your photos and keep testing
- Infographic: How to test product photos
- TL;DR: Test your product photos to make them better and maximize sales
How important are product photos to your business?
You’ve heard time and again that product images are crucial to your e-commerce business.
But just how crucial? We polled 100 consumers to find out.
We asked them to rank four elements of a product listing — product title, photo, description, and price — in order of which one catches their eye.
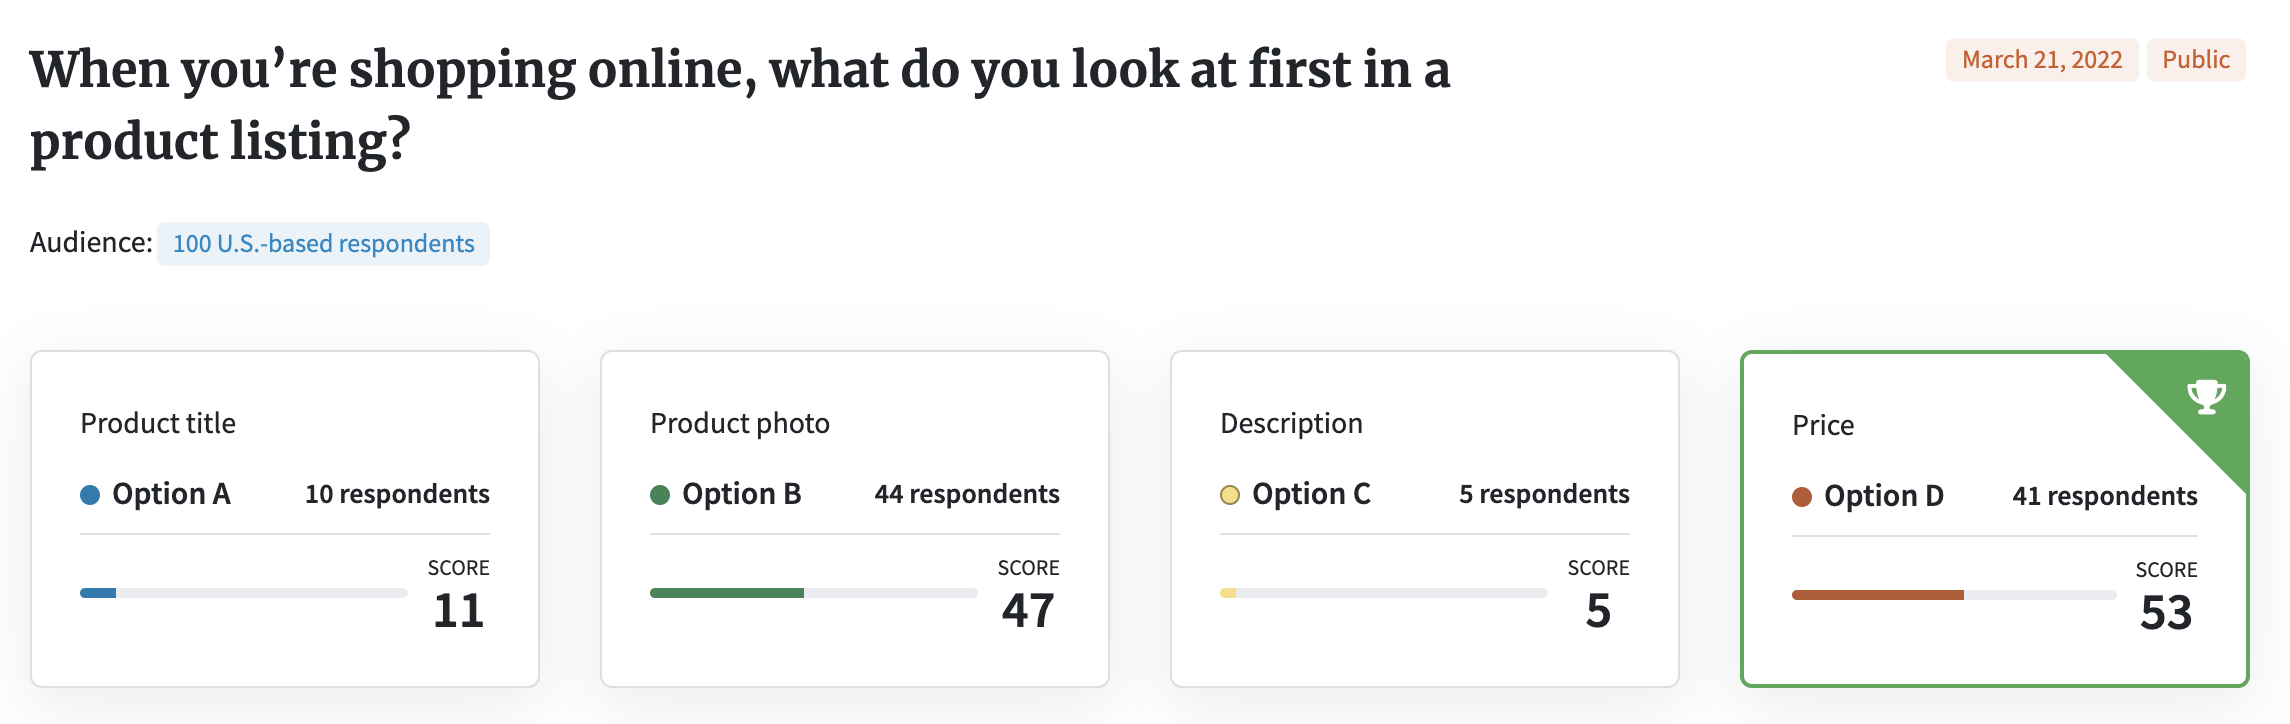
Turns out the product photo is the second thing shoppers look at. 53% of consumers look at the price first, followed by the photo at 47%, the product title (11%), and last, the description (5%).
Makes sense. People love a good deal. If they can’t afford something, they’ll move on. But if they like the price, the product photo is at least worth a look.
“Price and photo help me determine if the product is worthwhile or trash,” said one respondent.
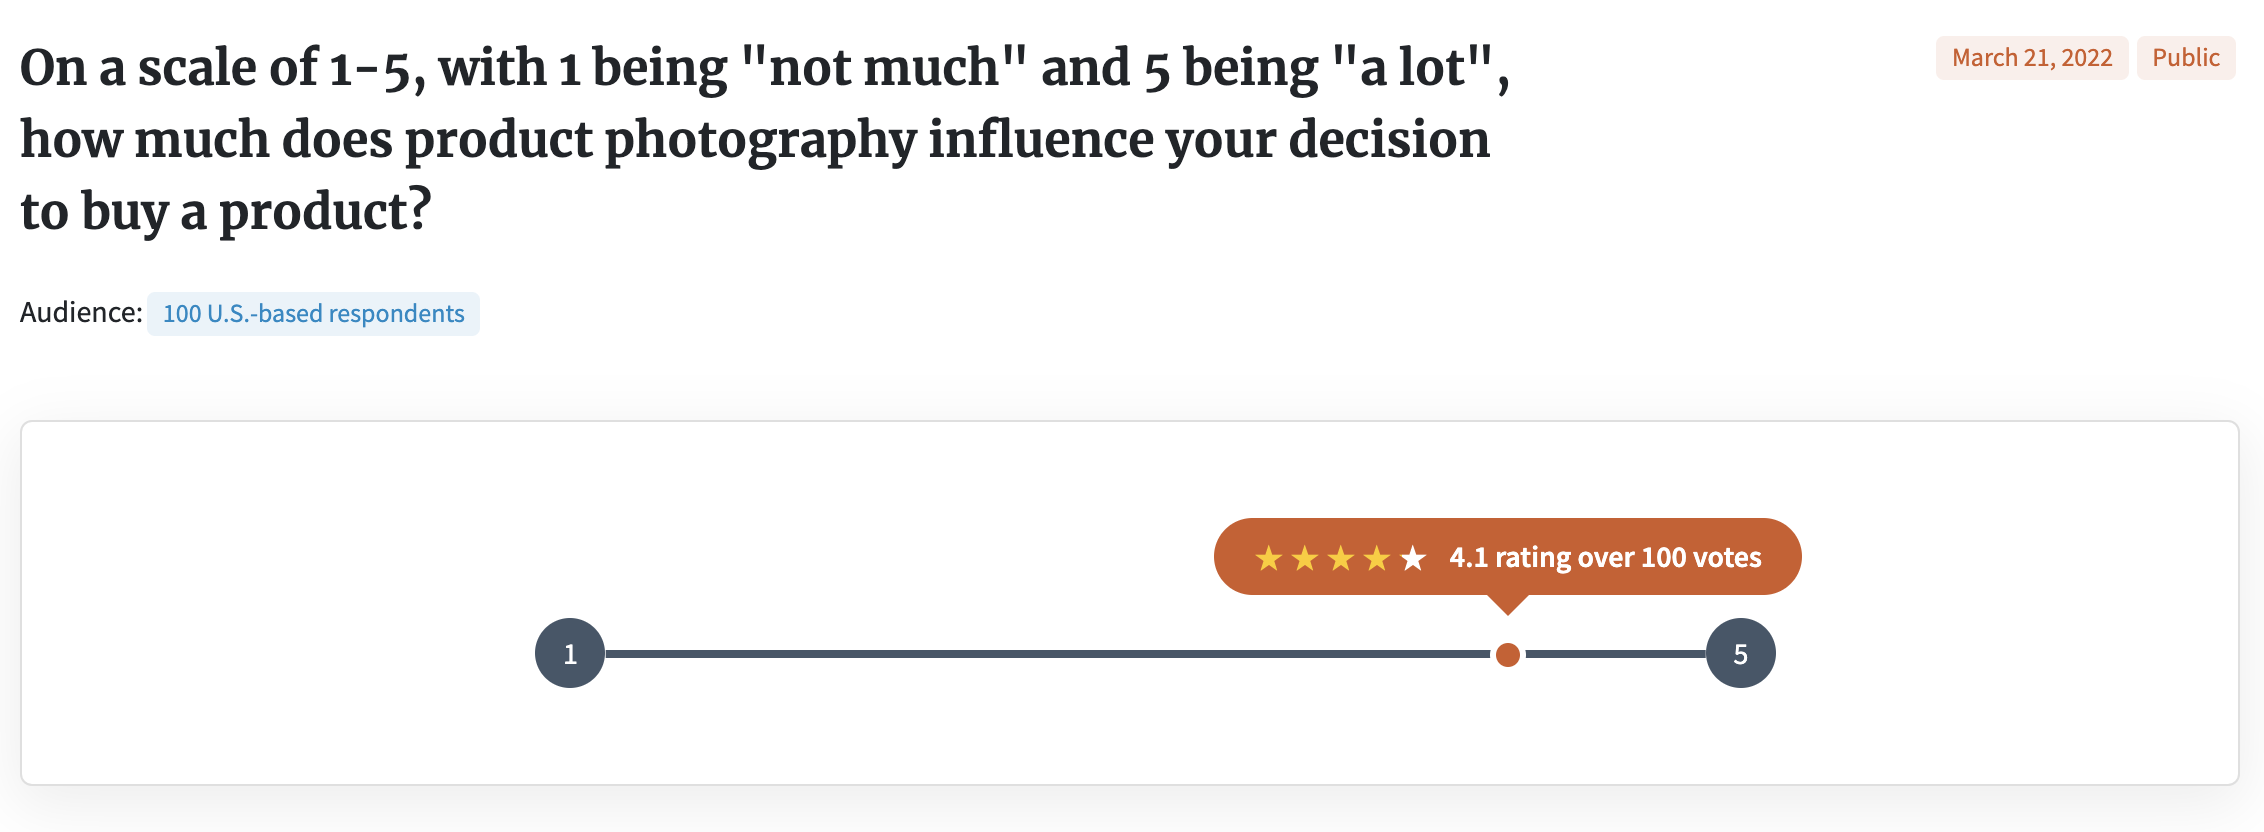
Once a shopper has made that decision, the photo becomes even more important, according to the results of a second poll we ran.
Respondents ranked product photography a 4.1 on a 5-point scale in terms of how much it influences their purchasing decisions.
There are other factors at play, as you can see from the comments. Price obviously matters. So do customer reviews and the type of product they’re shopping for.
As one person pointed out, a photo of “fungible, function stuff” — say, a bottle of vitamins — has less sway than a photo of something more aesthetic, such as furniture or jewelry.
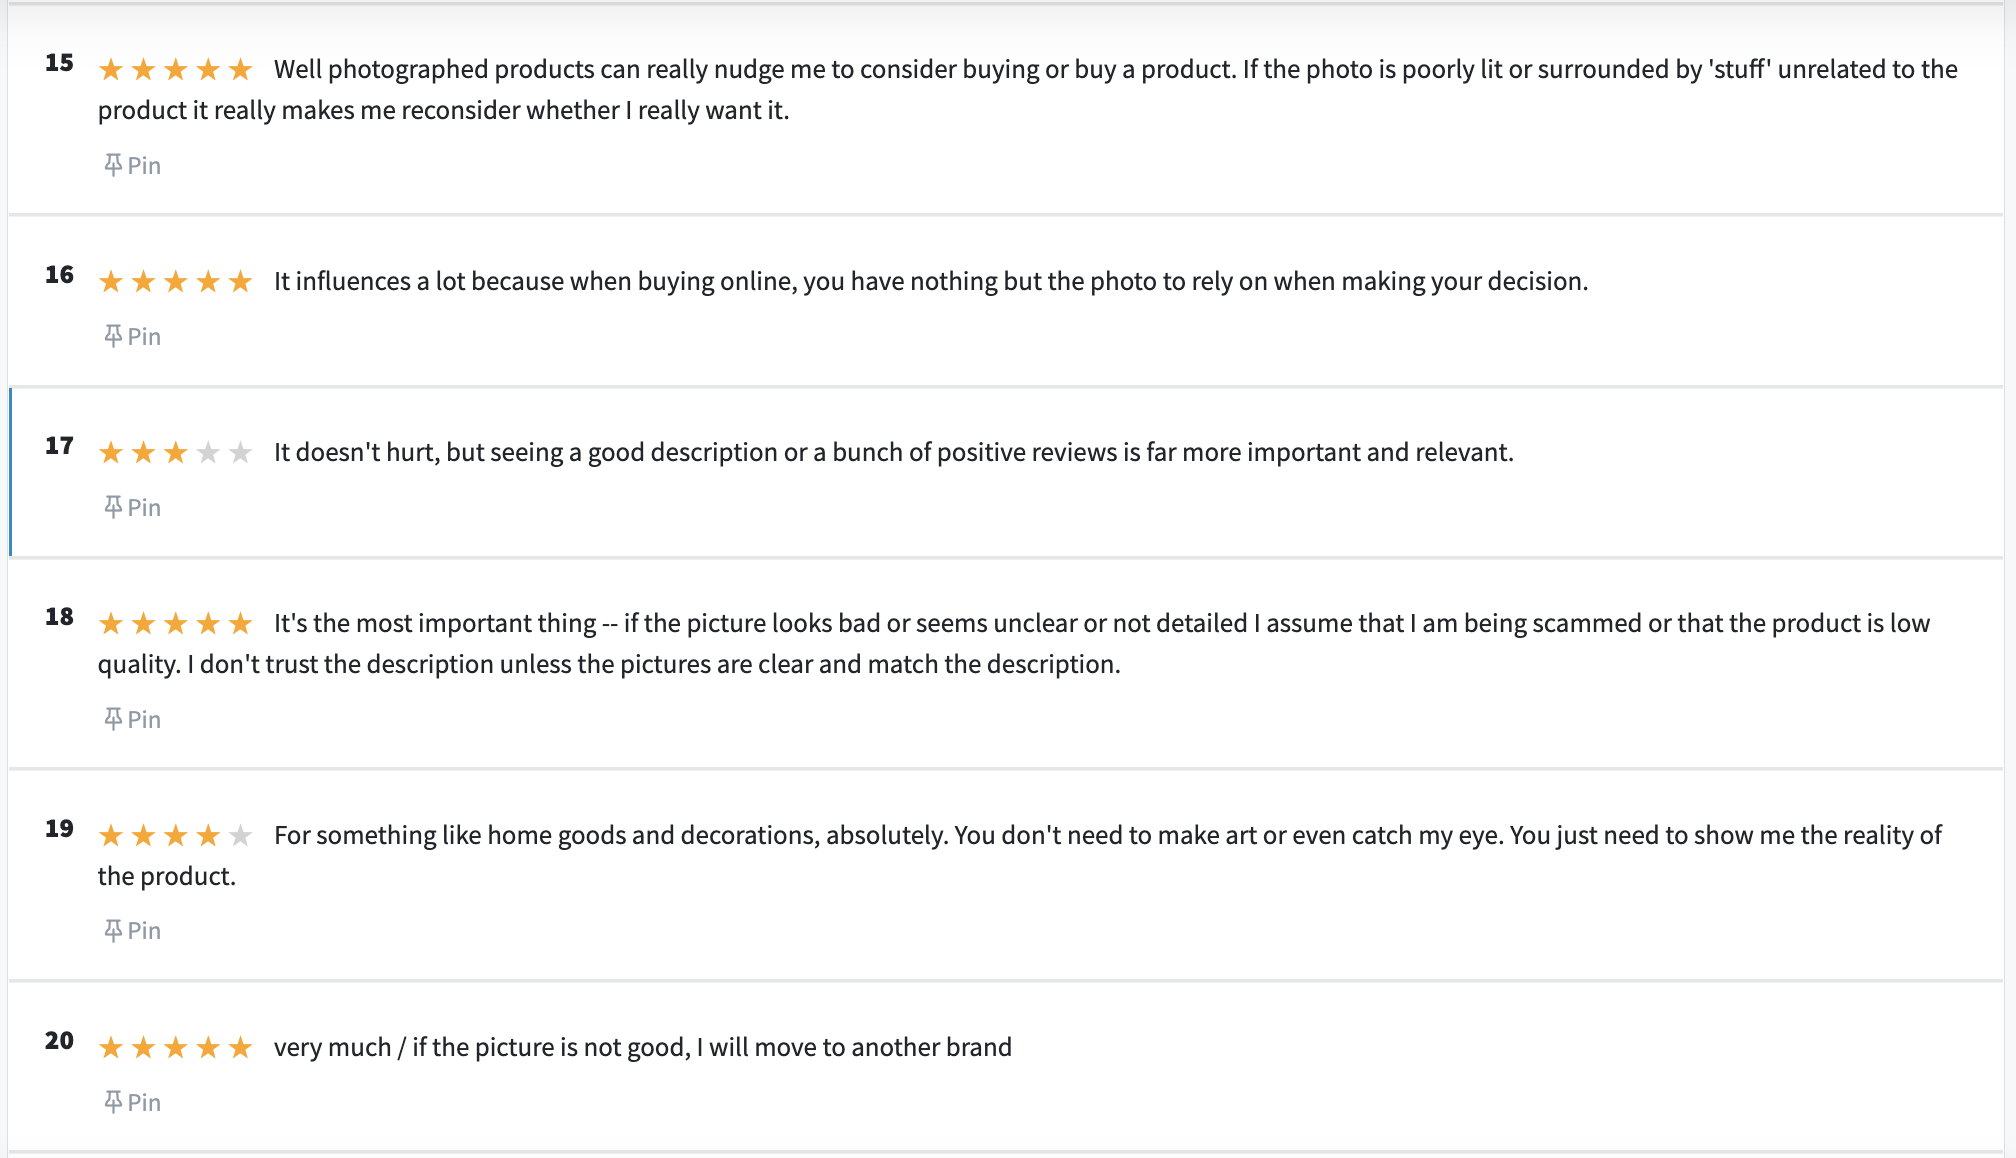
But the majority of consumers we polled say product imagery is often the deciding factor.
“If the product photography looks unprofessional or unclear, I immediately don’t trust the product or its quality,” another person said. “I’d look for alternative options.”
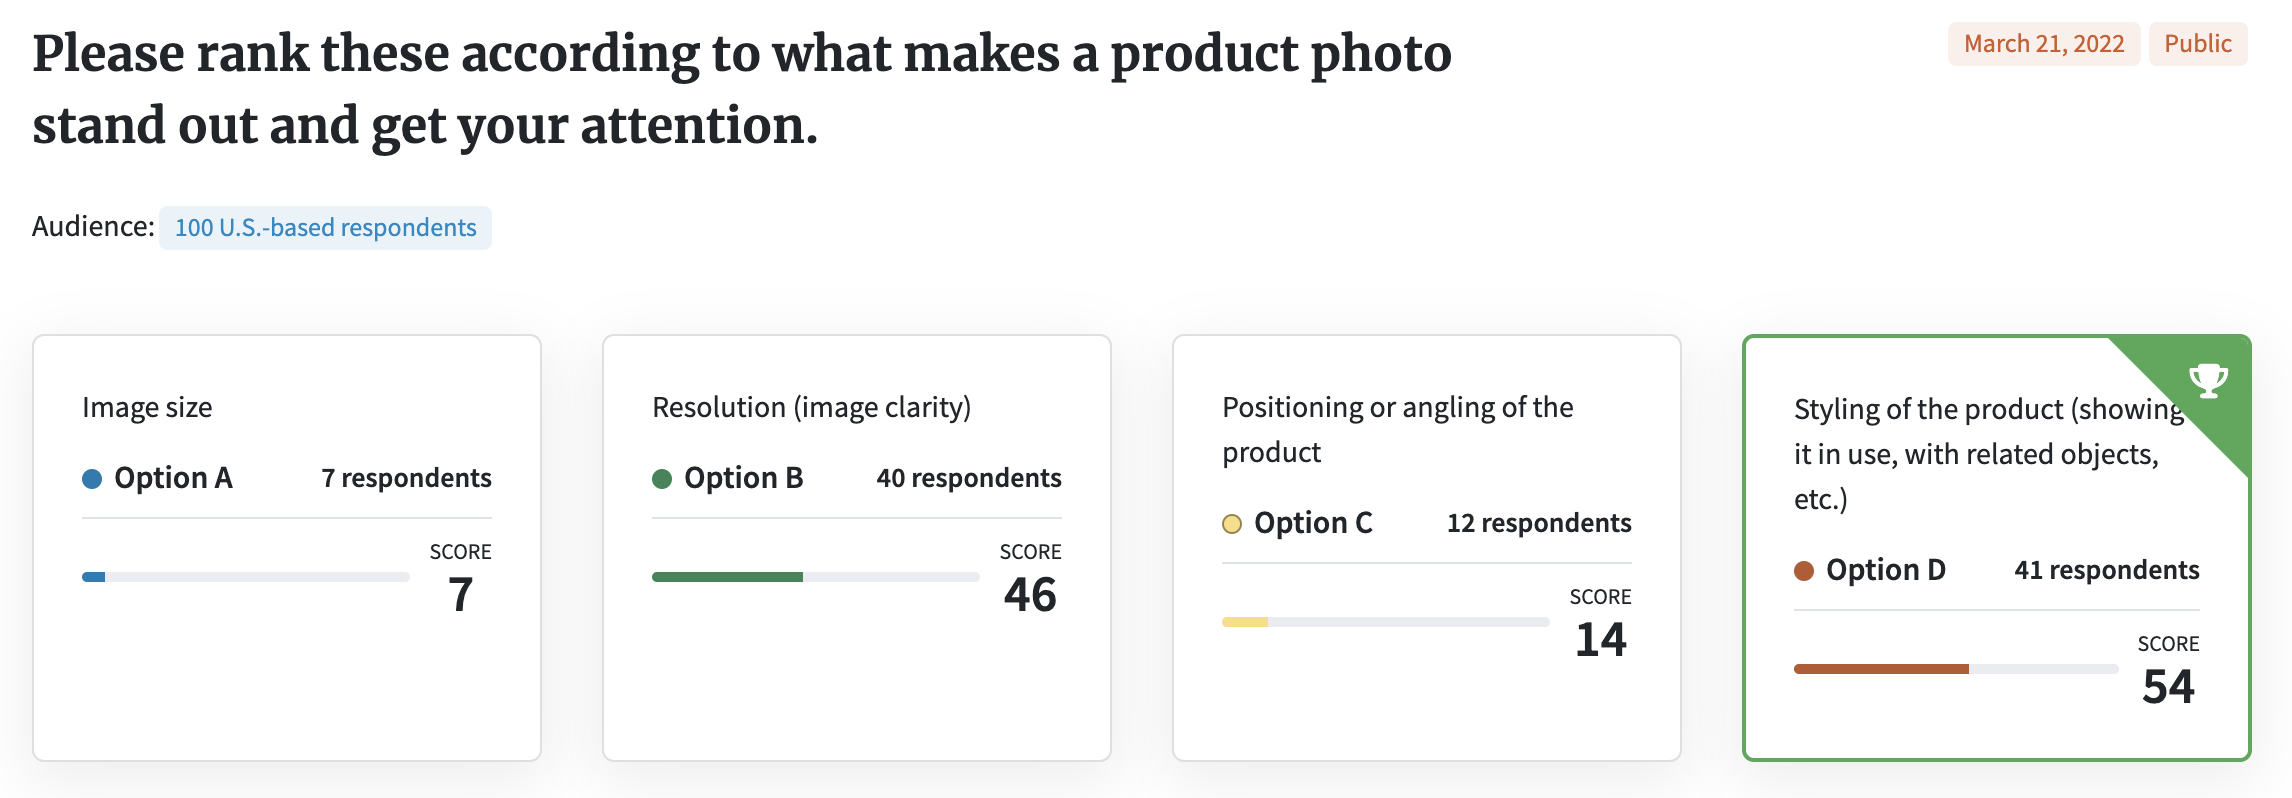
This raises yet another question. What, exactly, makes one image stand out from the million other thumbnails on a category page?
Shoppers we polled say image clarity and the styling of a product in a photo help the most. The positioning of a product is less important, while the size of the image is hardly a concern.
Consider this one last tidbit: it takes the human eye 13 milliseconds to process an image.
In other words, your product photo has a blink-or-you’ll-miss-it chance to make a good first impression.
A/B testing and optimizing your images become all the more important if you want to get clicks and ultimately, increase conversions.
Right, but before we get too far, let’s back up. What, precisely, is image optimization?

What does image optimization mean?
Before we get into the how of split testing and image optimization, we need to go over the what.
There’s a difference between optimizing photos for eyeballs and for search engines.
This guide is all about making your product shots appealing, but it’s helpful to know the basics of SEO image optimization.
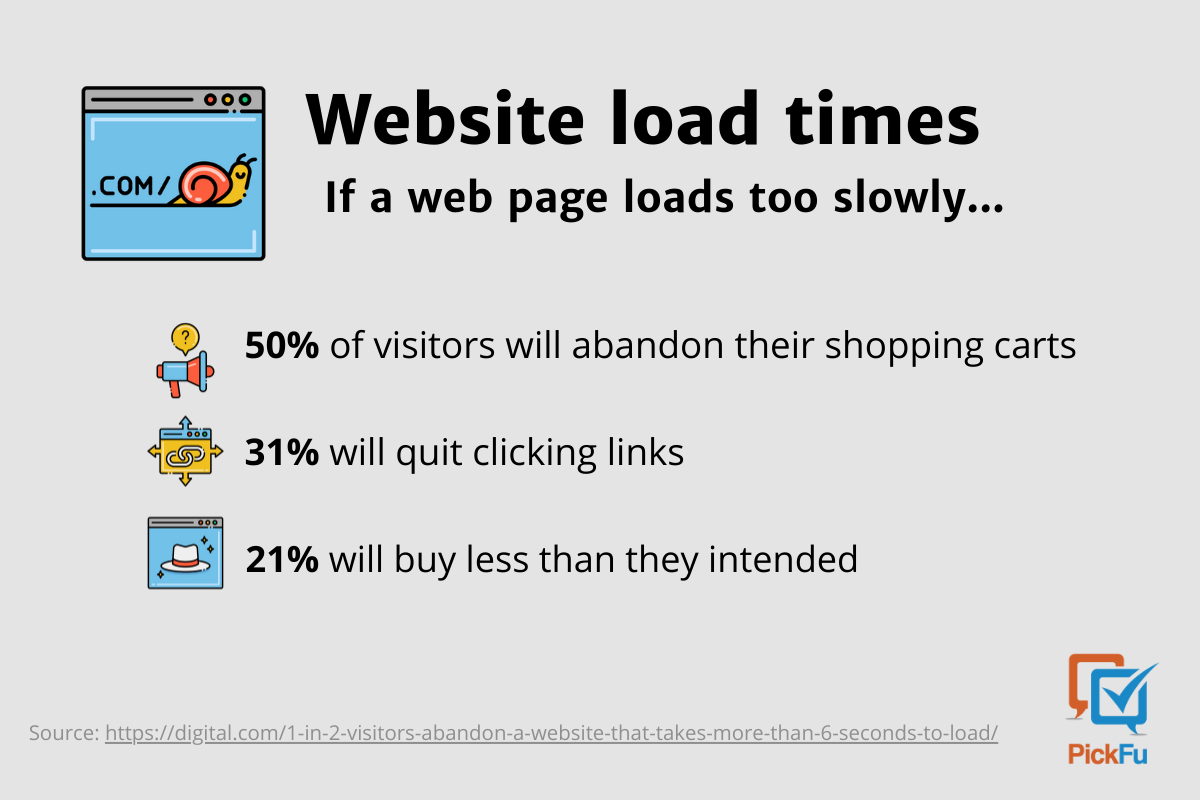
Images can bog down your site’s speed, performance, and user experience, which can turn customers off. Indeed, half of online consumers will ditch their shopping cart if a page loads too slowly.
The goal of SEO image optimization is to prevent that from happening. Image size, format, file name, and alt text work together to create a better browsing experience on your homepage or online store.
The more photos you have — and if you’re in e-commerce, we know you have a lot — the more important this process becomes.
Bottom line:
Search-optimized images help your site load faster and your content land eyeballs.
Of course, your customers have to like the photos they see. After all, they’re the ones with the credit card.
Enter A/B testing, a.k.a., split-testing.
Here’s how to get started.
How to test product photos
1. Identify your photos, testing goals, and timeline
First, look at your photo set and ask yourself these questions:
- Did you shoot against a white background? It removes distractions and is standard practice on Amazon and most e-commerce sites.
- Is the lighting sufficient? You don’t want to rely on direct flash. It’s too harsh.
- Did you shoot from different angles? The more of your product you can show, the better.
- Do your photos meet the image requirements of the e-commerce website or platform you’re using?
If you answered “no” to any of the above, you’ve pinpointed areas that might be hindering your click-through or conversion rate. You can edit or reshoot and make immediate improvements.
While you’re at it, keep these three product photography tips in mind:
- Place work lights on either side of what you’re shooting to cast flattering highlights. Take advantage of natural light, too. (Better yet, try three-point lighting.)
- Shoot from just below eye level to create a larger-than-life effect.
- Use close-up shots to show off the finer details.
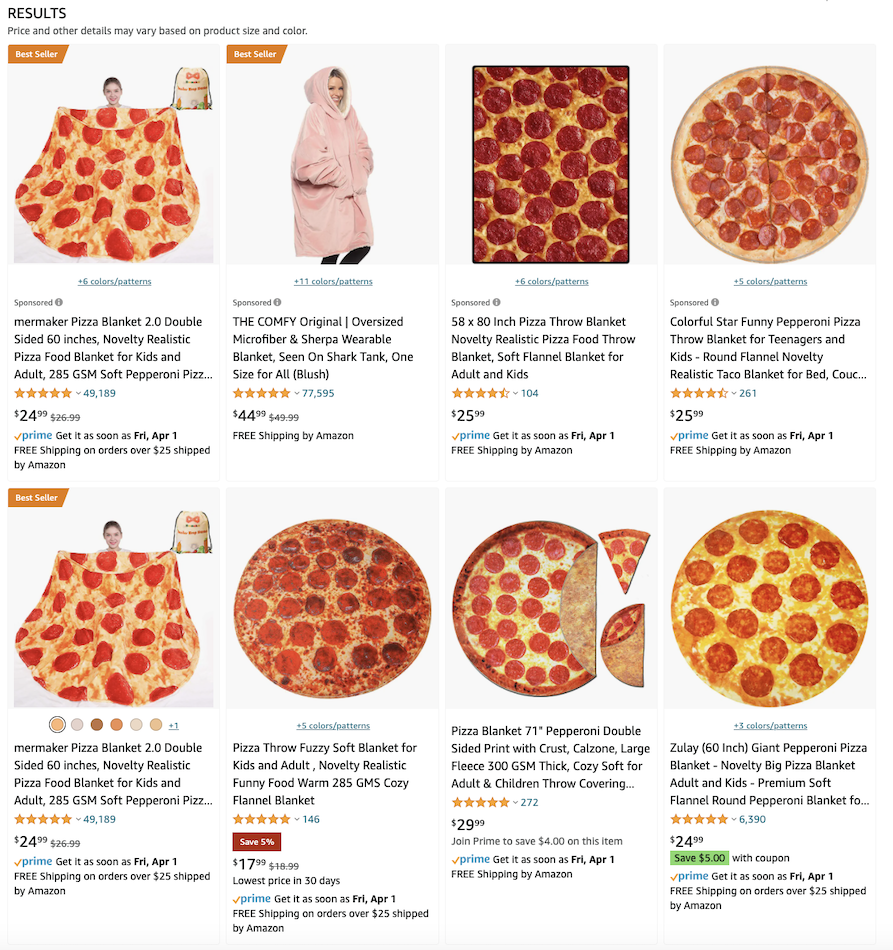
Here’s a rundown of the types of photos that benefit from split testing.
Main image. The most prominent photo in a product listing. (Note: Curious on how PickFu can help with amazon main image optimization? Check out our related article!)
Secondary images. Lifestyle shots showing off product features and functionality.
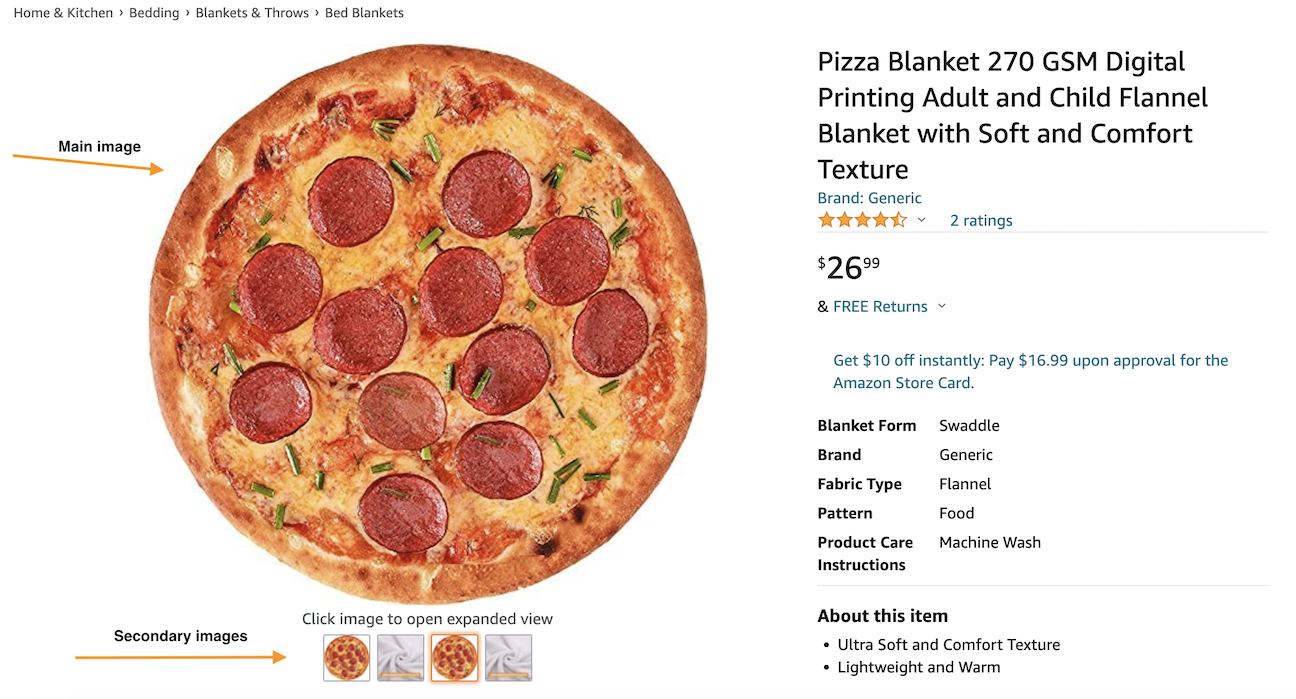
Thumbnail image. A sized-down preview of your main image on a search results page.
Hero image. This sits, banner-style, at the top of your homepage to give people a sense of your branding.
Don’t forget about the images for your pay-per-click (PPC), social media, and email marketing campaigns. Email click-through rates are highest if you keep it to three images or less, according to industry research. Testing will help you choose the best ones.
As for when to test, it depends on where you are in your brand development or product lifecycle.
Here are three stages when A/B testing (or split-testing) your product photos makes the most sense:
- In the development and pre-launch phase
- When rebranding your company or product
- Before you launch an advertising campaign
The common thread is to be proactive about testing. If you’re reading this article, you’re on the right track.
2. Pick a testing platform
A/B testing may seem like a lot of work. But you can bet that your competitors are testing their content regularly — 71% of them every month, by one estimate.
Fortunately, a slew of software tools will do the work for you. However simple or sophisticated your testing needs are, there’s a tool that can satisfy them.
Google Optimize is a go-to general testing tool. If you already use Google’s workspace, it would be a seamless addition. Plus, it’s free, which might be reason enough to try it if you’re a startup or small-business owner.
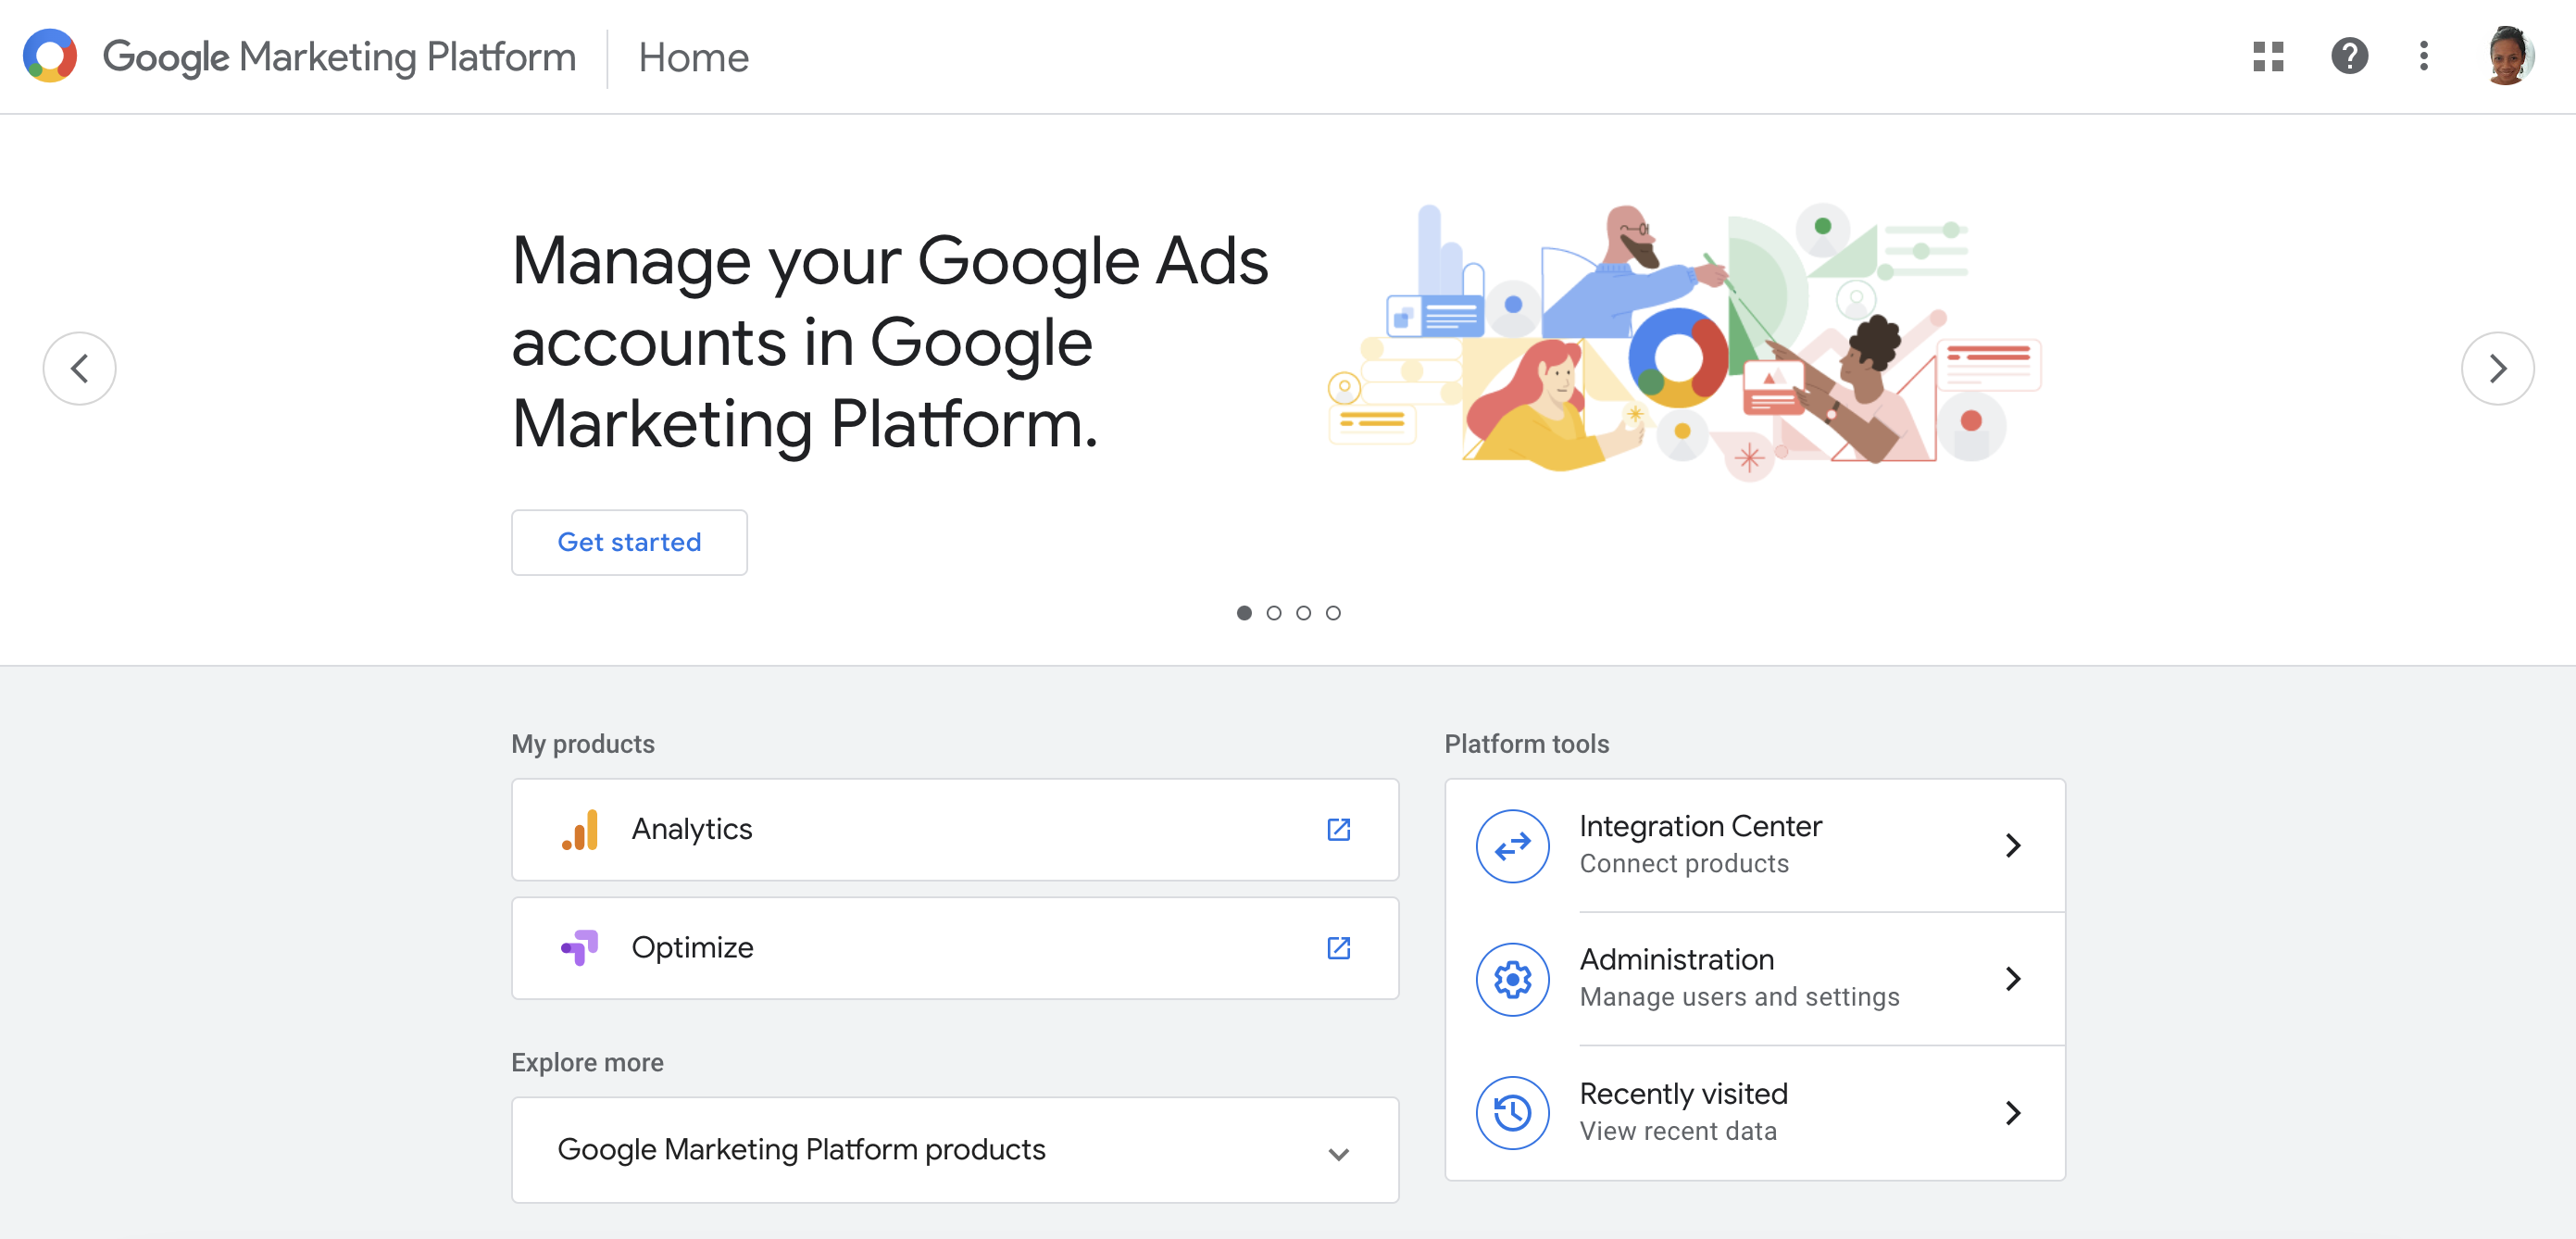
You can use Google Optimize to run straightforward A/B tests and more involved ones like multivariate tests, i.e. testing different website hero images, each with a different headline.
(If I may lift the PickFu curtain for one second: we use our own platform and we use Google Optimize. There’s no such thing as too much optimization!)
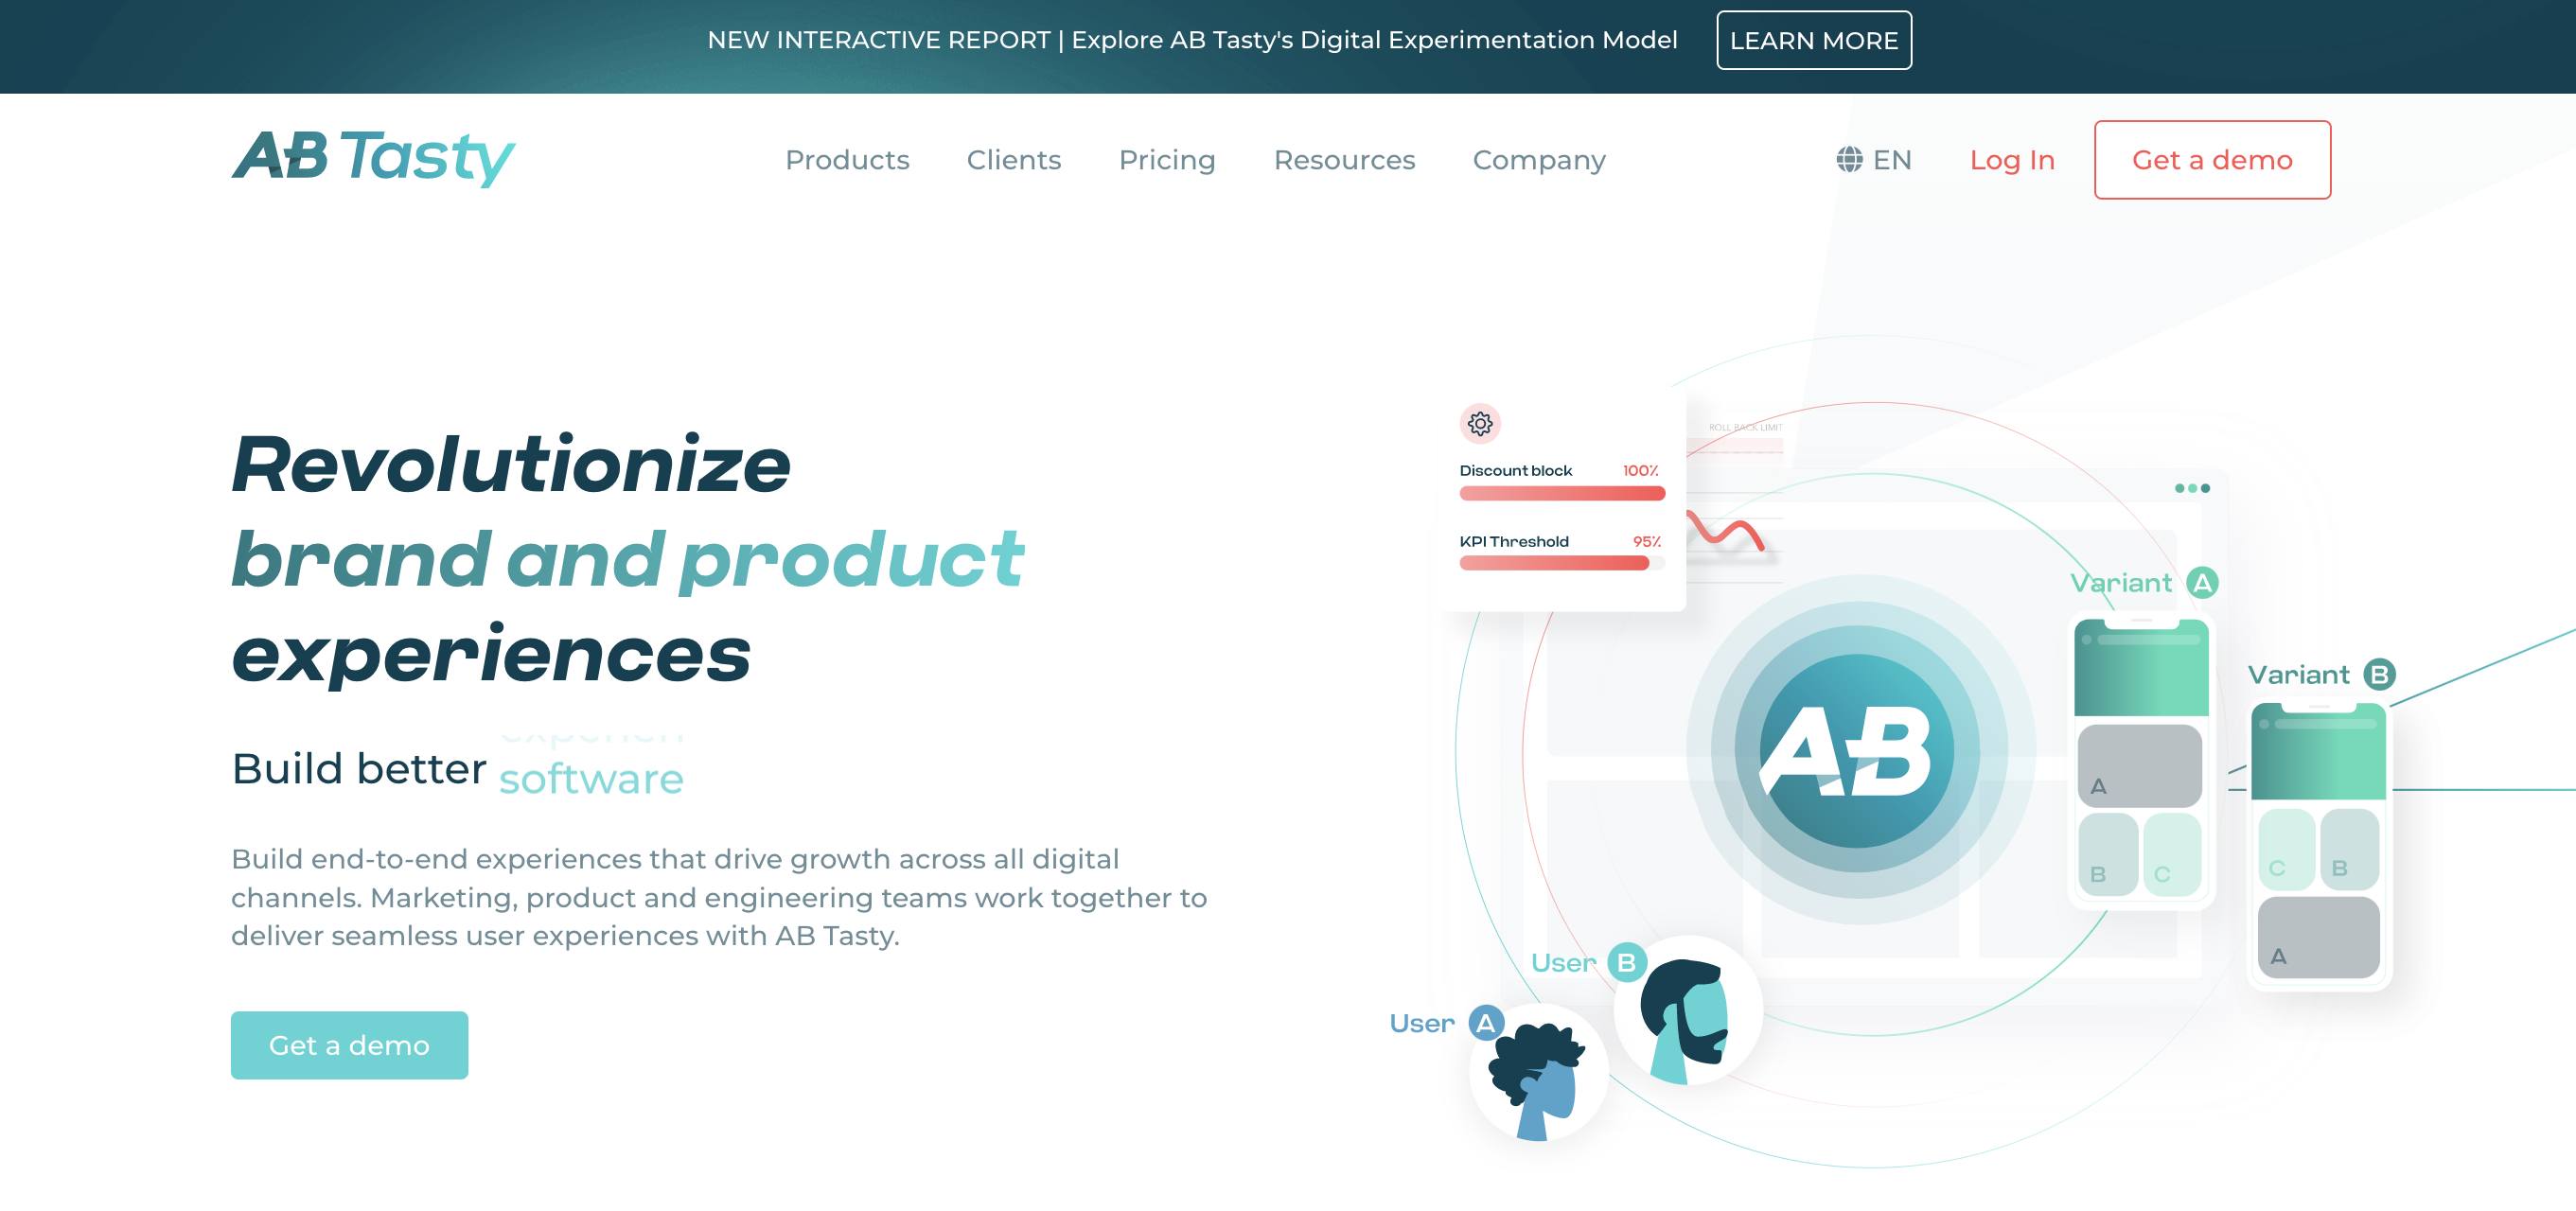
AB Tasty, another popular platform, offers a range of optimization tools that would suit medium to large companies. Users say its drag-and-drop editor makes it easy to create and test variations of their content.
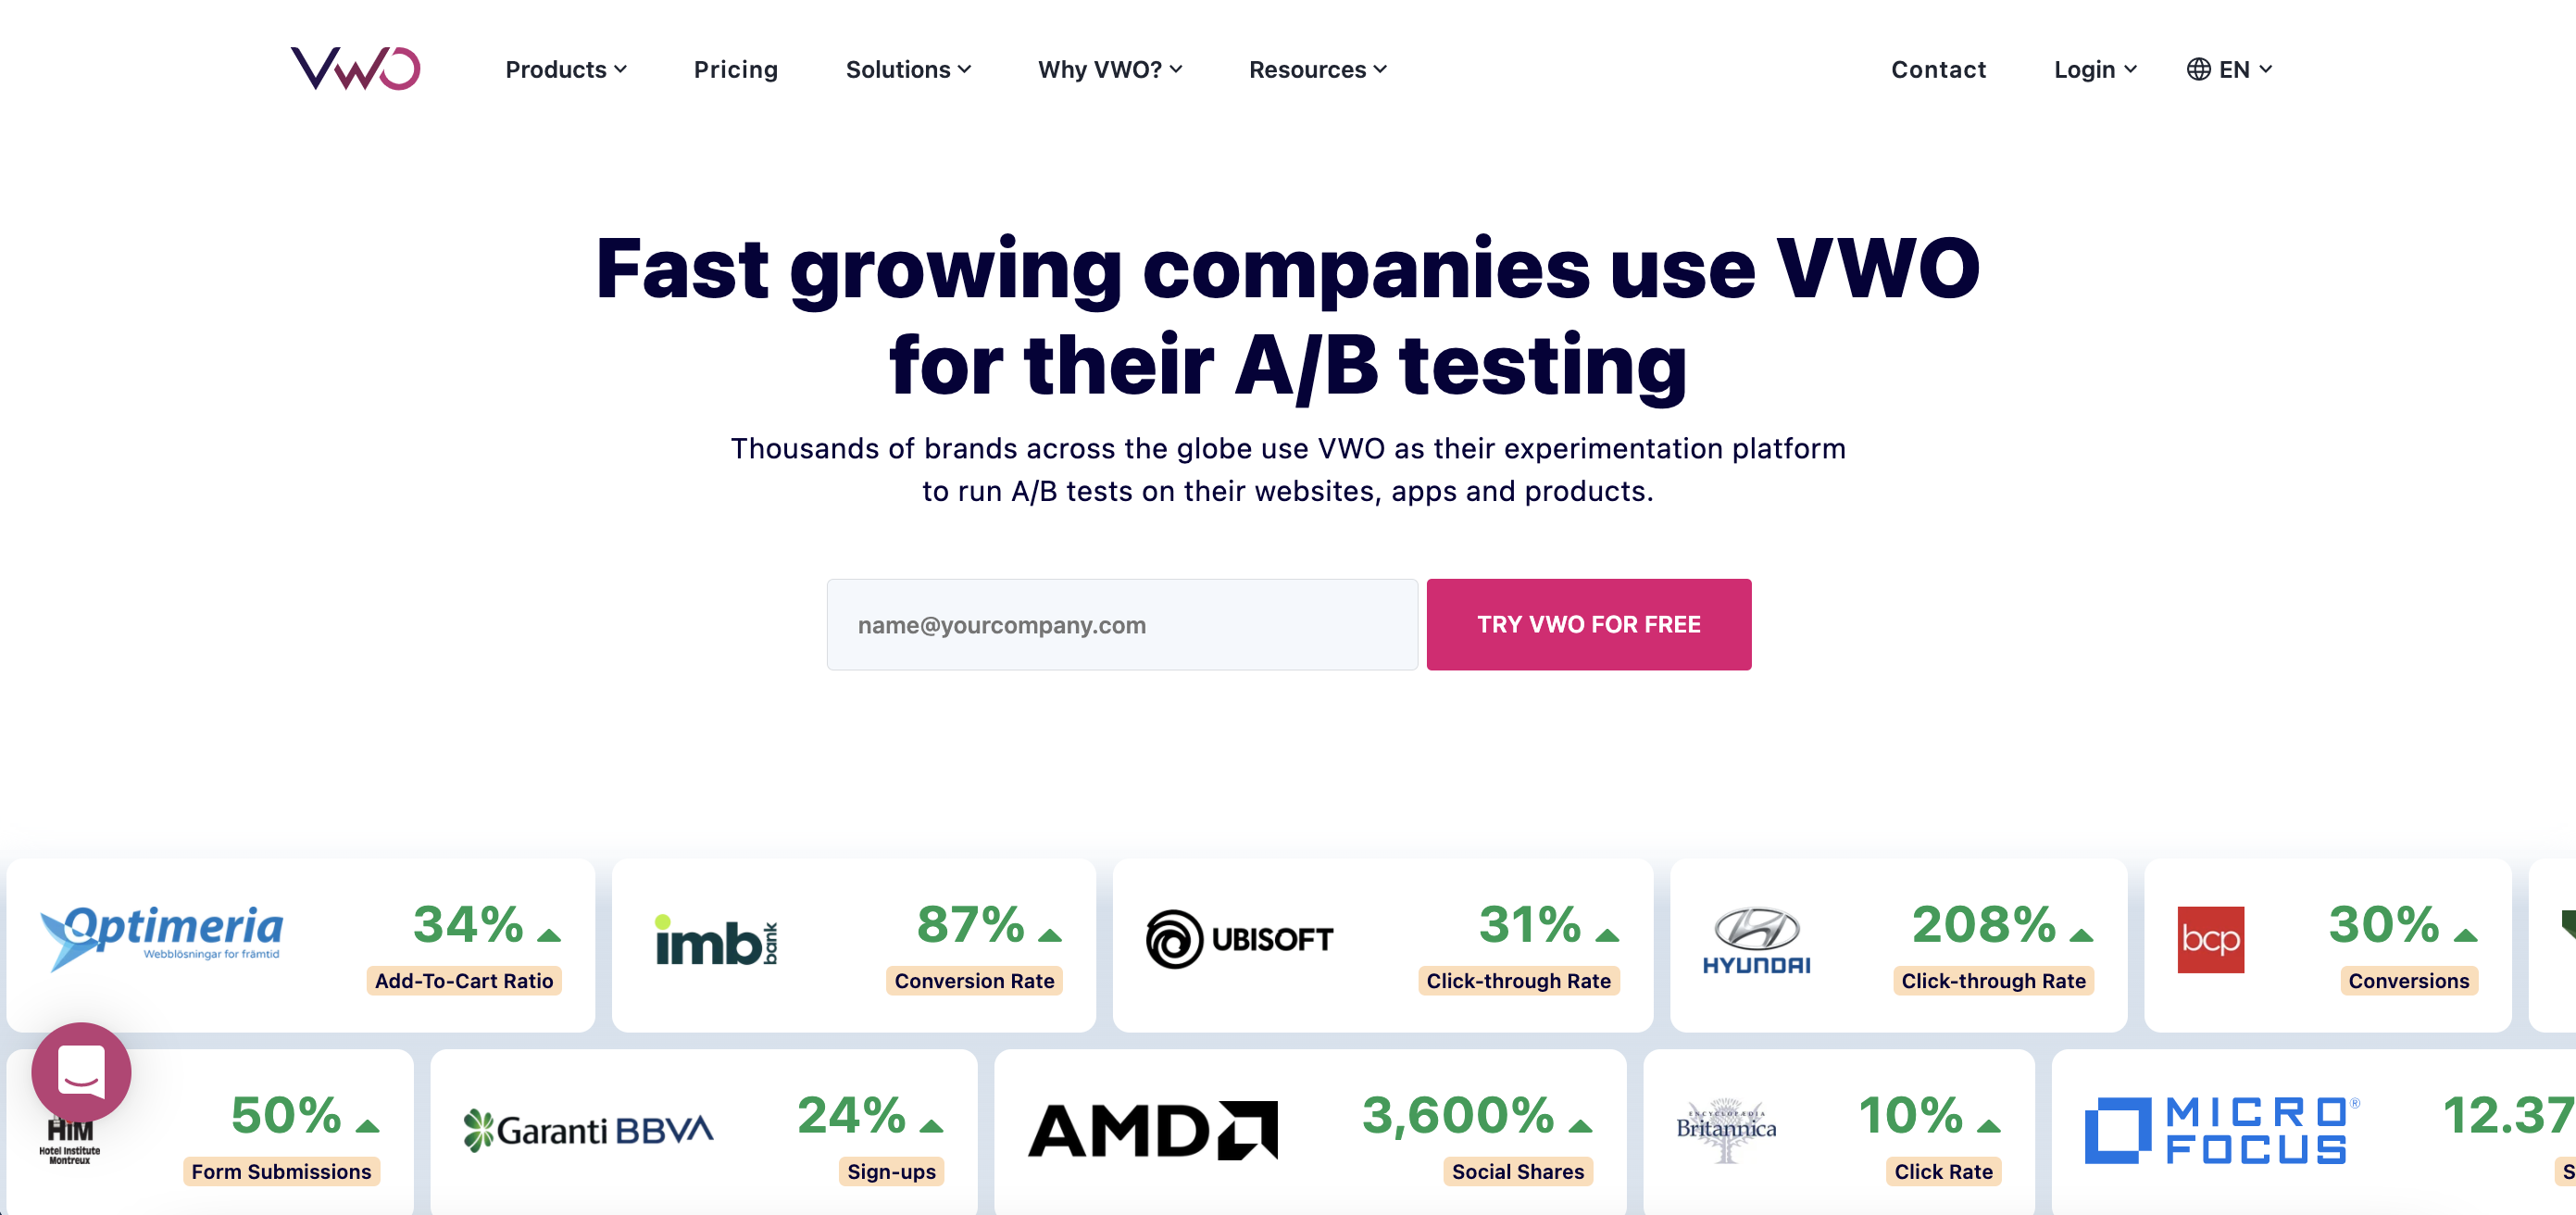
Moving up the complexity ladder, Optimizely and VWO do A/B testing and a lot more, including on-page surveys and heatmaps. Both are designed for big companies who need to test and track the performance of their websites, products, and apps.
Other platforms that are approachable (and affordable) if you’re just starting to test:
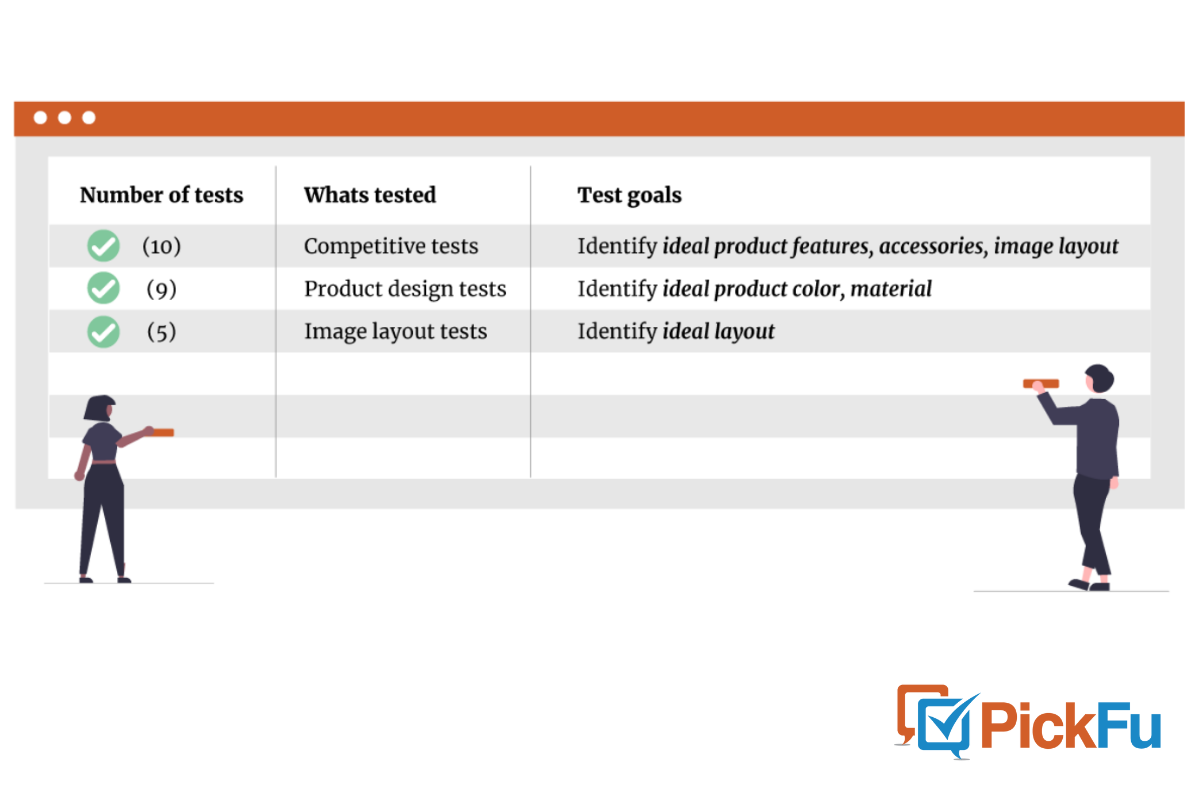
Moving on to Amazon-specific tools, we’ve done some vetting for you to come up with this list of the best Amazon A/B testing tools.
Here’s a quick look at three of them:
- Listing Dojo. Another free tool. There’s no built-in algorithm that declares the winning variant; it’s on you to figure it out from the data.
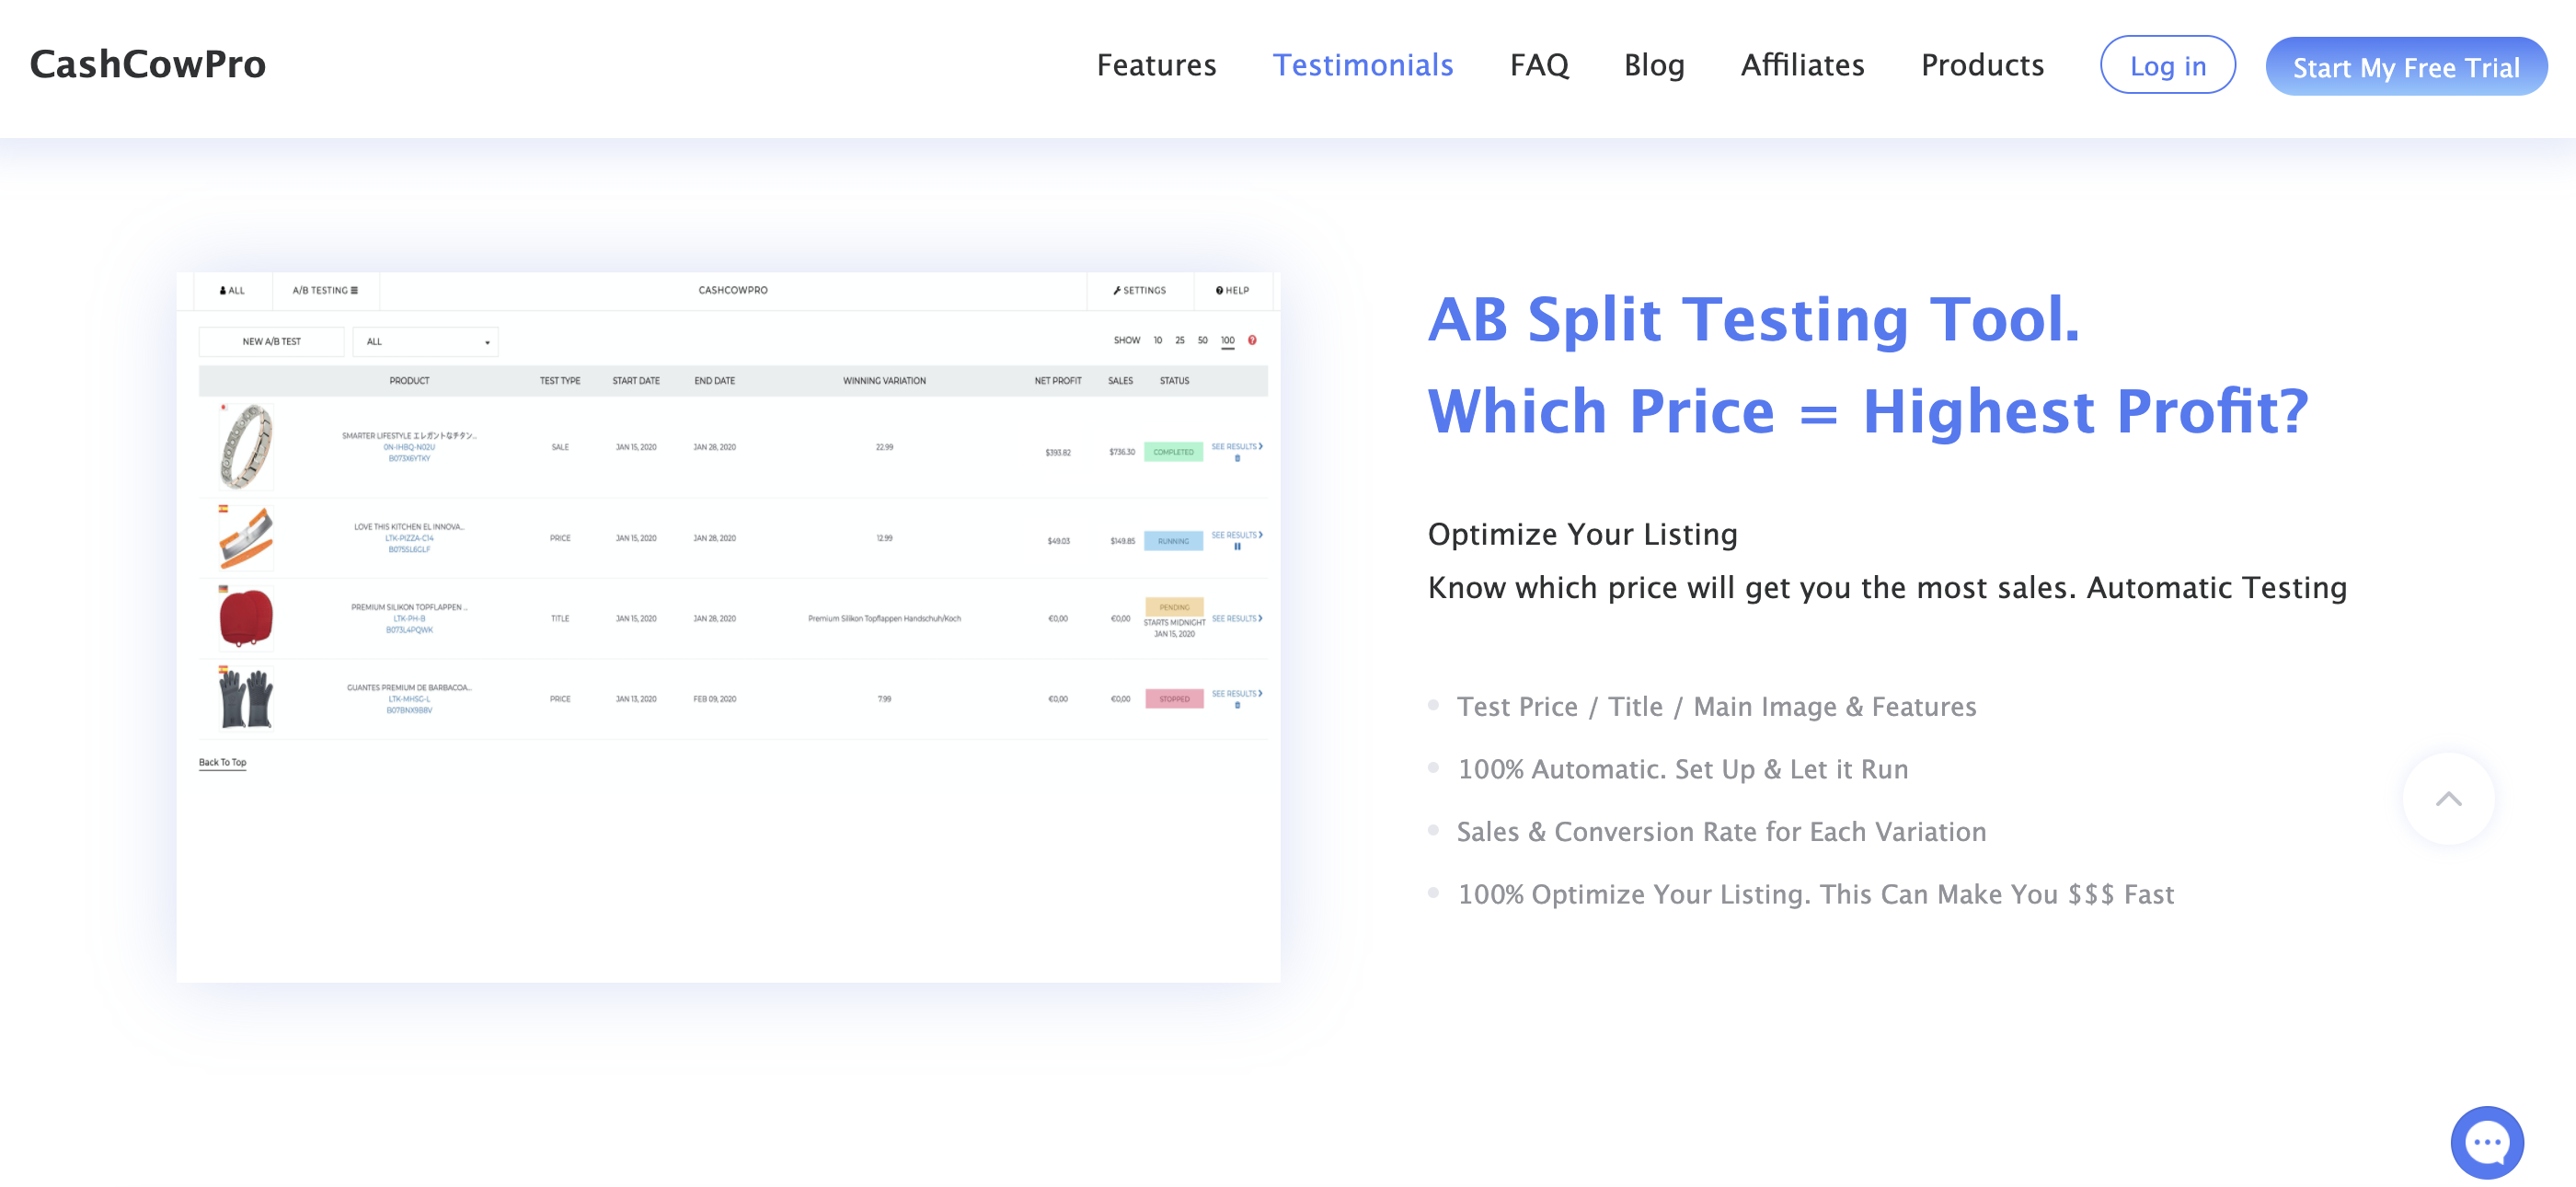
- Cashcowpro. A/B testing is of its many features. It only allows for main image testing, not secondary images.
- Figpii. You can create unlimited variations of your content to test and target different types of visitors (new or returning).
Manage Your Experiments is another option for Amazon sellers. This is Amazon’s tool for testing product images, product titles, and A+ Content.
Here’s the rub. To use Manage Your Experiments, 1) you have to be a brand-registered Amazon seller, and 2) your ASIN, or unique product, must be “high-traffic” enough to qualify.
Under Amazon’s vague guidelines, high-traffic means “several dozen orders per week or more” at a minimum. (Some sellers whose ASINs do meet that volume have told us they still can’t access Manage Your Experiments.)
Eligible sellers can check if their ASINs qualify in their Amazon Seller Central dashboard.

Whichever testing tool you choose, the main thing to note is that A/B testing happens in real time with actual customers and visitors to your site.
Test results come straight from your audience. You can track and compare click-through rates, impressions, and revenue of each variation you’re testing. There’s no second-guessing the accuracy of the data.
On the other hand, a typical test needs at least two weeks to accrue enough data. In that time, you risk a drop in traffic or sales with the lower-performing version of your content.
This brings us to yet another option: testing in a sandbox environment with no impact on your product listings, traffic, or sales.
That’s where PickFu comes in.
Think of PickFu as an online focus group. You’re testing not with actual customers, but with real consumers who match your audience profile.
You can test variations of your product photos — not just options A and B, but up to eight options — with a custom audience of your choosing.
Respondents submit votes and written feedback so you know not only which photo they prefer but also why.
The other difference between PickFu and a traditional split test? Results start coming in as soon as you’ve published your poll.
It takes a few minutes to set up a PickFu image test. Here’s how to do it.
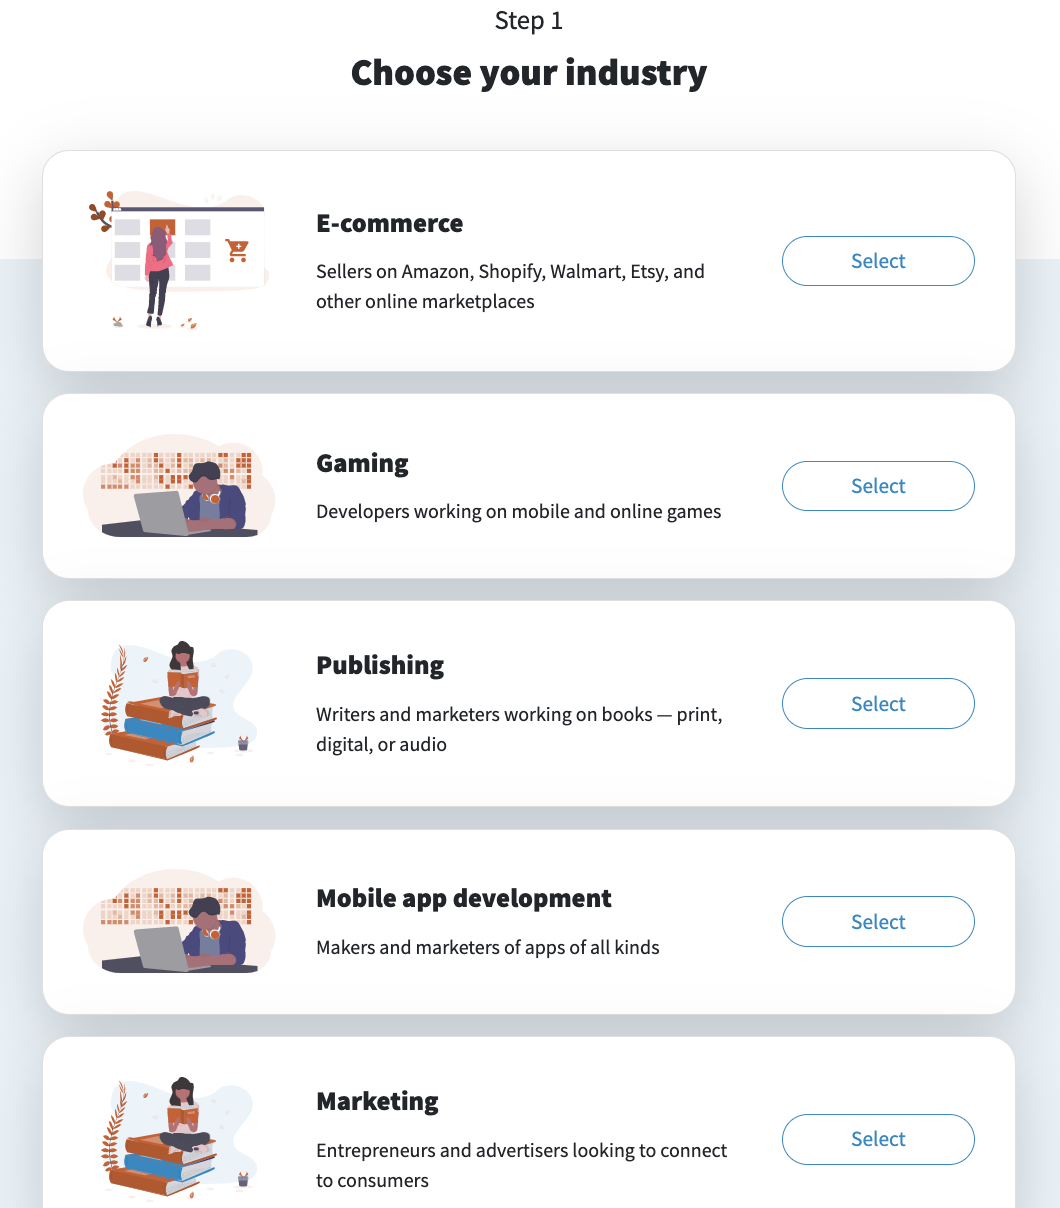
If you’re a new user, create a free account. Once you’ve done that, click “Start new poll” at the top of your screen.

You can either use the templated poll builder or create a poll from scratch. The poll builder is good for first-timers.
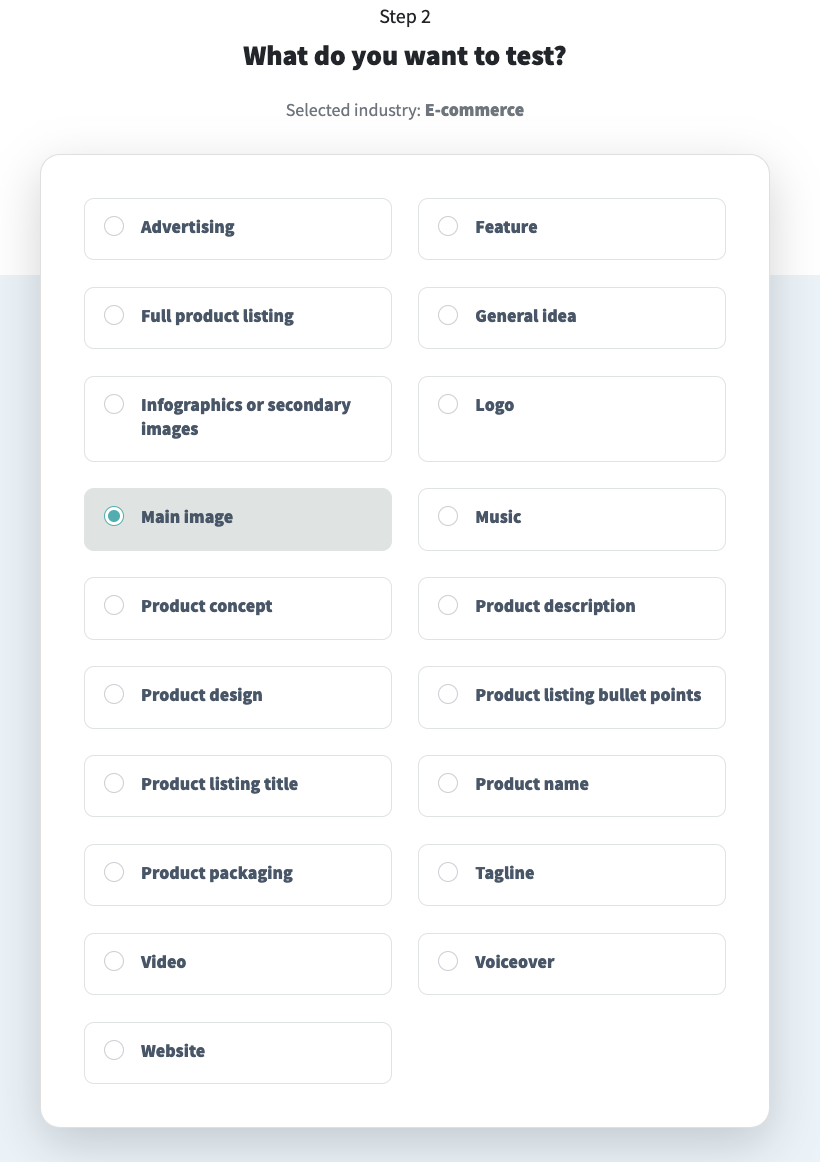
Let’s go this route and select “E-commerce” as your industry:
The next screen shows the options you can test: main images, secondary images, and infographics.
To keep things simple, we’ll choose “Main image”:
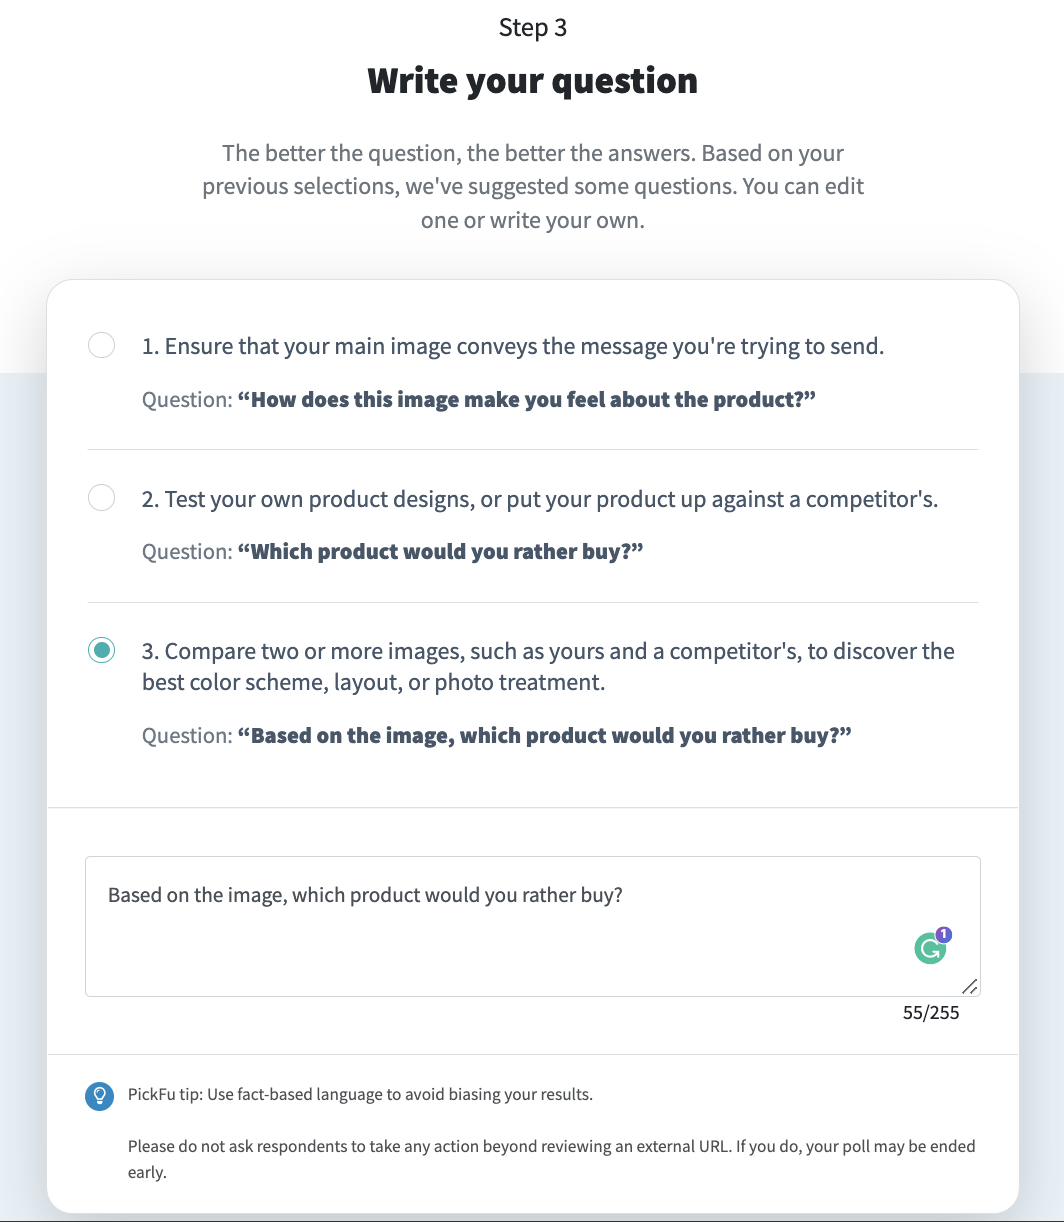
Time to add your poll question. You can write your own or choose from a few suggested questions.
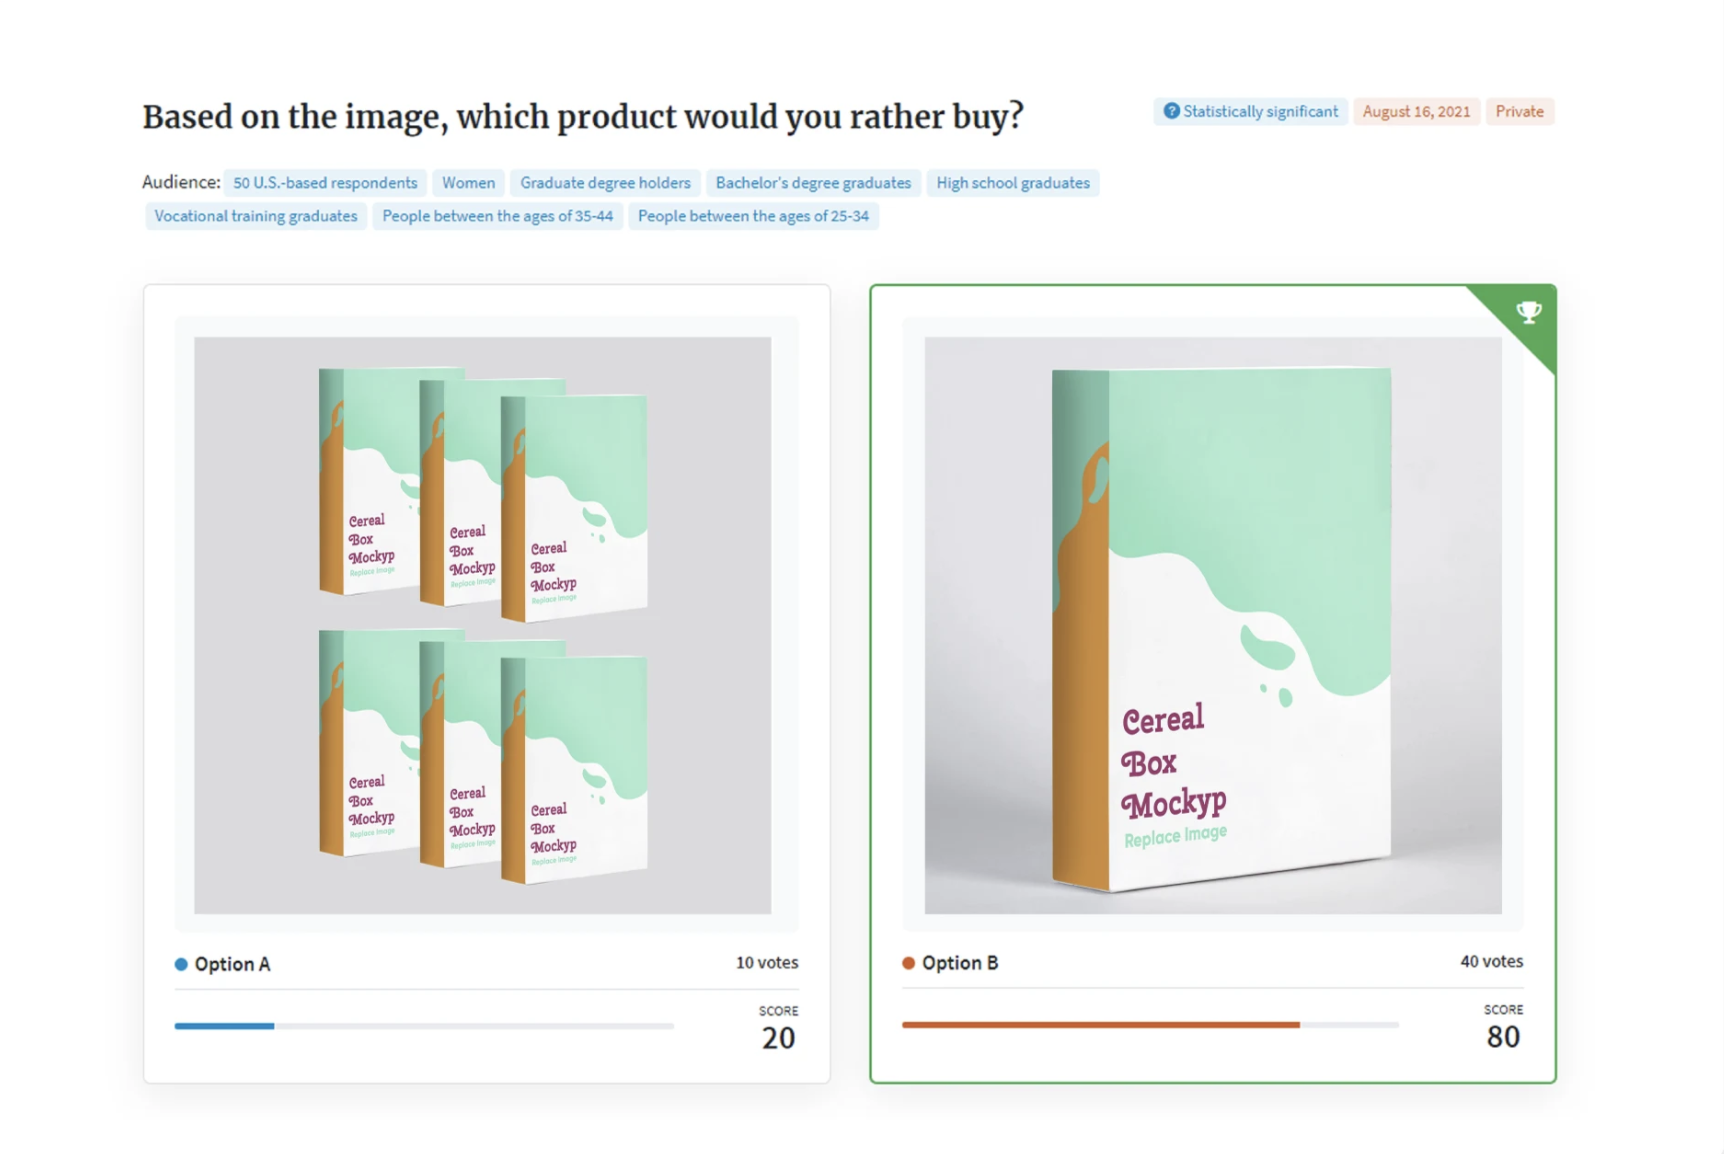
Let’s go with question 3, “Based on the image, which product would you rather buy?”
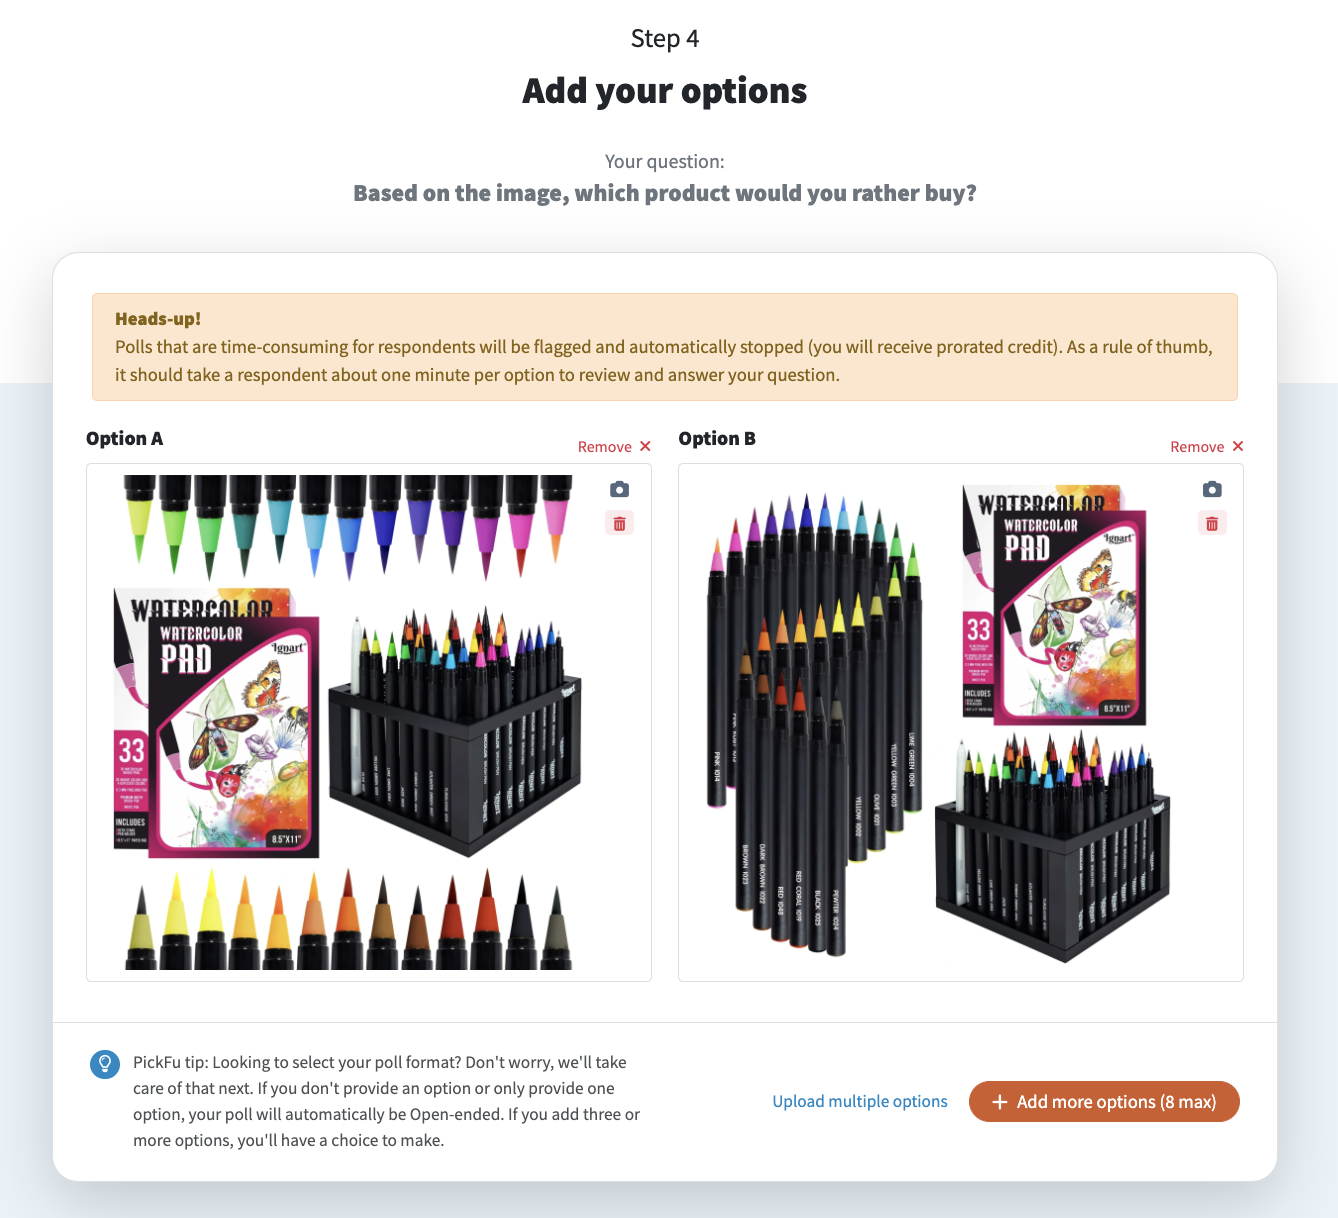
Here’s where you add your photos.
Either click on the camera icon to pull up your files, or drag and drop your images into the blank option fields.
If you’re testing more than two options, you can upload the entire batch by clicking on “Upload multiple options”.
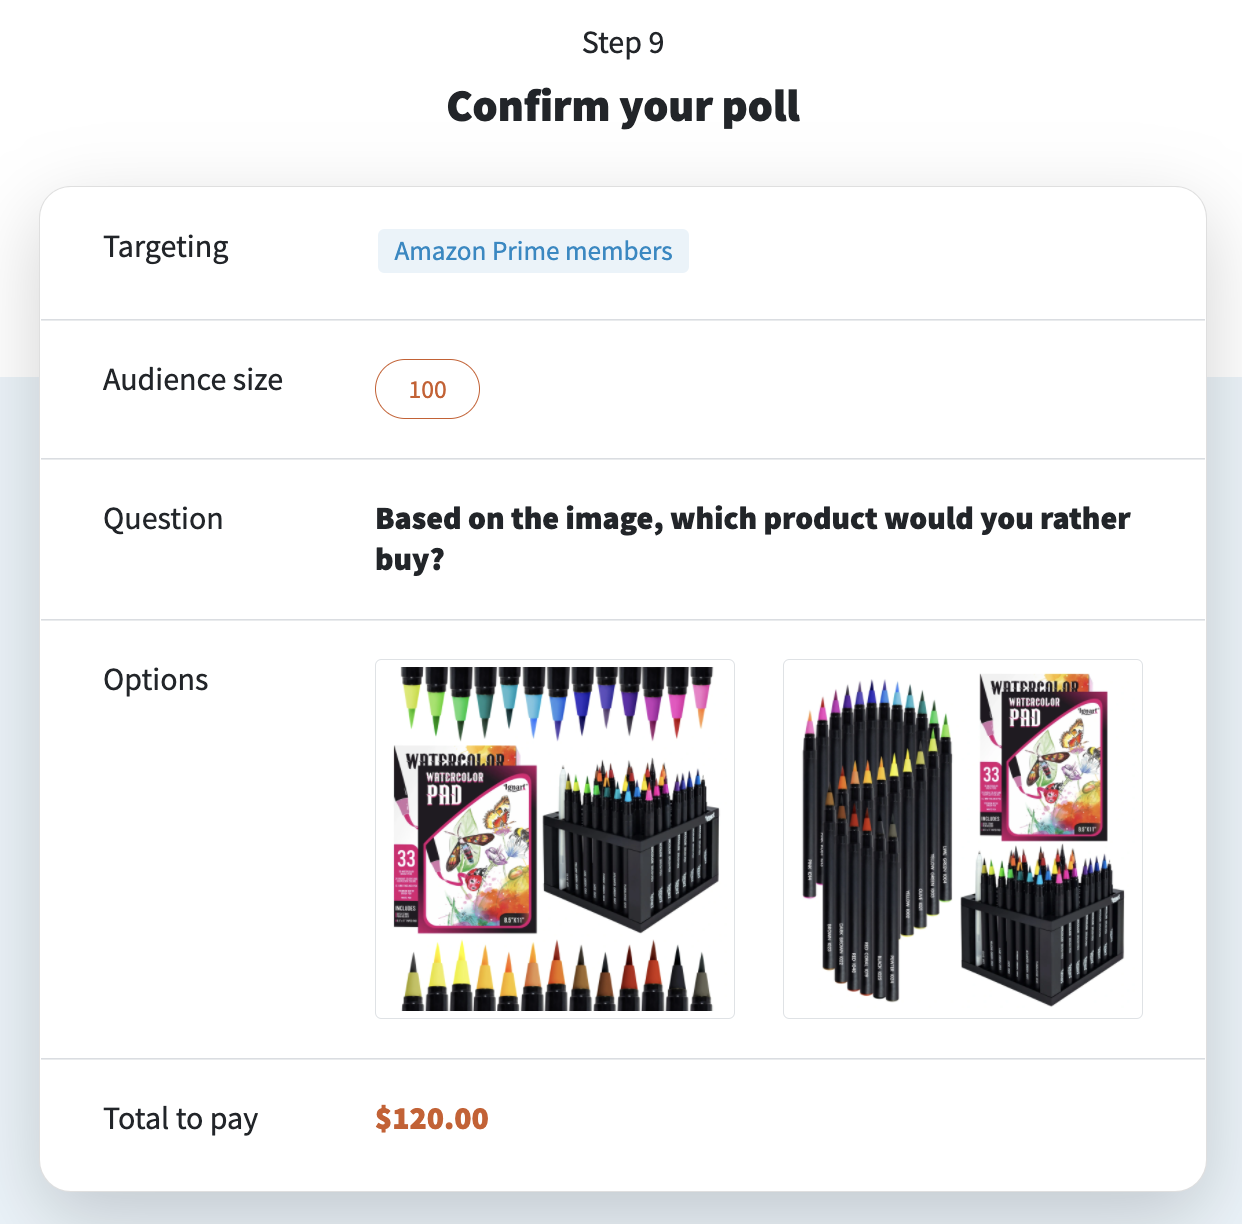
We’re going to keep this hypothetical poll simple and stick with two options. We’re using two Amazon product photos for a watercolor set:
Next, choose your audience type and size. A baseline 50-person poll starts at $1 per respondent, depending on targeting and demographics.
Think about who your customer is and what you’re trying to learn by testing.
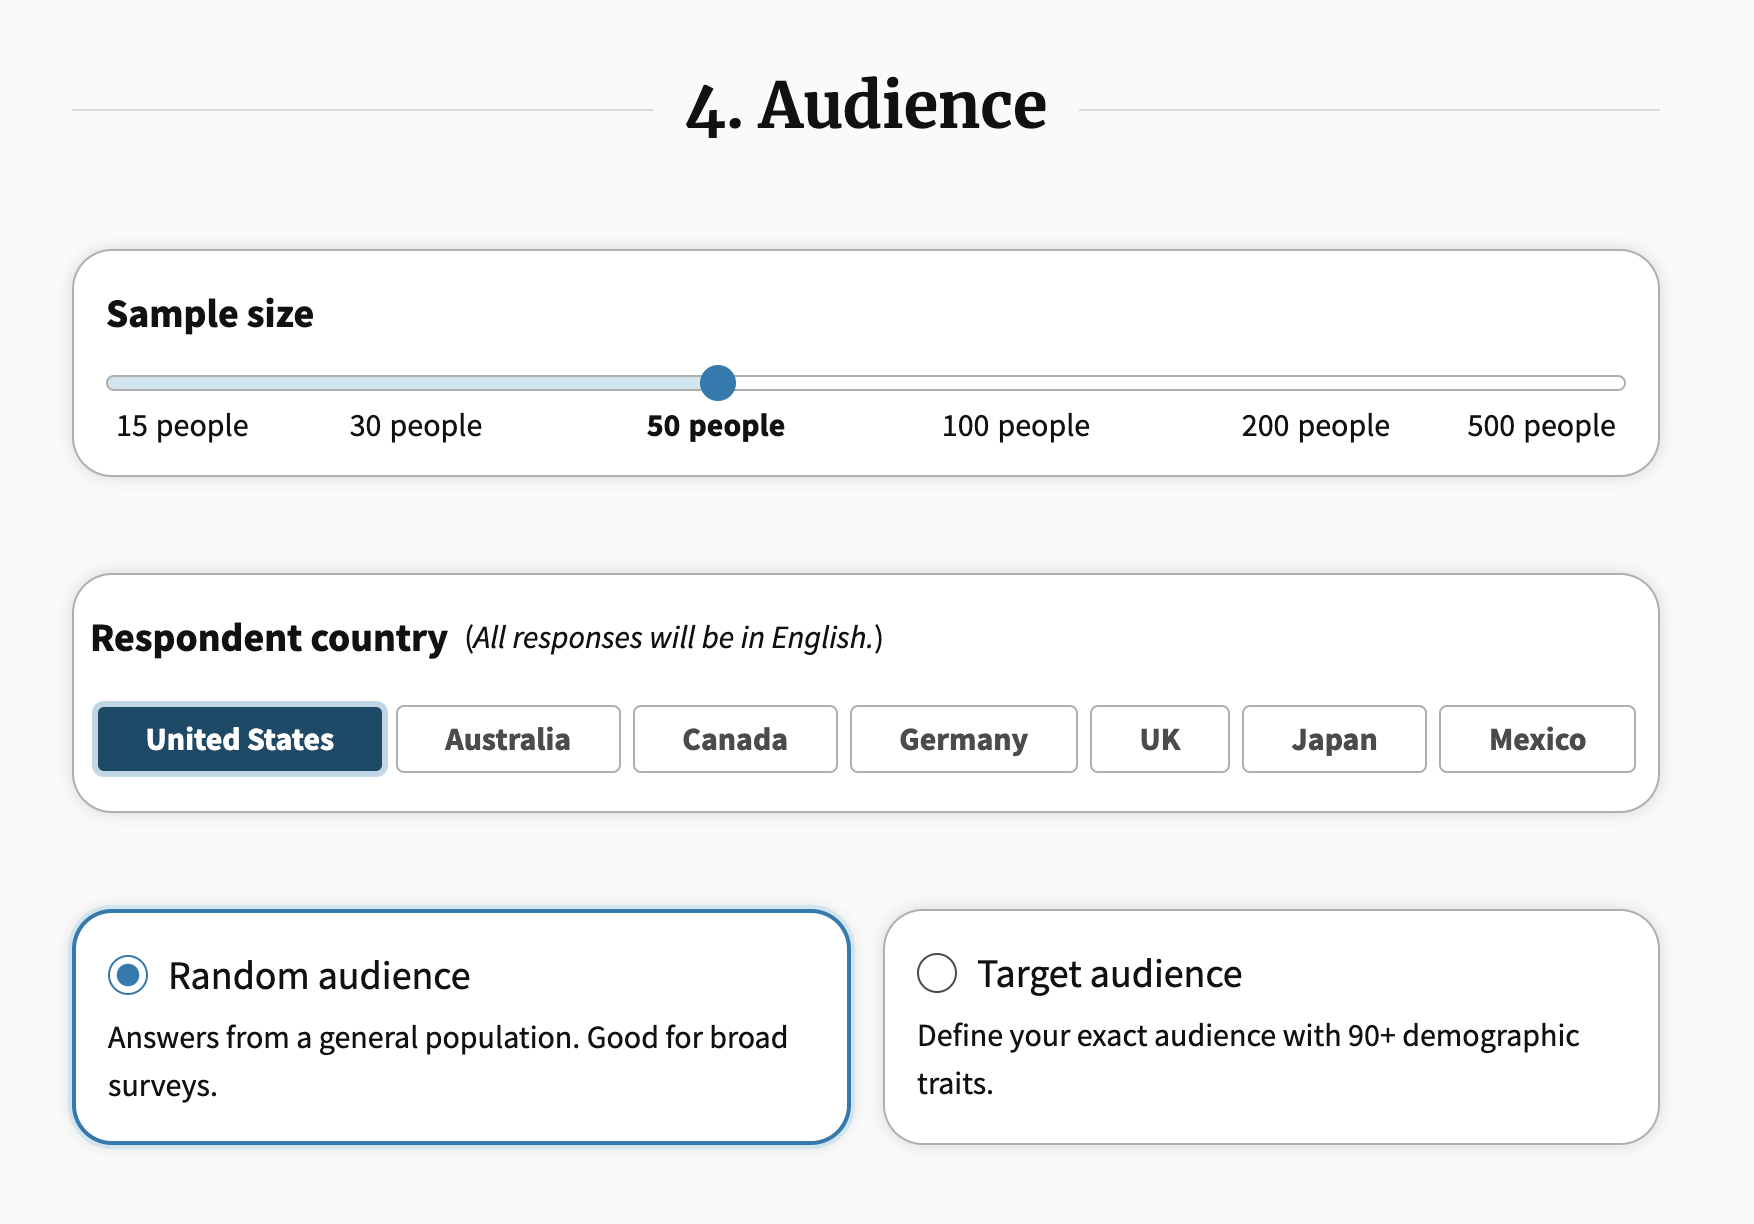
In general, if it’s early in your testing process, it’s good to start with a smaller, random audience.
We’ll talk more about audience targeting in a minute. Let’s keep going.
The next screen gives you the option to collect more data on the people answering your poll.
Every poll includes the gender and age range of each respondent. The cost of your poll will go up as you add targeting and demographic traits.
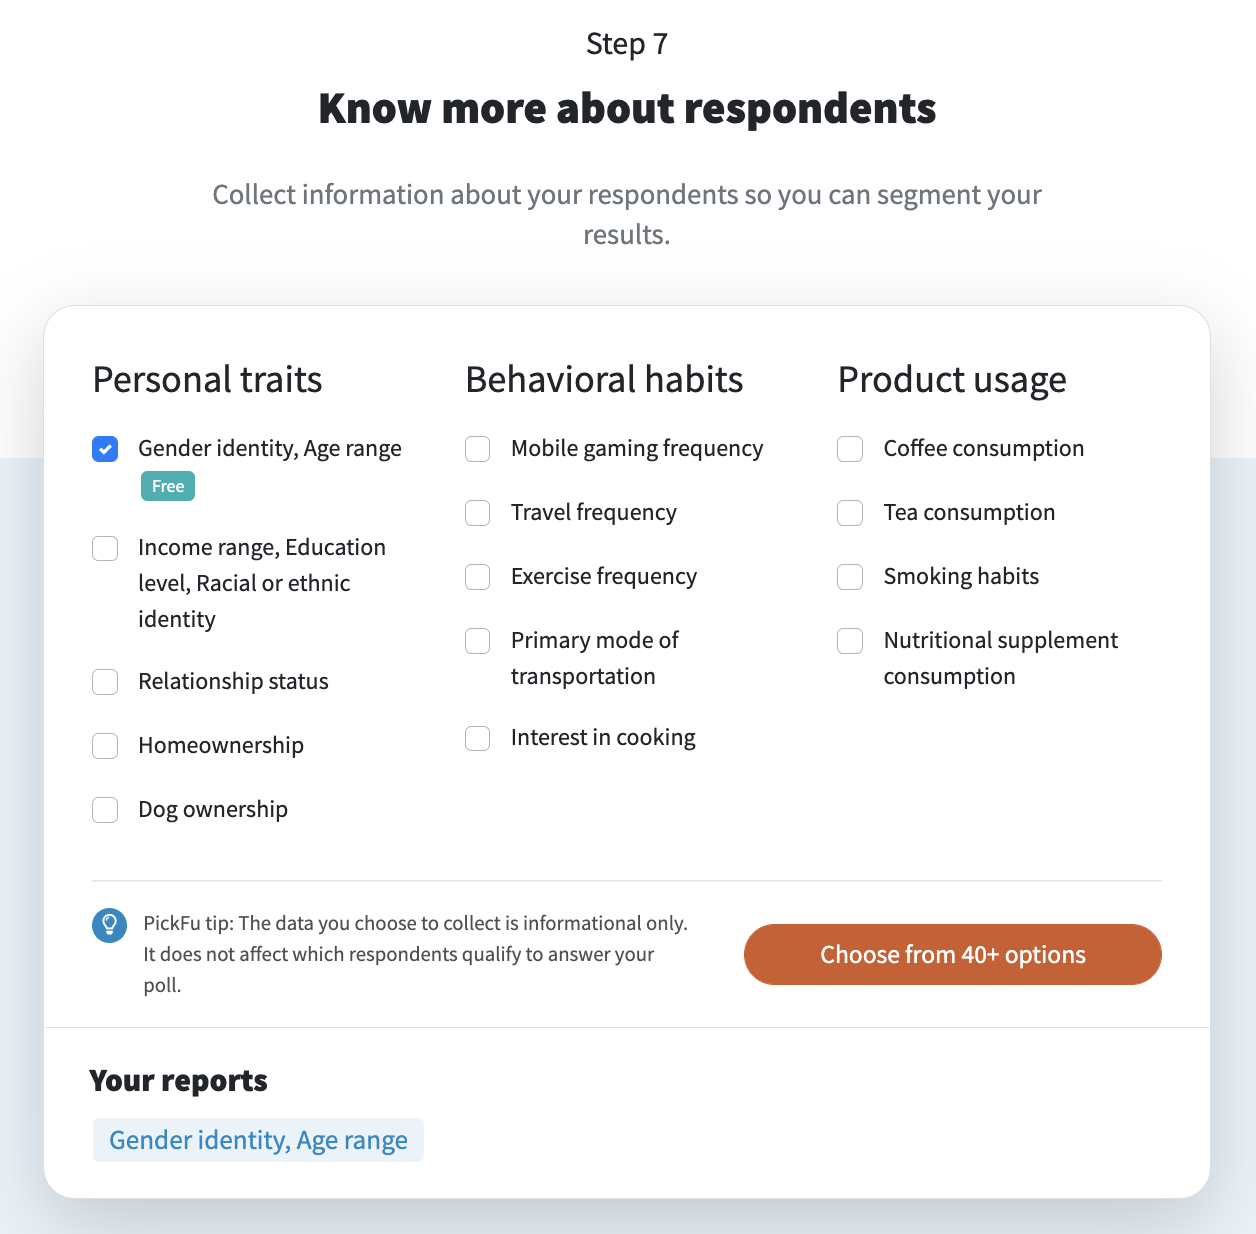
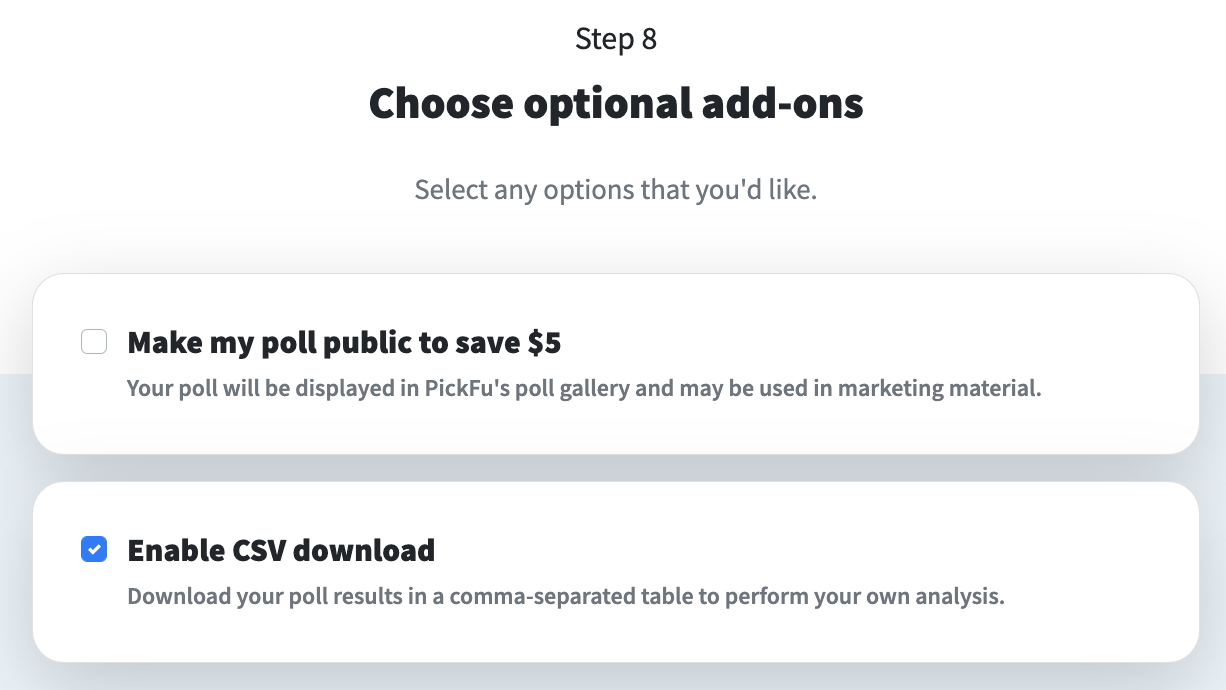
Almost done. You have two more optional steps.
You can save $5 if you publish your poll in the PickFu poll gallery (all polls are private by default).
You can also opt out of a .CSV download if you don’t want or need it to slice and dice your test results.
The final screen is where you’ll check that all looks good with your poll.
For our example poll of the watercolor set, we’re targeting 100 Amazon Prime members. Total cost: $120.
After confirming that you’re ready to start the poll, you’ll be taken to a checkout page, where you’ll do one last review and enter your payment info.
Once you hit “Pay”, your poll is off to the races.
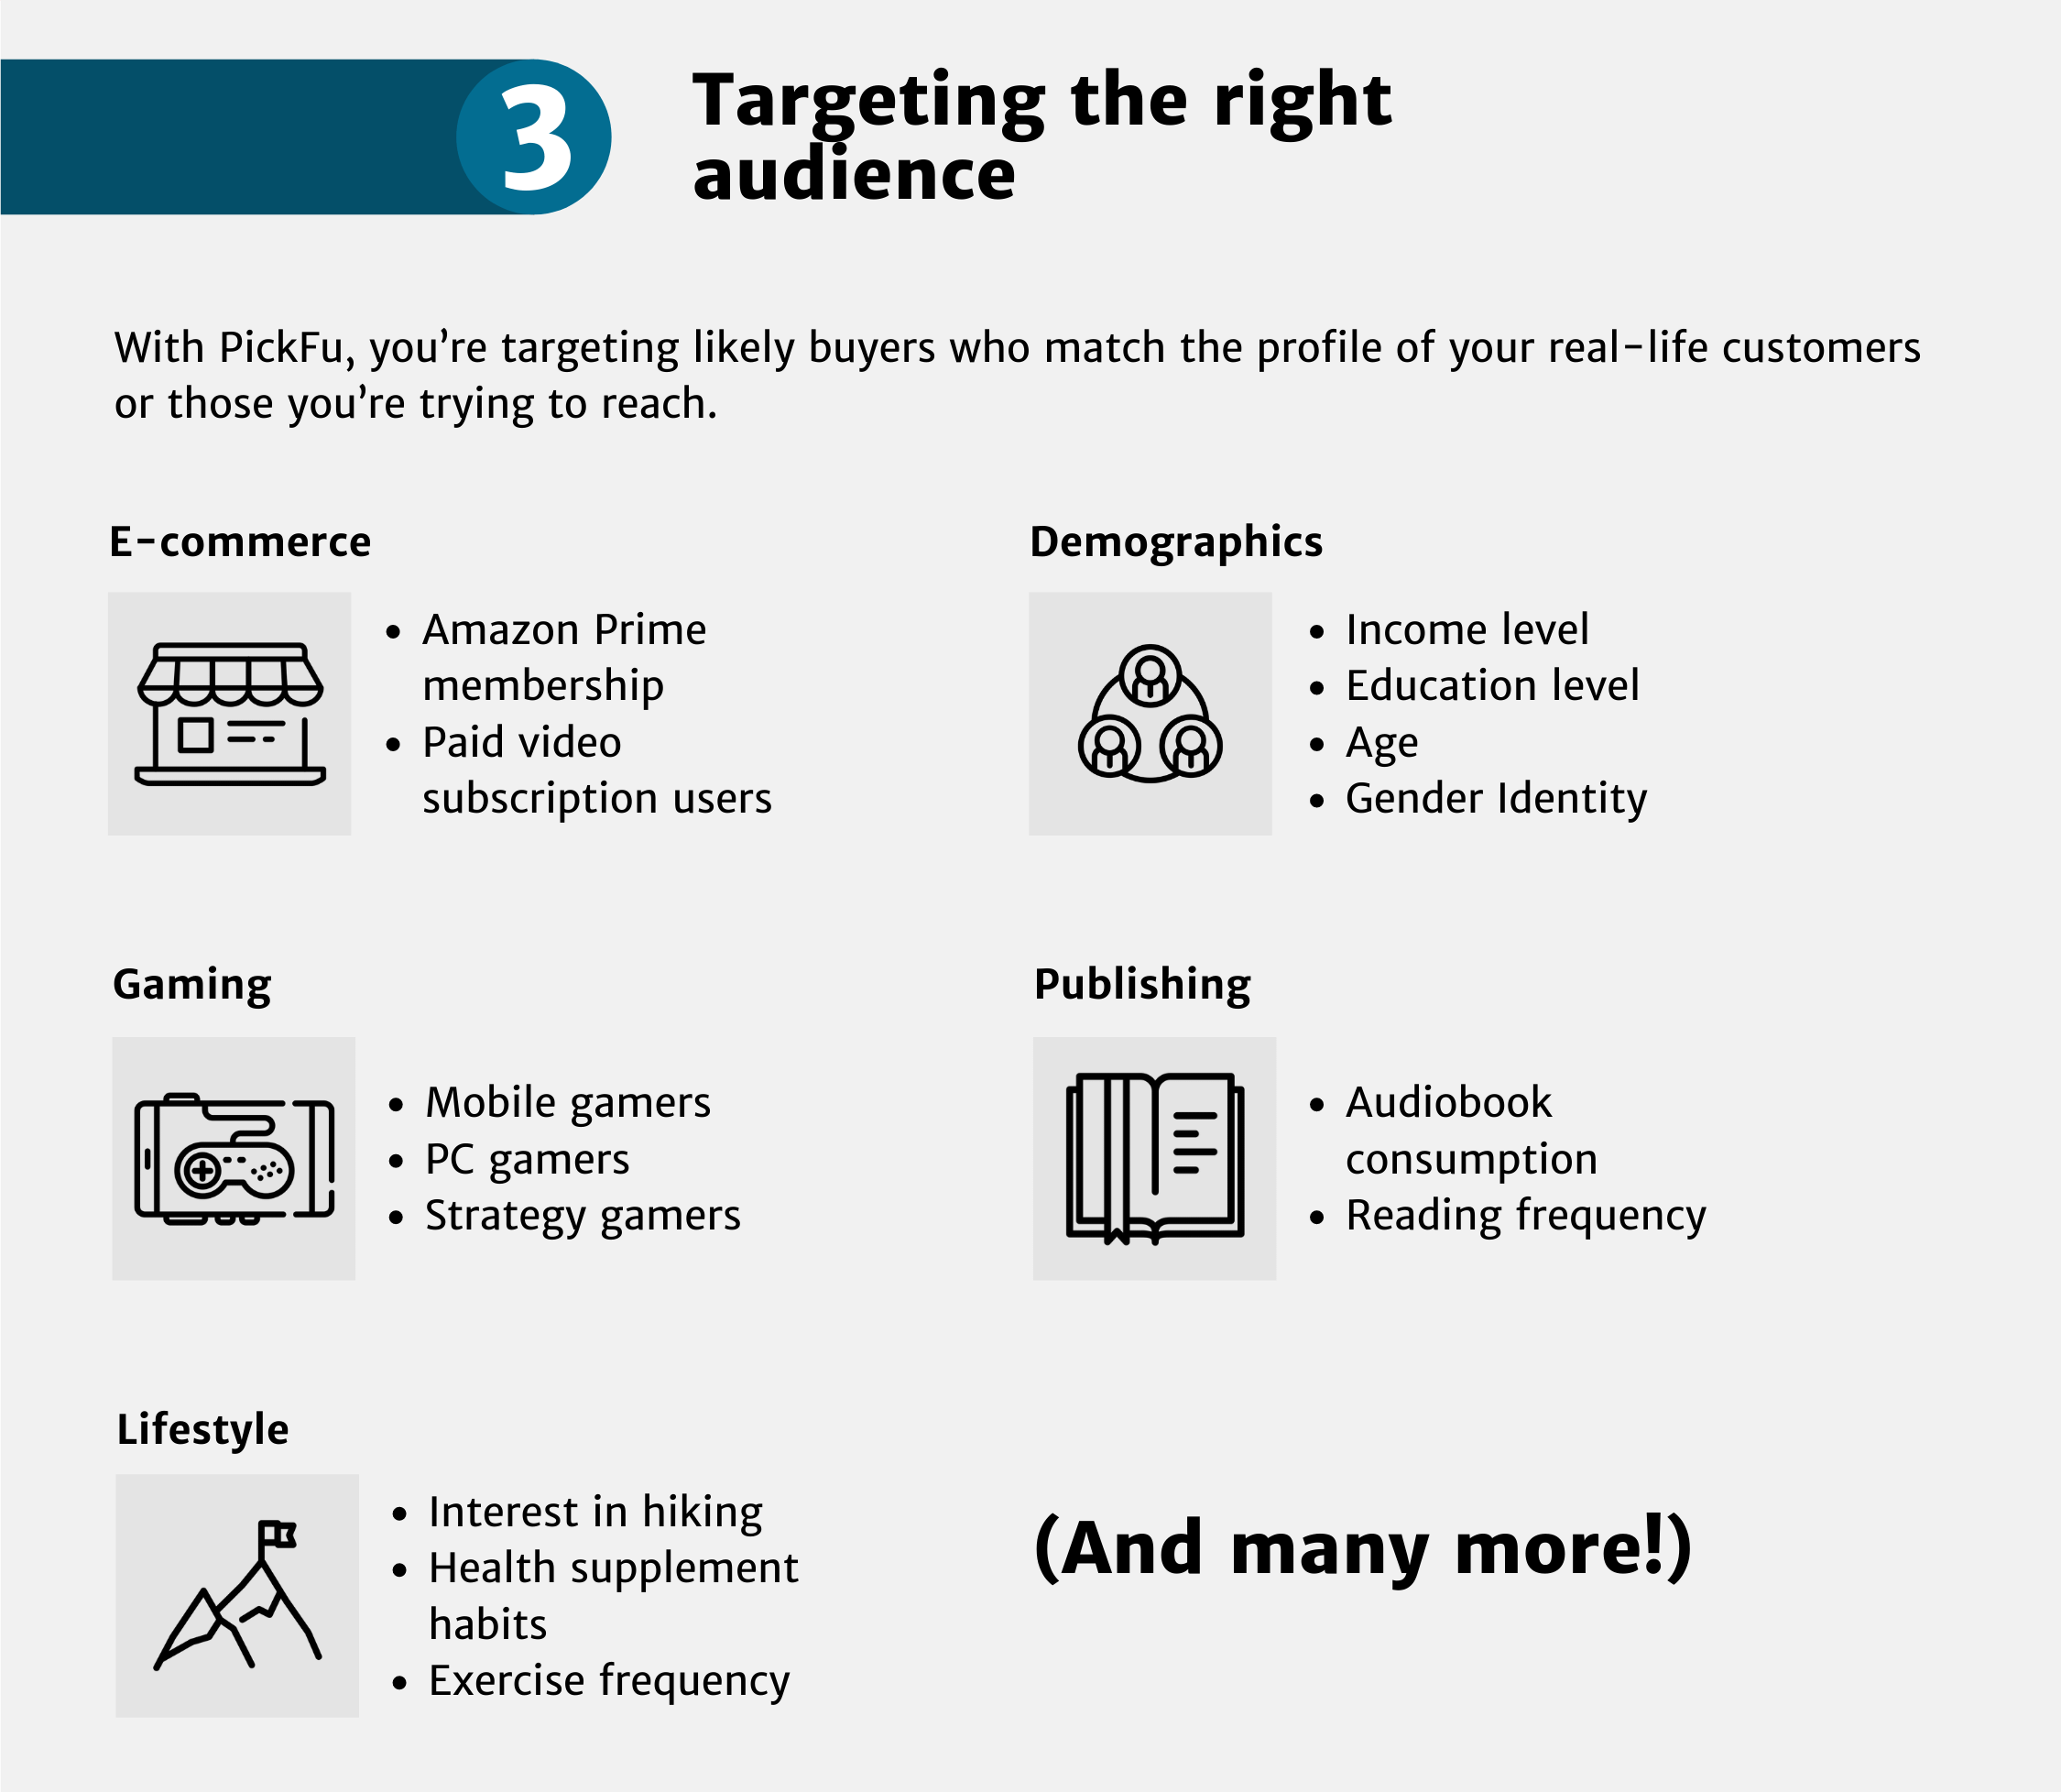
3. Target the right audience
As I said earlier, for the most relevant insights, you have to survey the right audience.
If you use an A/B testing platform like Google Optimize, your customers are your testing audience.
With PickFu, you’re targeting likely buyers who match the profile of your real-life customers or those you’re trying to reach.
You’ll always get a demographic breakdown of every person who answers your PickFu poll.
But you have the option to get way more specific with audience targeting. You can target respondents by their interests and habits, their product usage, even their political and religious affiliations.
Who uses your product or subscribes to your service? Who comes to your online or brick-and-mortar store? Their opinions on your product photography will be most valuable.
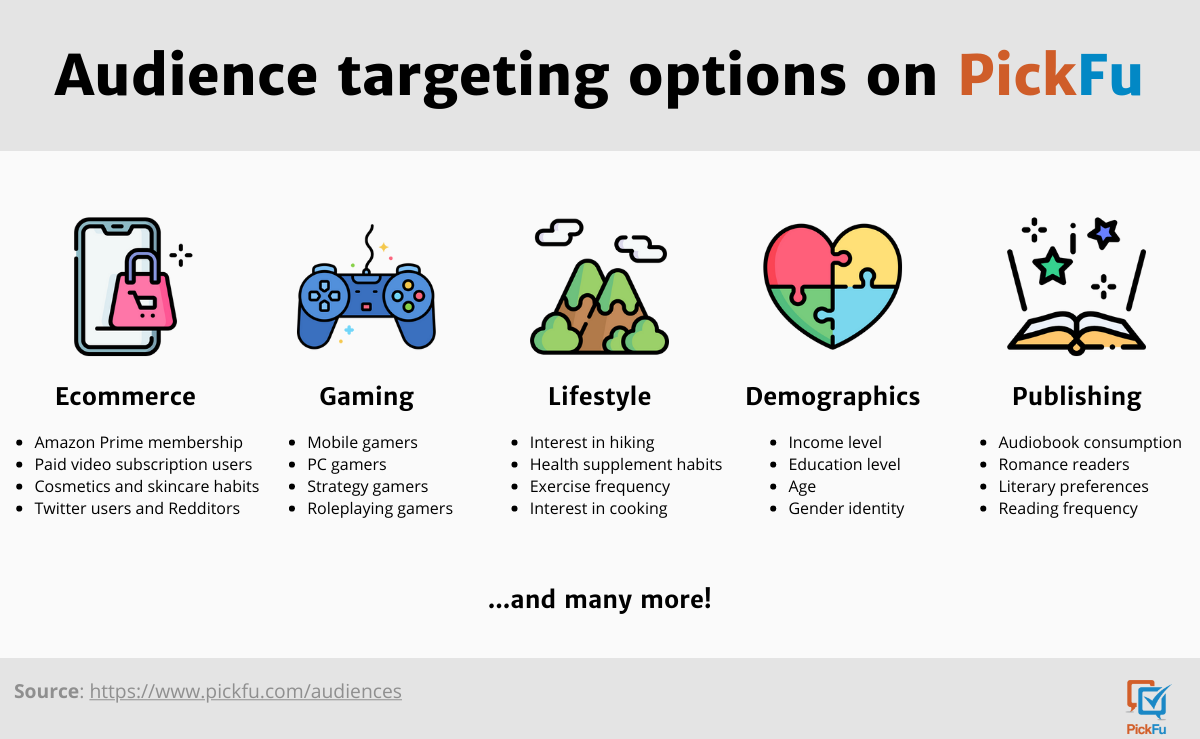
If it’s early in your customer research and testing process, you might target one trait — gender, for example, or if you’re in e-commerce, Amazon Prime members or Etsy shoppers — and narrow down from there.
Here’s an example from our poll gallery.
In this main image test for a facial serum, the user is targeting its intended audience of female consumers. (Men buy skincare products, too. Just saying.)
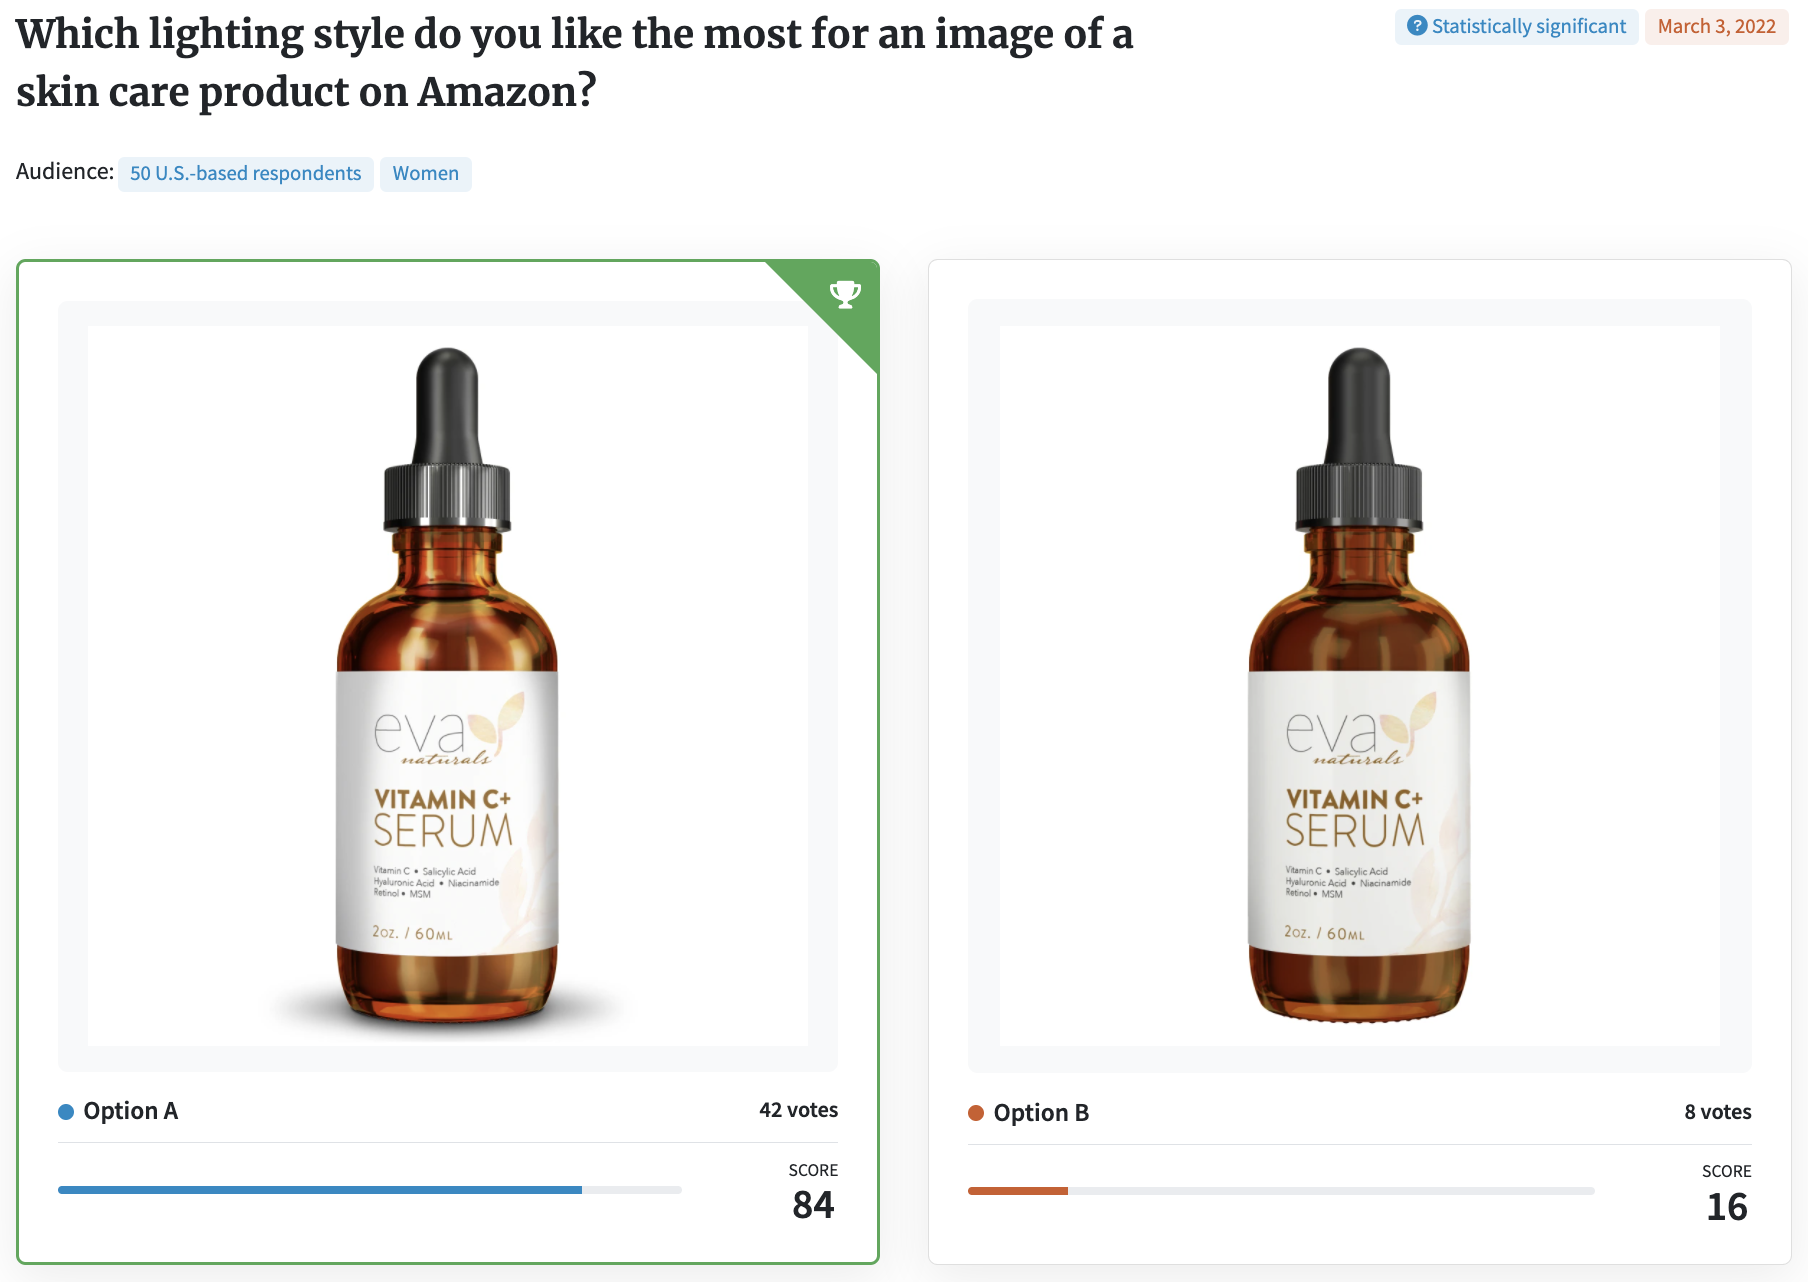
Note how the poll asks respondents about a specific aspect of the photo, namely the lighting style.
This is where audience targeting starts to pay off in more ways than a typical split test.
Dig into the comments and you’ll see respondents not only talk about the look of the bottle and label but also how that relates to having bright, healthy skin.
They’re connecting the glow of the bottle to their desire for glowing skin, which is exactly what this product, in their minds, will help them achieve.
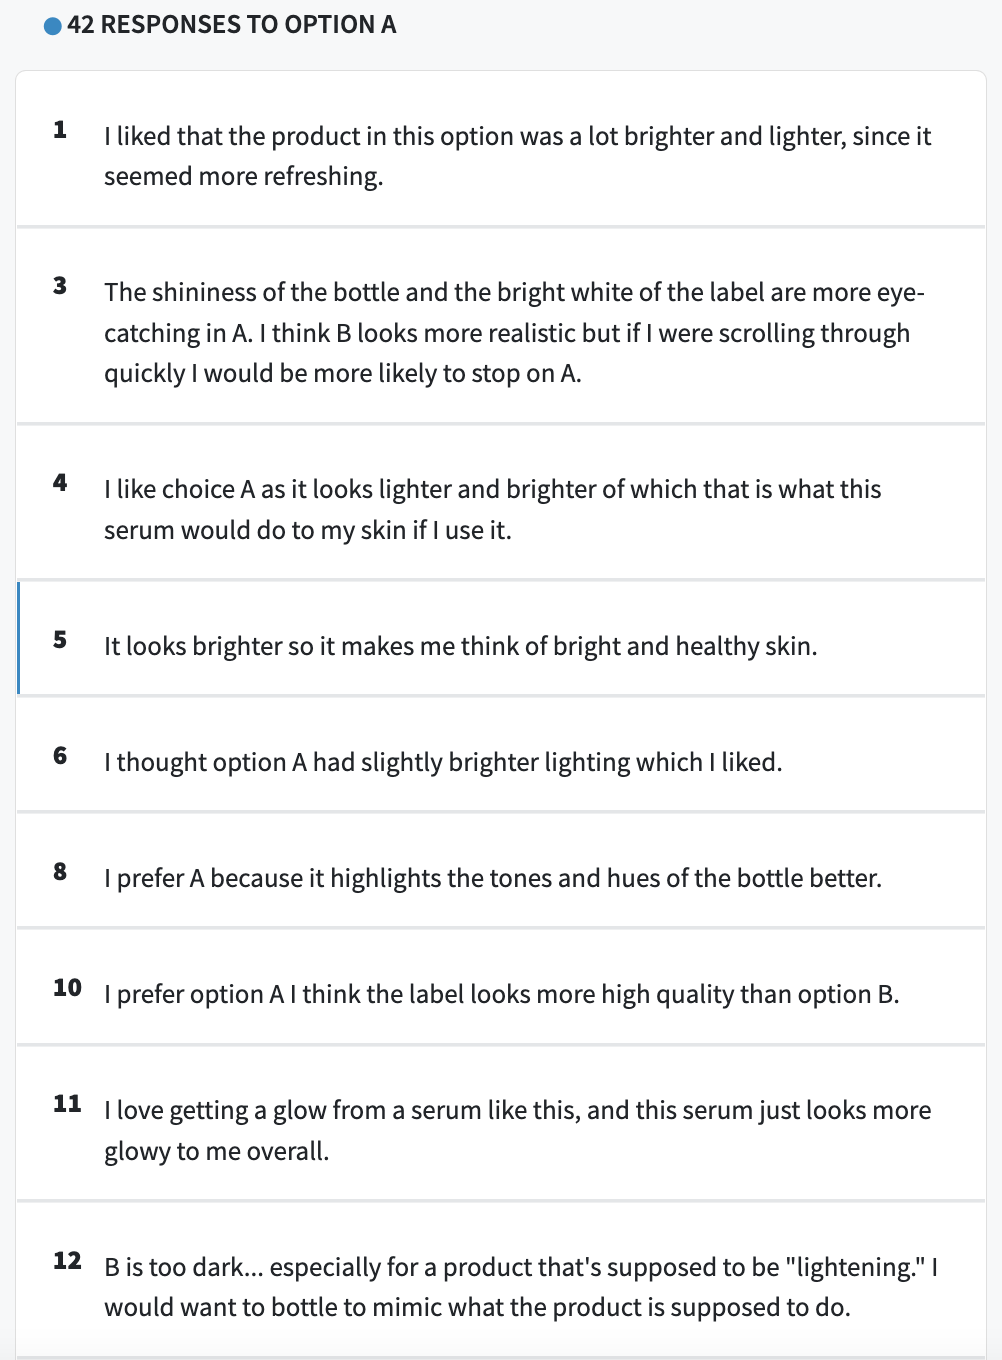
You’ll also notice a lot of the same words and phrases come up in their comments:
- glow
- bright
- clear
- clean
The user that ran this poll can take that customer language and apply it to the branding on their website, in ads and social media posts, and even on the packaging itself.
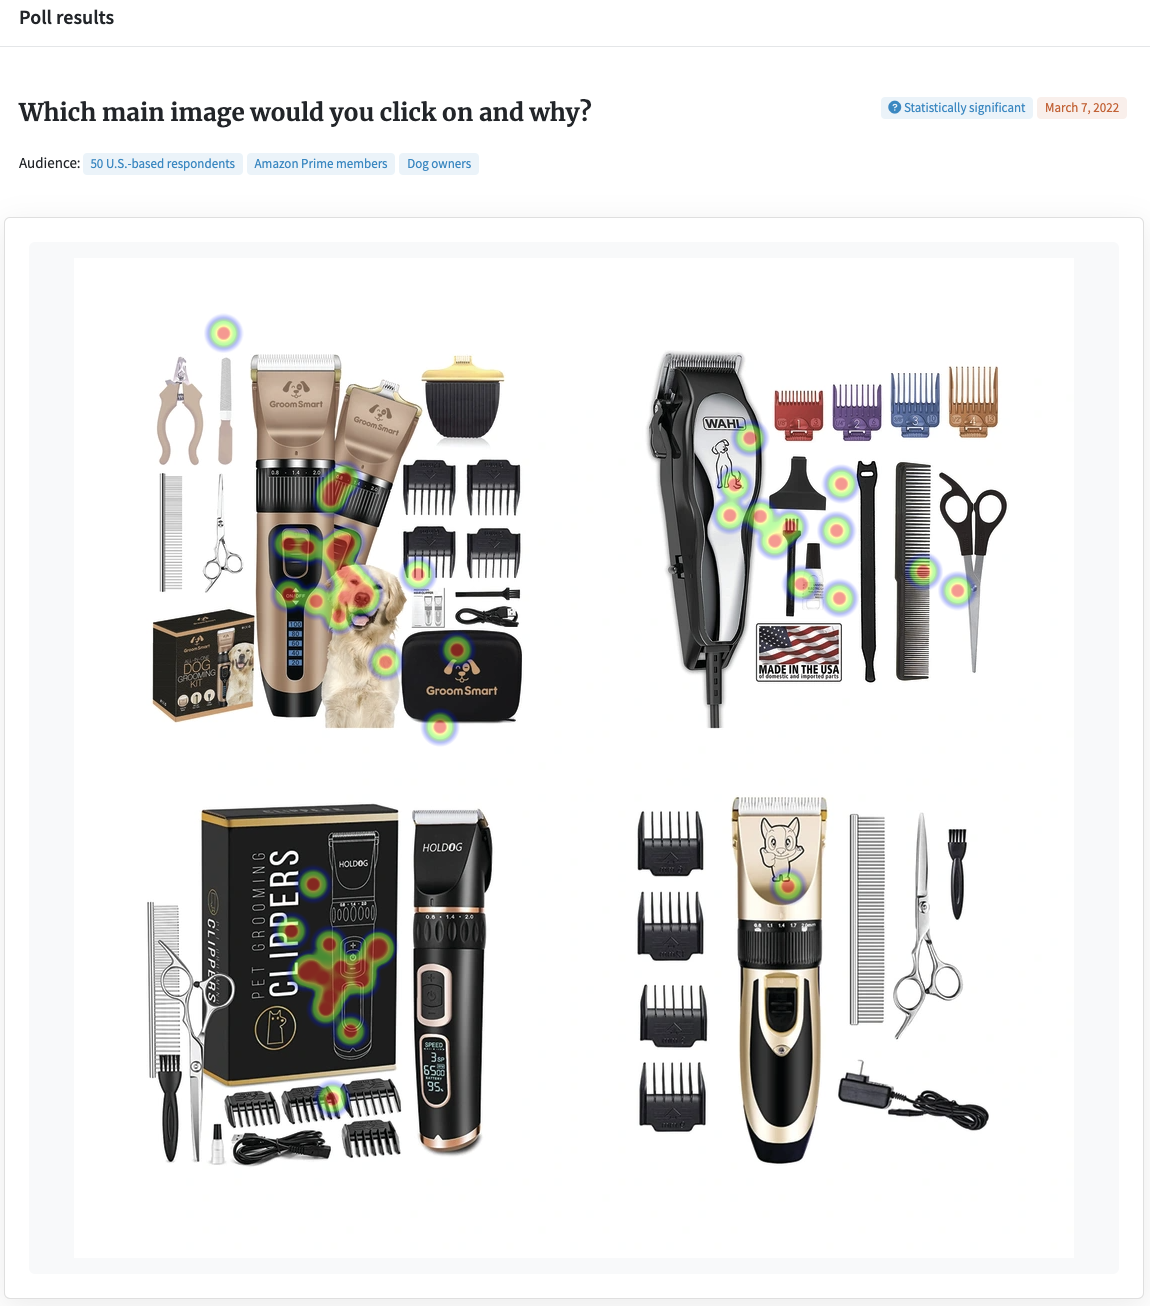
Let’s look at another main image test, this one for a pet grooming kit. Here, the audience is dog owners who are Amazon Prime members.
By setting this up as a click test, the user can see on the heatmaps which areas of the photos and features of the grooming kit appeal to their target customers.
To pull up the data for each photo, hover over the photo and you’ll get a click-and-drag prompt:
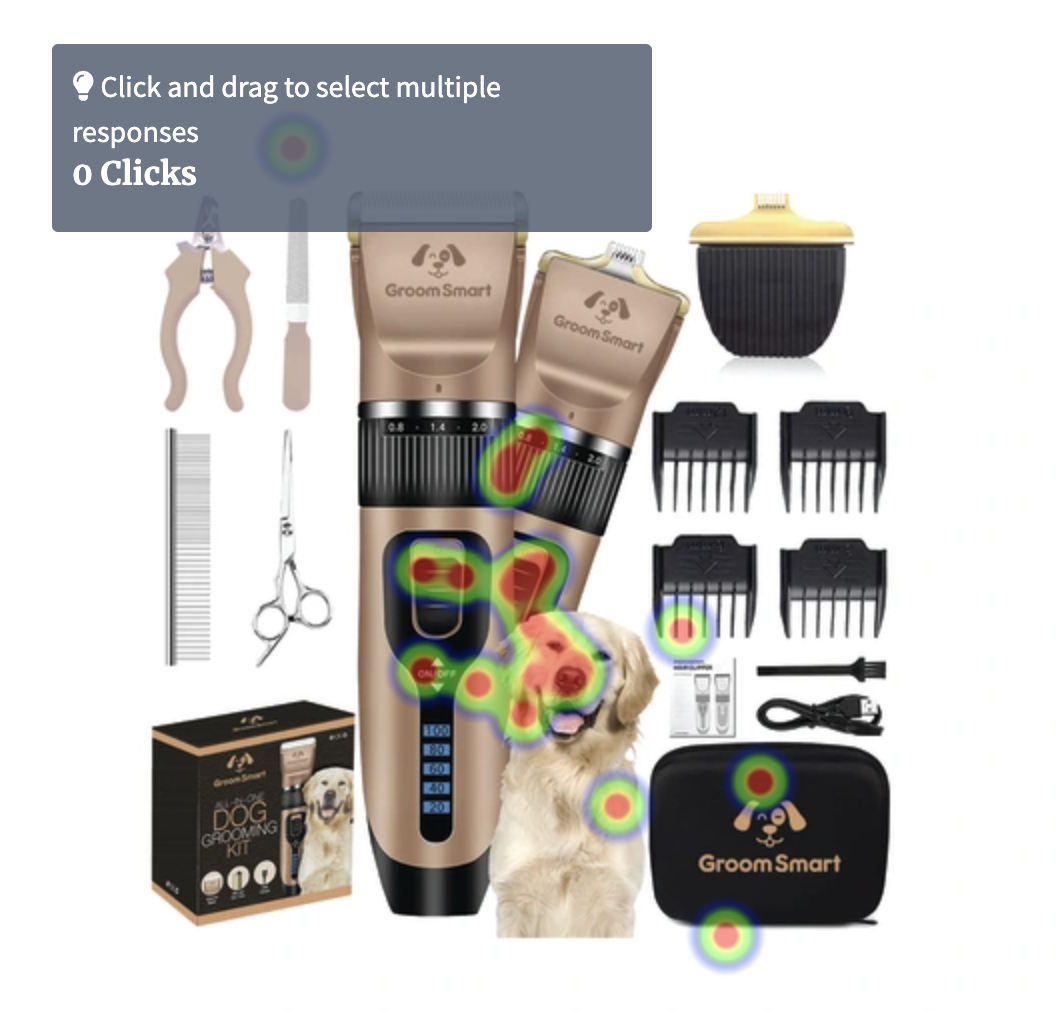
When you drag and release your cursor from the top left corner to the bottom right corner, it pulls up the number of clicks and the comments from those respondents:
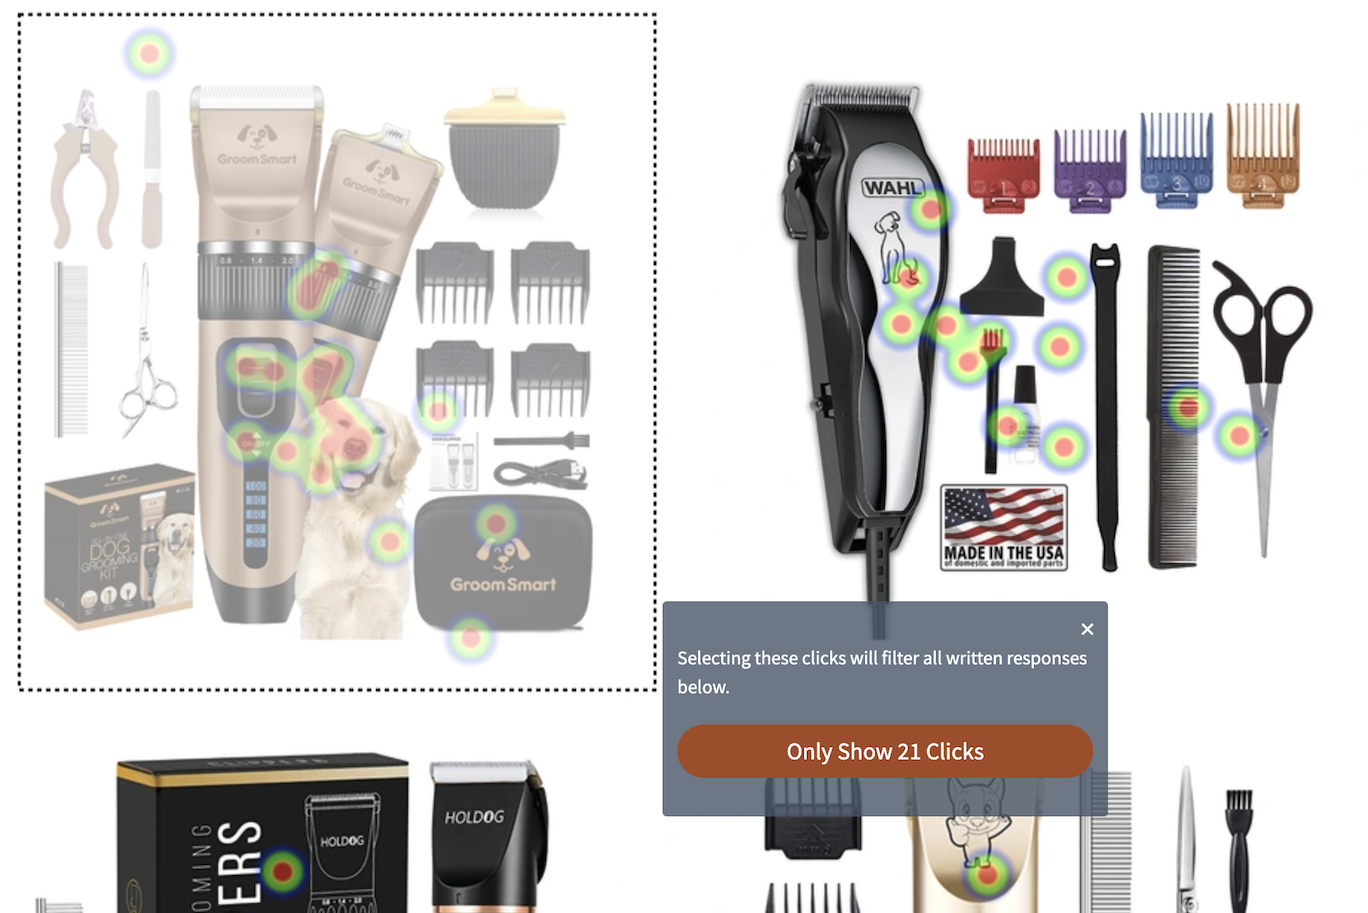
As it happens, this first image got the most clicks of the four options.
When you click on the “Only show 21 clicks” button and scroll down to the comments, you’ll understand why.
(Spoiler alert: it’s the dog.)
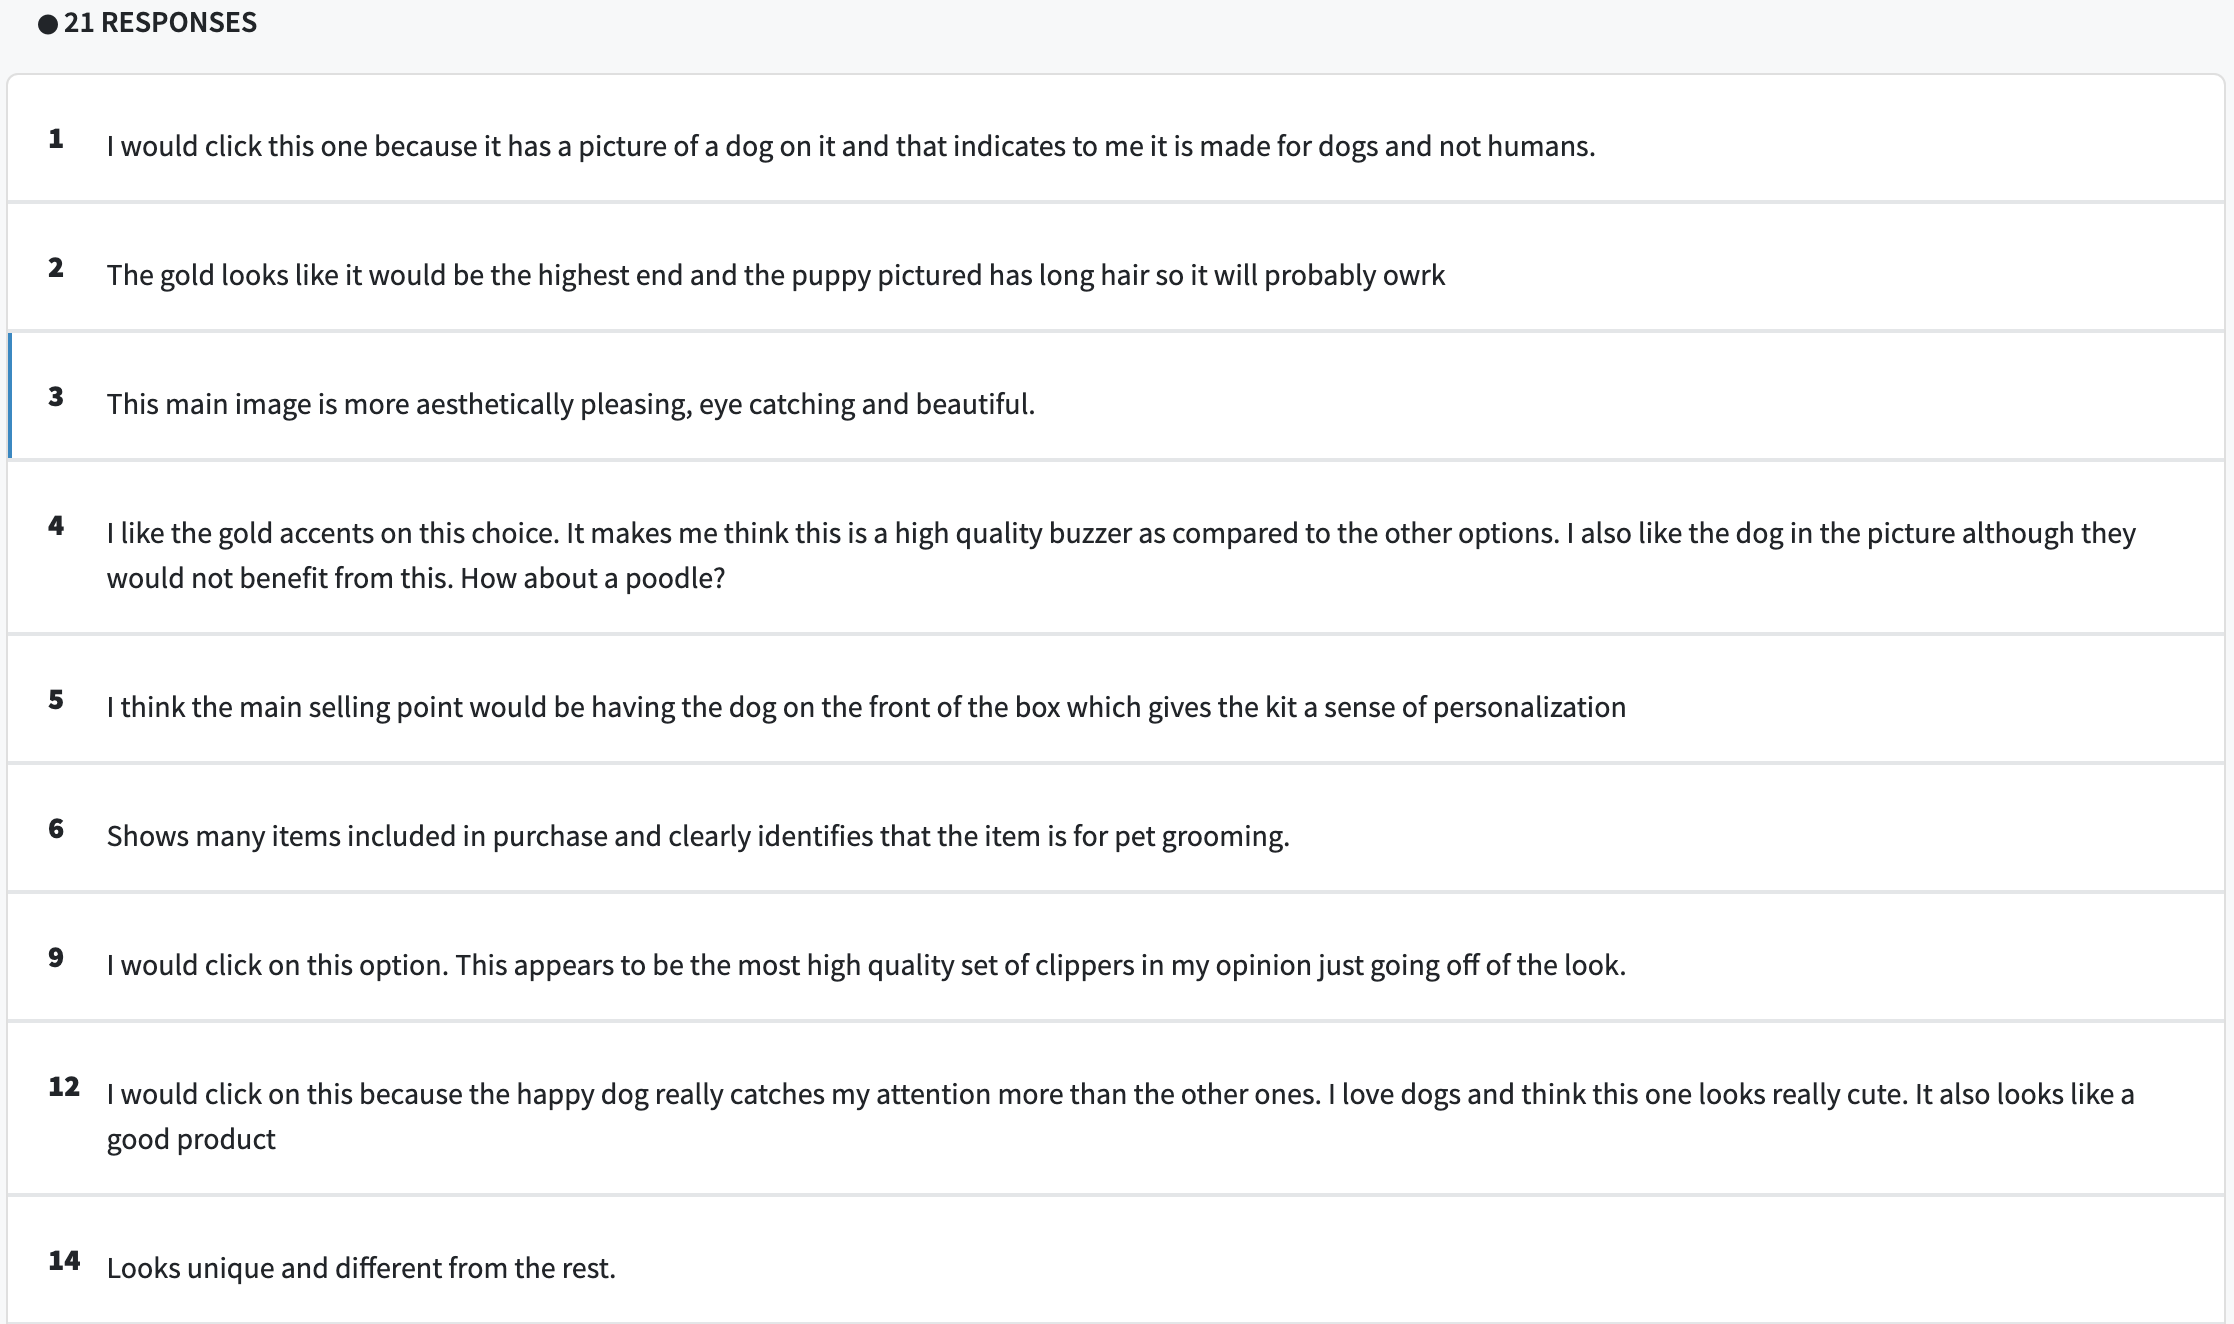
Remember, these are motivated and frequent shoppers; nearly half of Amazon Prime members buy something at least once a week. They see a lot of product listings, and they know what to look for in pet products.
To them, this photo hits all the marks from both a visual and emotional standpoint: attractive layout, quality product, and an adorable dog to boot. Woof.
Besides the right audience, there’s one more thing you have to target correctly: the right variable – and only the right variable.
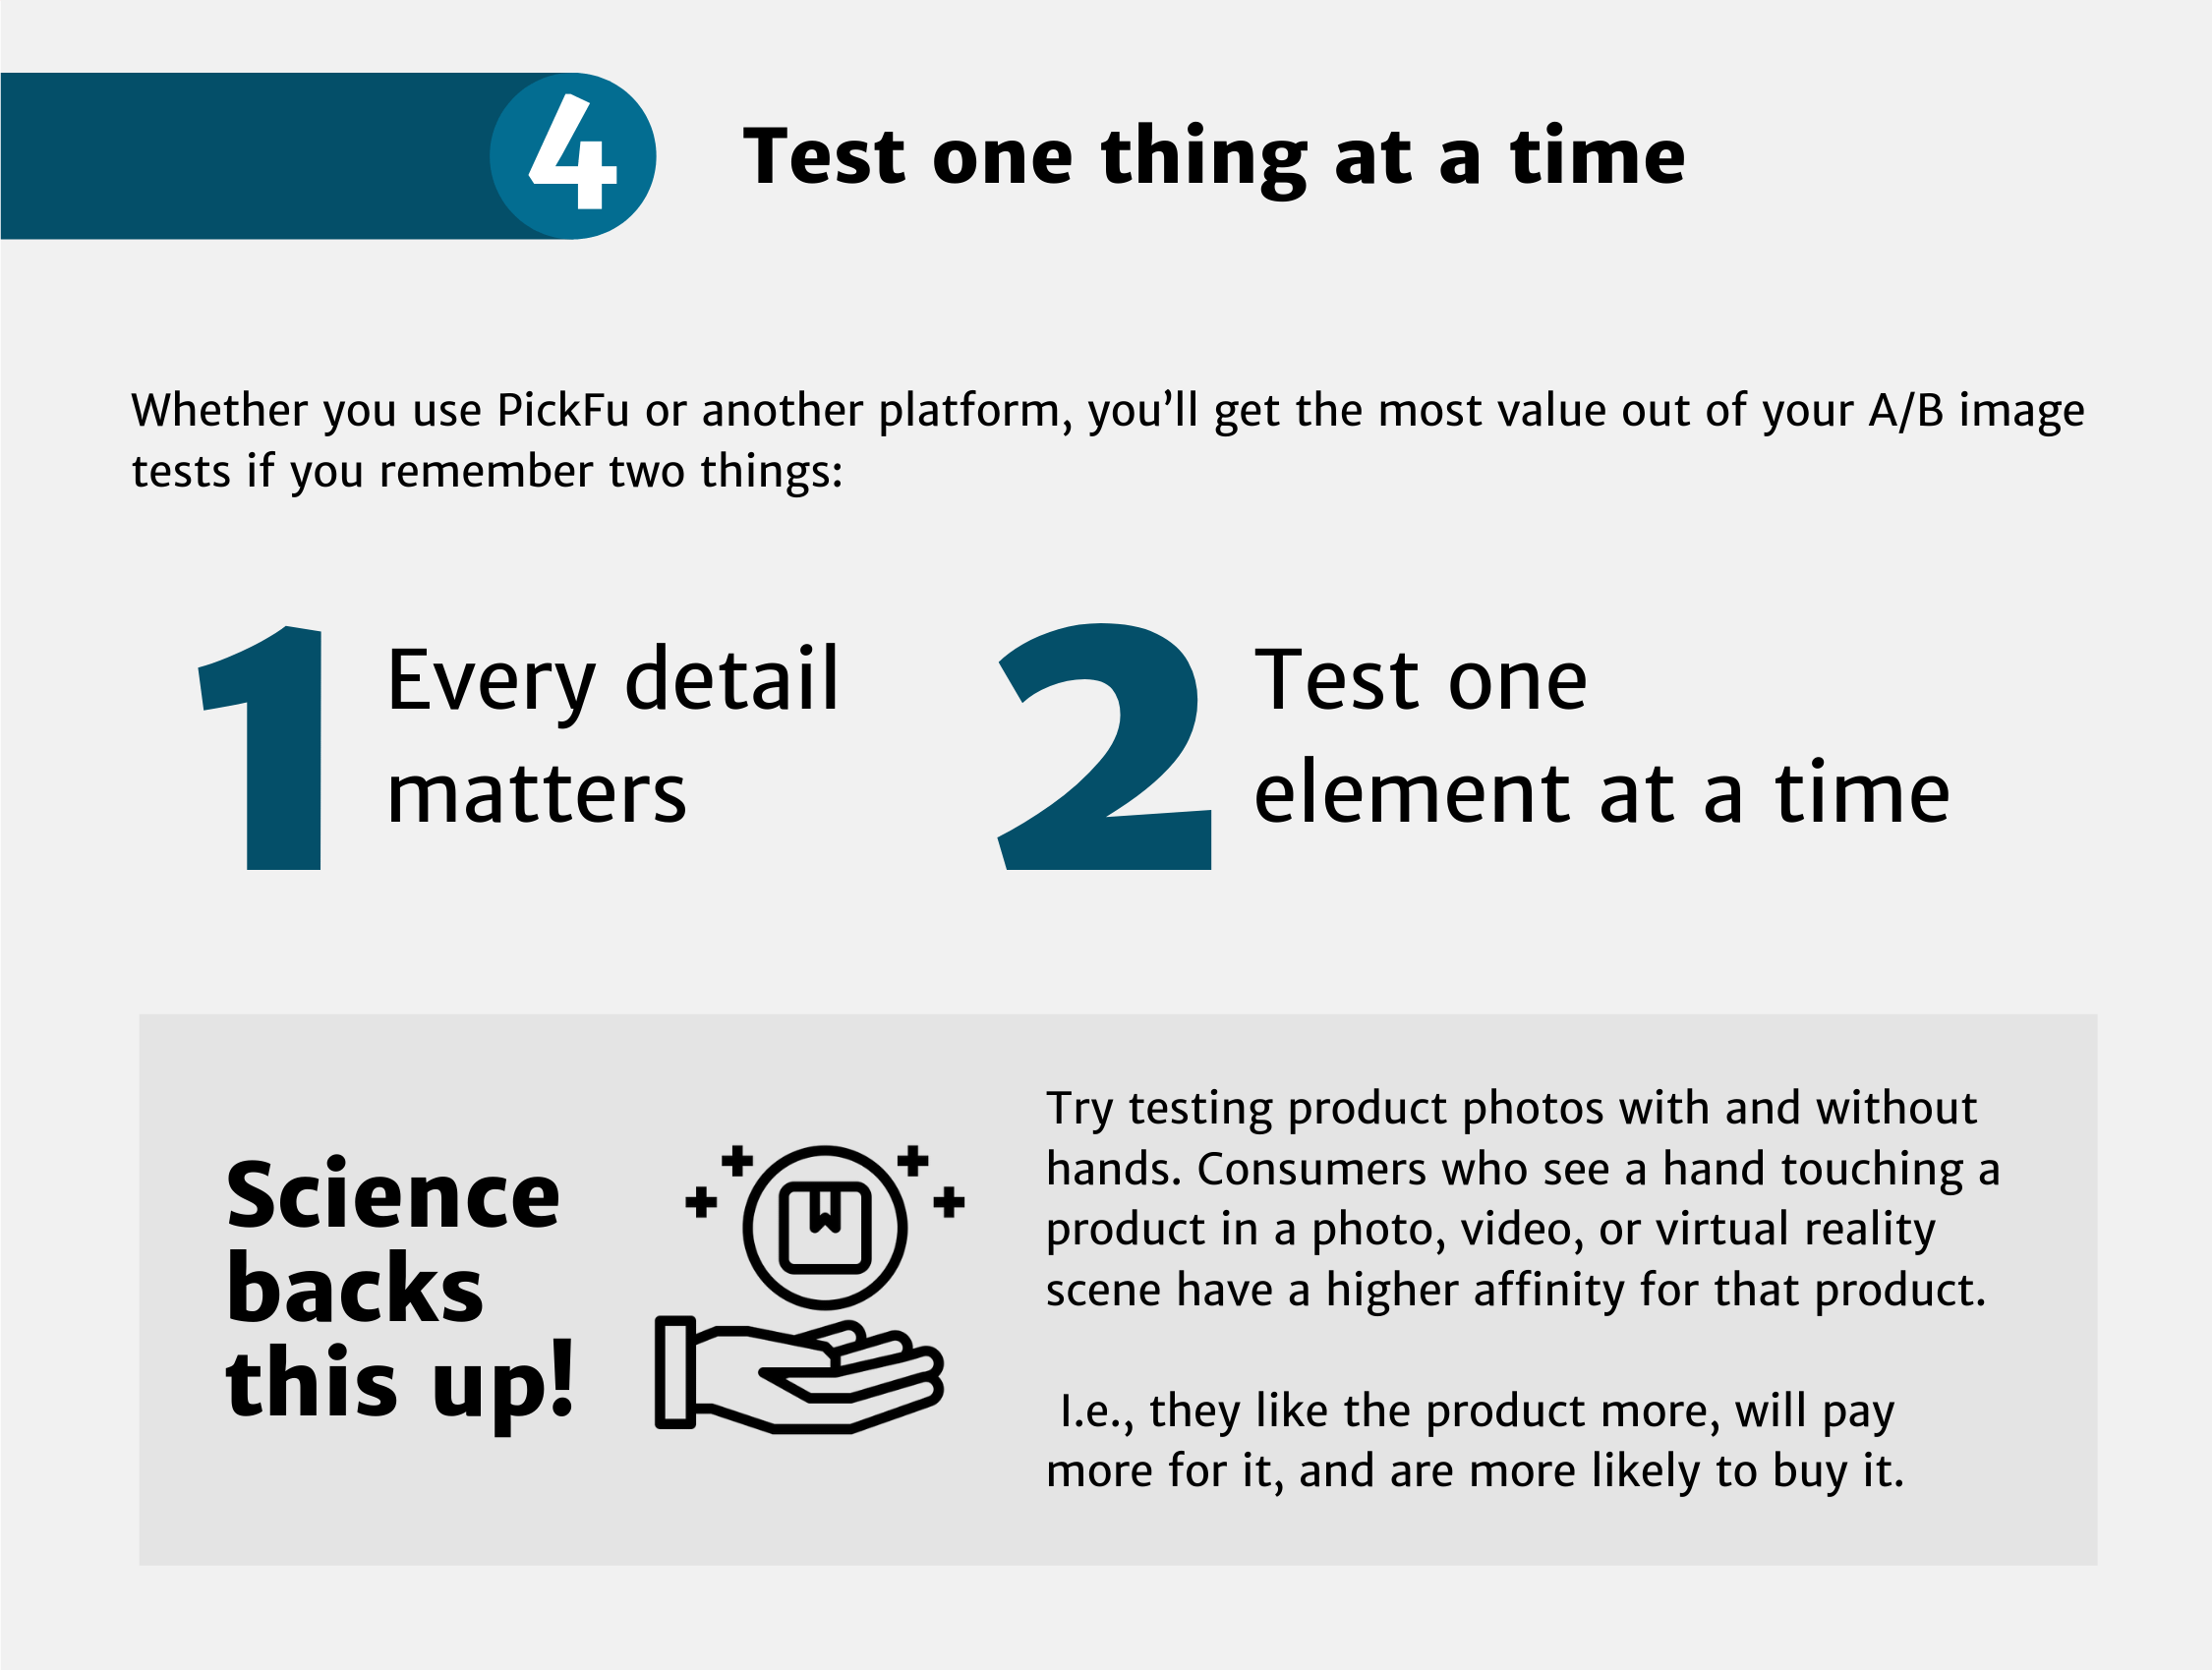
4. Test one thing at a time
Whether you use PickFu or another platform, you’ll get the most value out of your A/B image tests if you remember two things:
- Every detail matters.
- Test one element at a time.
Online shoppers can’t hold, sniff, or squeeze your product. They rely on the photos on your homepage or in your e-commerce store.
Sure, they’re looking at colors, patterns, and sizes.
But even the color of a prop or the angle of your product photo can impact how a customer feels and ultimately, whether they’ll want to buy it.
Science backs this up. Consumers who see a hand touching a product in a photo, video, or virtual reality scene have a higher affinity for that product. I.e., they like the product more, will pay more for it, and are more likely to buy it.
Our users have seen this, too.
Take our case study of Vendo Commerce. The e-commerce agency needed to create new brand imagery for its client, a top beauty brand.
Vendo ran a simple two-image PickFu poll to test the existing main image for the featured product, a hairbrush on its own, against a photo of the brush in its packaging.
The second photo was the clear winner. Vendo updated all its imagery accordingly. Since then, purchase orders across the brand have gone up between 5-11% every week.
Vendo Commerce doesn’t just test hairbrushes, either. They use split-testing to validate product bundling, too. Check it out:
In short, focus your test on one variable at a time, whether that’s typography, the placement of a prop, or even total product quantity.
Whatever it is, keep other details such as the cropping of the image consistent. You’ll get the most reliable results that way.
Let’s look at another example from our poll gallery.
In this main image test for an eco-friendly oral care kit, the user is experimenting with the layout of the contents of the kit:
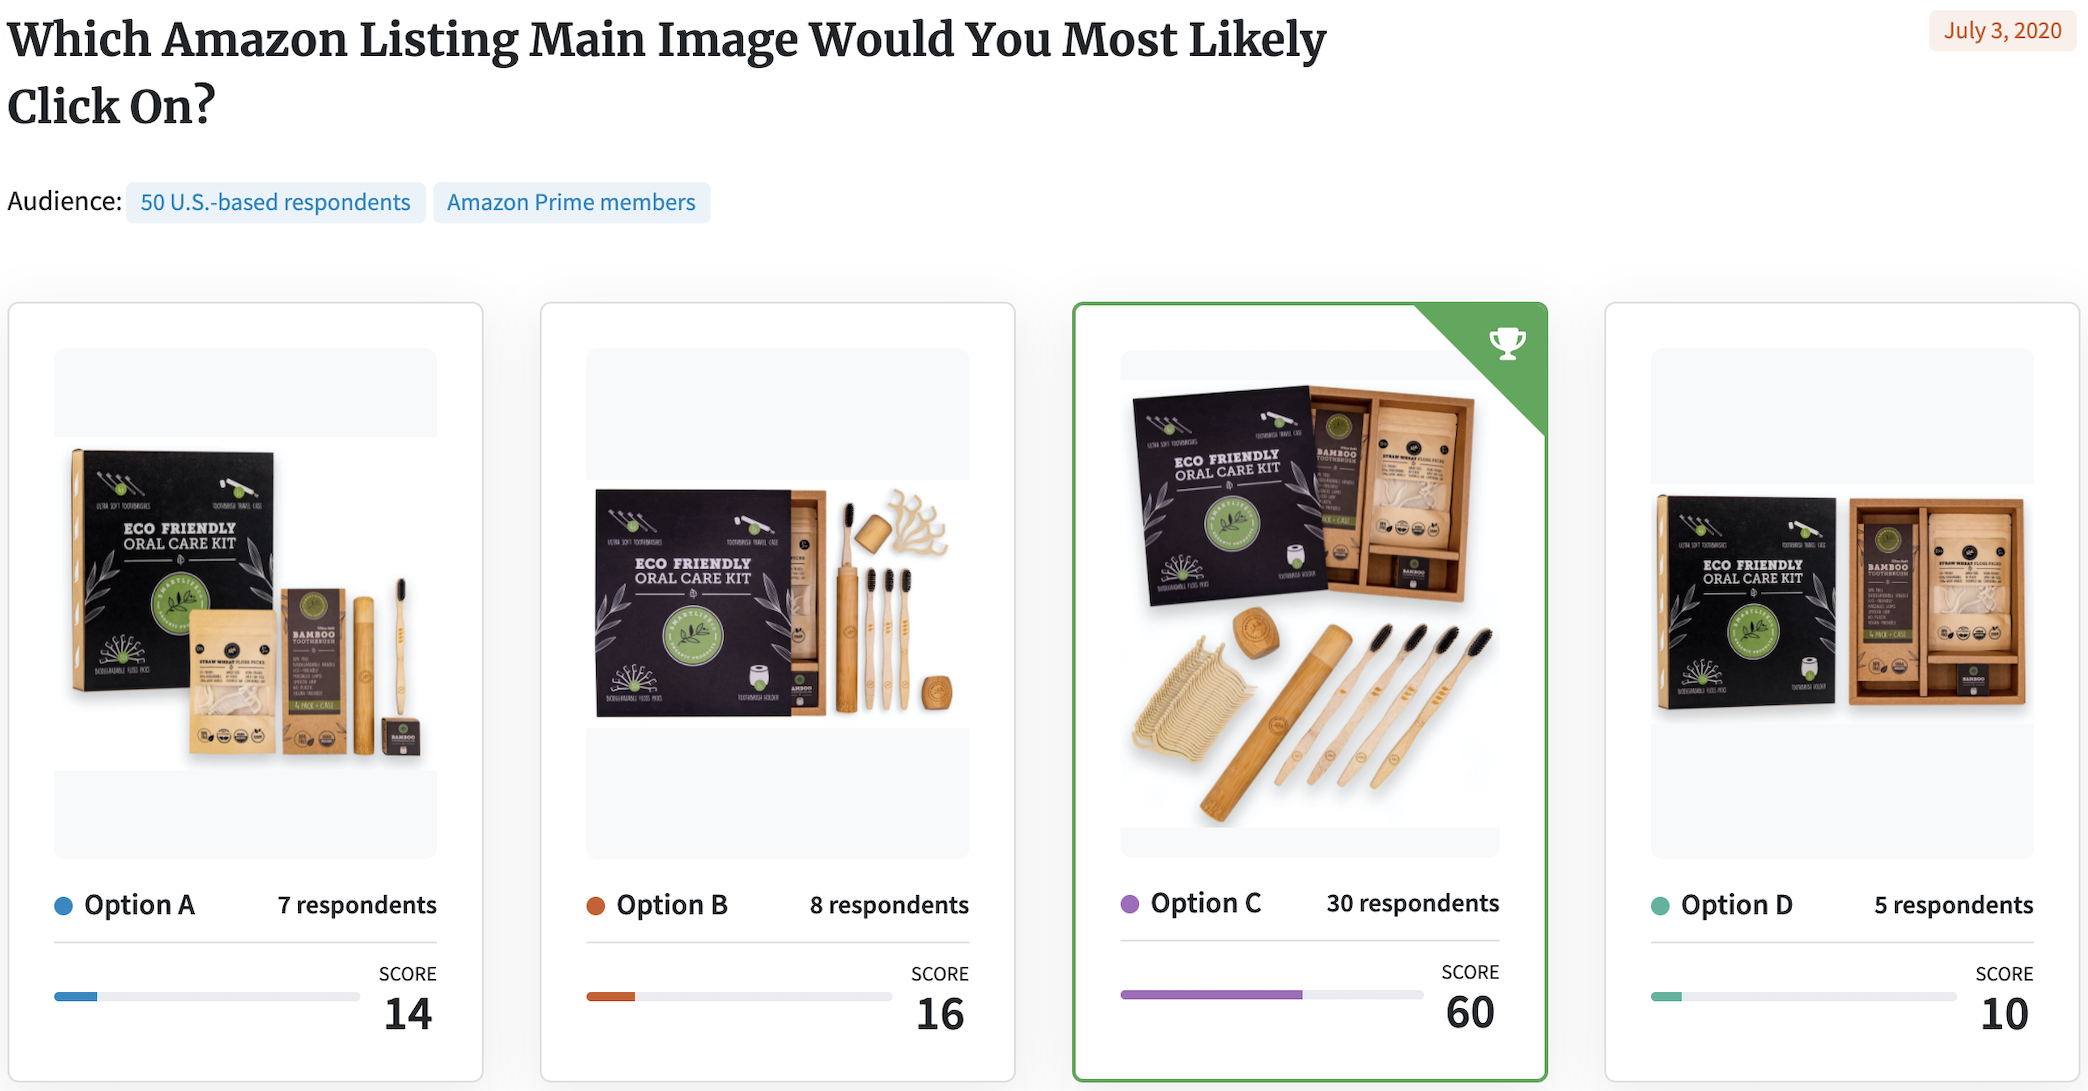
Notice how the product, packaging, and labeling are the same. Each image is taken from the same flat-lay view.
The business wants respondents to focus solely on how the kit and its contents are displayed. Respondents, for their part, see a clear winner: Option C.
Now, here’s an example of what not to do.
We ran a mock poll for a utensil holder, using three Amazon main images.
See the problem?
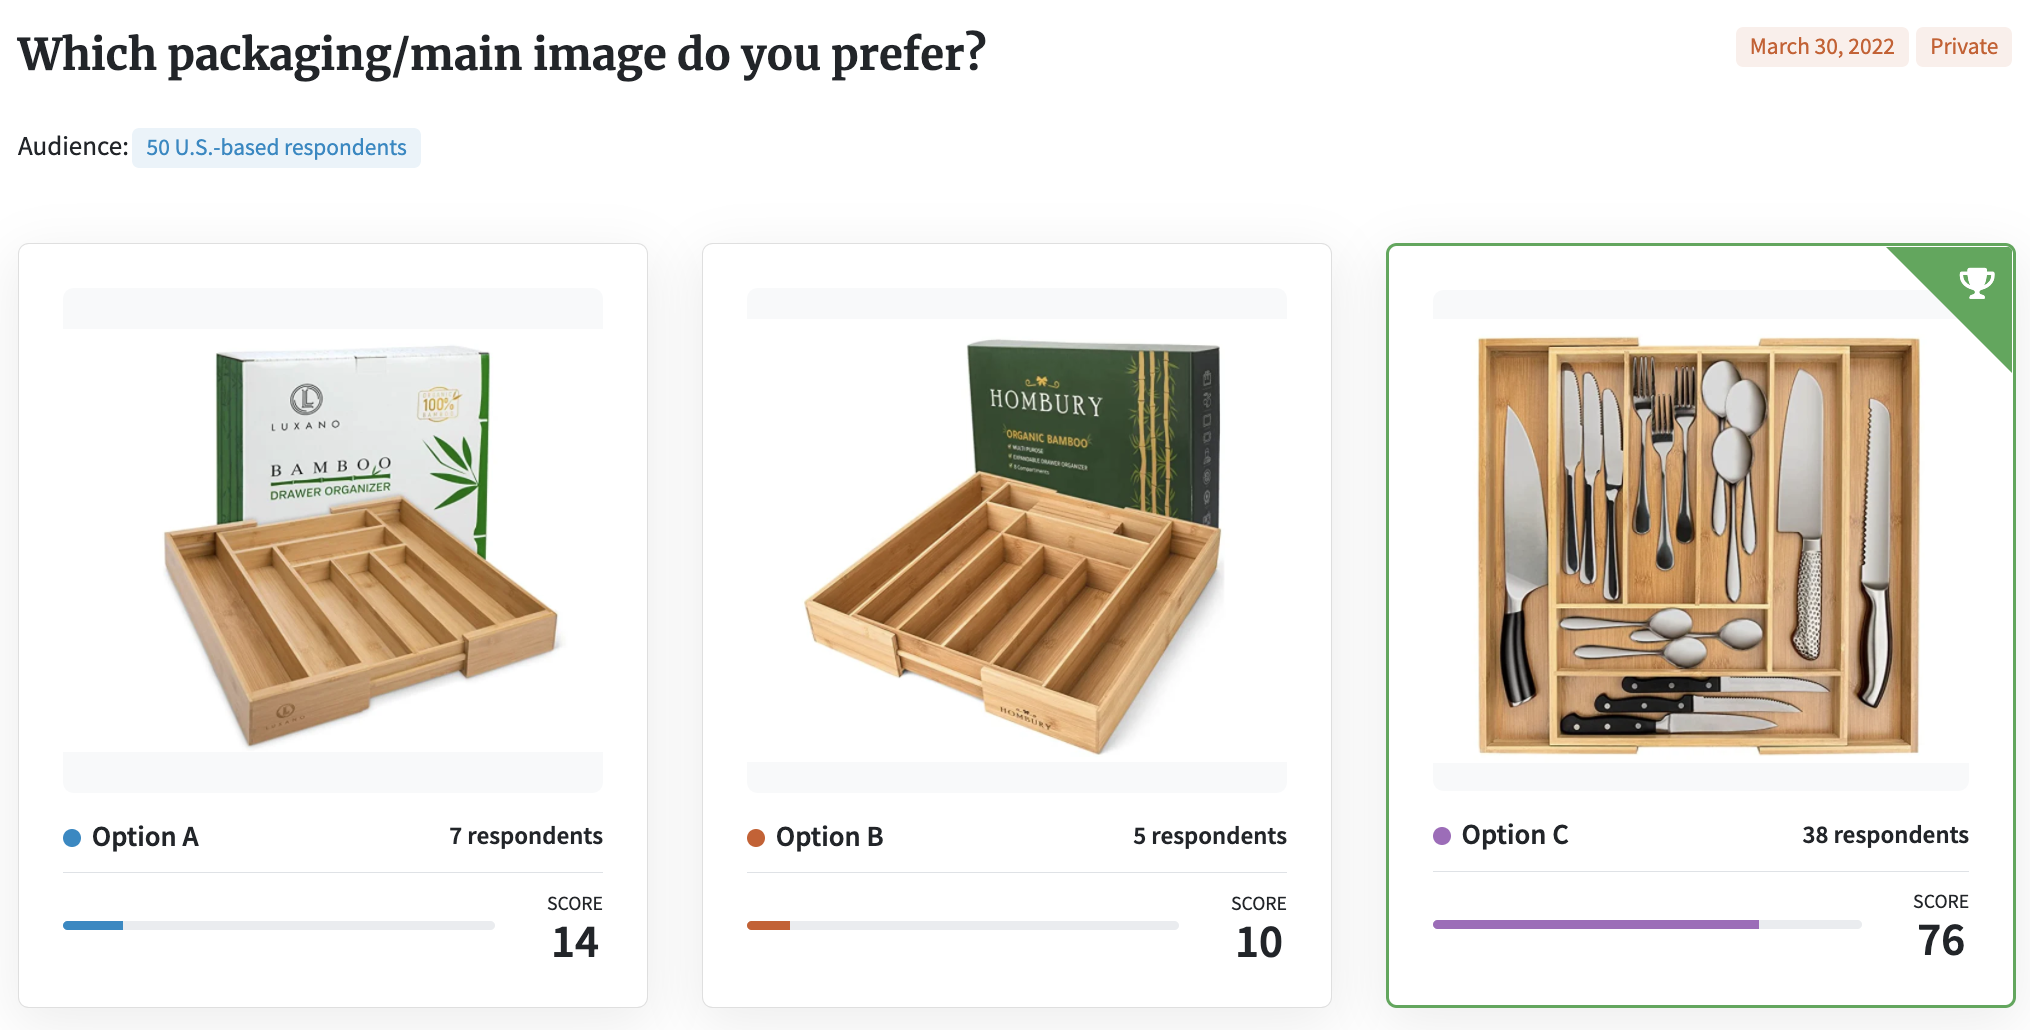
“Which packaging/main image do you prefer?” is a classic double-barreled question. It’s asking two questions, which is one too many.
The photos are confusing, too. Two of them show an empty tray placed next to the packaging. The third image shows the tray filled with utensils…minus the packaging…shot from an entirely different angle.
This poll is ripe for a redo. It needs a focused question and consistent photos comparing either the packaging or the styling of the product, not both.
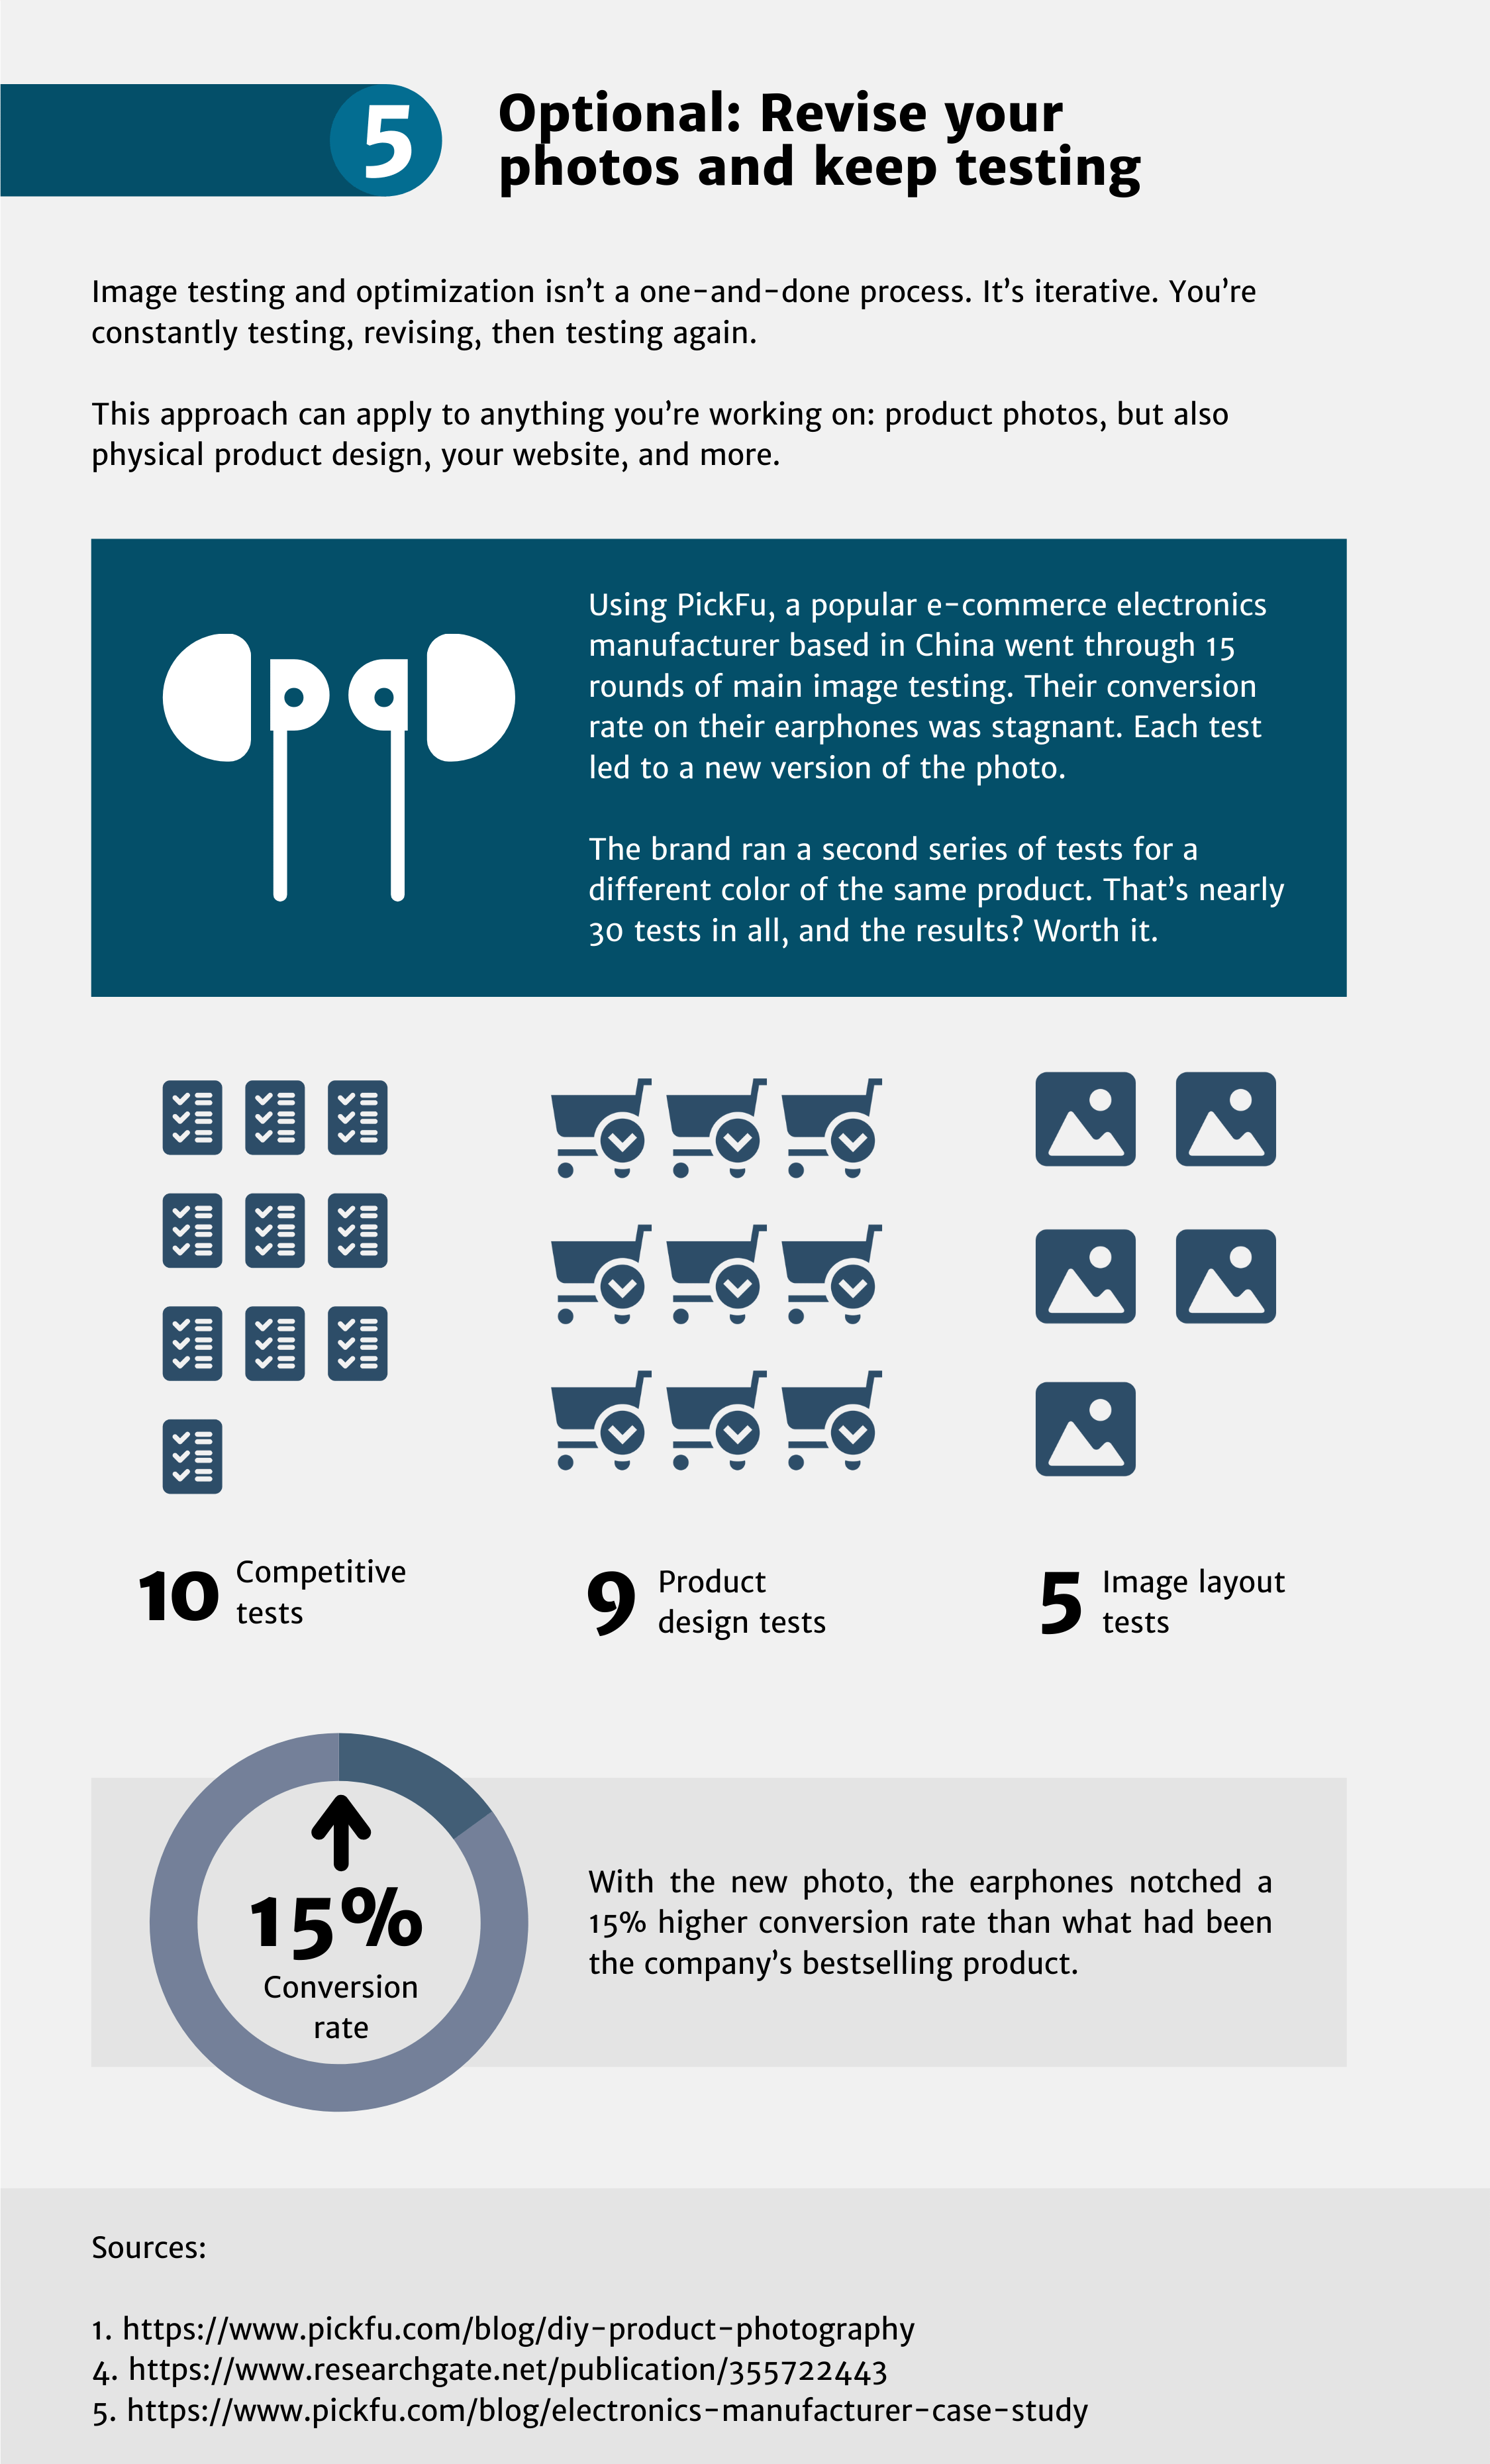
5. Optional: Revise your photos and keep testing
If the poll example I just showed you tells us anything, it’s that image testing and optimization isn’t a one-and-done process.
It’s iterative. You’re constantly testing, revising, then testing again.
This approach can apply to anything you’re working on: product photos, but also physical product design, your website, and more.
Take a look at this case study of an electronics manufacturer that sells its earphones on Amazon.
The company went through 15 rounds of main image testing for a pair of earphones with a stagnant conversion rate. Each test led to a new version of the photo.
The brand ran a second series of tests for a different color of the same product.
That’s nearly 30 tests in all, and a ton of valuable insights gained.
Sweetest of all? With the new photo, the earphones notched a 15% higher conversion rate than what had been the company’s bestselling product.
I’m not saying you have to run dozens of polls to get the benefits of A/B testing.
The point is to be intentional with the tests you run and use what you learn along the way to make gradual improvements.
In the long run, an iterative approach will save you time and money. And it’ll lead to improved usability, better design, and happier customers.
Infographic: How to test product photos
TL;DR: Test your product photos to make them better and maximize sales
If you think your product photography can do a better job of driving conversions, you’re probably right.
But until you start A/B testing your photos and getting feedback, you won’t know for sure.
To get started:
- Gather your assets and set testing goals
- Choose a testing platform
- Target relevant audiences
- Test one variable at a time
- Revise and repeat testing as needed
Testing can confirm that you’re on the right track with image optimization. Or it can take you in an entirely different creative direction than what you’d planned.
Either way, your product photos — and your business’s bottom line — will be better for it.